Some of your adjustments are a bit aggressive. When I edit, I'm a strong proponent of the "less is more" school. If a "little" salt in your food improves the flavor, a "lot" of salt in your food is NOT NECESSARILY better. When adjusting, I will sometimes do what I think is the best I can do... but before publishing or printing, I walk away. I come back several hours to a day later and revisit the image. Often something will jump out at me that I either completely missed, or did poorly.
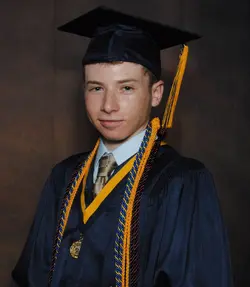
Since you've got your profile tagged as "ok to edit" photos, I did a few adjustments. I'll describe what was done so you can get a feel for how to replicate this with future photos.
I use Aperture (this is the photo asset management/organization and adjustment app that I use for 99% of what I do).
I noticed the image was overall just a bit soft, and I also notice very heavy noise... I knew this would need aggressive de-noising, but de-noising globally will have the affect of "softening" an entire image. Since this image was already just a bit soft, I didn't want to apply global de-noising. More on that in a moment.
I also noticed the image was exposed fairly well, but it was just a touch "cold" (a little blue).
Using Aperture, I _very_ slightly "warmed" the look (slide the white balance in the yellow/orange direction). I don't want your son coming out looking like a tangerine. This was a very slight tweak. You can think of this more as "trying to remove the slight blue color cast" rather than "trying to increase the yellow/orange color cast".
I wanted to sharpen, but not globally. Using a "brush-on" effect, I _very_ slightly sharpened his eyes and a tiny amount on his lips. If you over-do this, it'll look blotchy. I usually brush on the effect, then grab the intensity slider and increase it until it I can see it starting to look bad, then back it off until it's back to looking good (basically I'll sharpen as much as I can as long as it is only improving the look... to much will make it look worse.) So I'm hunting for that point where too much is worse and backing off the intensity so that it's safely below that point.
I did use a retouch brush to take out a few blemish. One just above his left eyebrow; one on his right cheek; one on his left jawline. I don't want "fake" skin (go crazy with this and he'll have skin that looks like plastic)... I'm just removing any blemishes that stand out.
Lastly (but this is probably the most major change)... de-noising.
I use special software for de-noising because Aperture, Lightroom, and Photoshop ... are ... well I'm trying not to be vulgar here so let's just say they're "not so very good" at de-noising (my actual opinion of them all would require me to utter words best not used in polite conversation. I shall say no more.) SO... I have a special utility for de-noising images called Imagenomic NoiseWare Professional (this is available as a Photoshop, Lightroom, or Aperture "plug-in"). Noise Ninja is another de-noising tool which is also very good, but I prefer NoiseWare Pro as I find it gives me just a bit more control.
Rather than a global de-noising utility, it allows me to "tune" the noise-removal based on the type of noise I see. I can tell it that an image has problems with color (chroma) noise, or that it's more of a problem with "luma" noise. I can tell it that noise is particular bad in shadows, moderate in mid-tones, but not bad at all in the highlights (this is common.) Basically it comes with LOTS of pre-sets, but I almost always custom tune my noise removal based on what I see.
The "problem" with global noise reduction is that it's done indiscriminately. When you "de-noise" something, you average the color or light levels of a single pixel based on it's surrounding pixels. When you average things, it has the effect of "softening" the overall look. Tack sharp details no longer look tack sharp... they start to look mushy. Mushy is not good.
Your background and his robes have serious noise issues. But his face (which is in lighter tones) has very moderate noise issues. I "tuned" NoiseWare until I was happy that it was being aggressive with the background, moderately dealing with his robes, but mostly leaving his face and any nice crisp details alone.
(If I've done the upload correctly, it should "display" on the page in a reasonable size, but when you download it, you should get it back in your original size.)
Apart from being a little noisy they look ok to me. Have to agree with TCampbell on these. I try and never use any de-noise software for the reasons stated.
(crop)(low).webp")
6(crop)(low).webp")
(low).webp")
(low).webp")
(crop).webp")


![[No title]](/data/xfmg/thumbnail/37/37138-63809b91a8061d61d48c541f18a69861.jpg?1734169836)
