What's new

Practicing on people shots; cc

myvinyl333

No longer a newbie, moving up!
Joined
Feb 16, 2010
Messages
535
Reaction score
32
Location
Eastern Iowa
Can others edit my Photos
Photos OK to edit
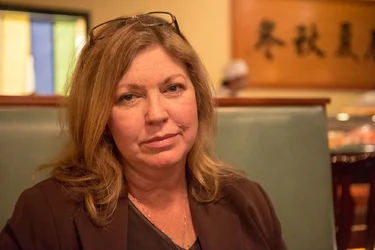
I have little experience in shooting people, unless they are playing an instrument. While at supper today my wife became an impromptu trial subject. I have a lot of issues with the way the shots focused on her glases when I had it set on her eyes. I could not get a shot that seemed focused. The light in the restaurant was not the best so I kept changing speeds/iso. Please Fire away... cc. (I shot in RAW so needed post processing?) It is not a complete loss the sushi was great!
$Kim 10-27-12 (1 of 1)-4.webp$Kim 10-27-12 (1 of 1)-2.webp $Kim 10-27-12 (1 of 1)-3.webp
 
Last edited:
The light in the restaurant was not the best so I kept changing speeds/iso.
Shutter speed, iso don't affect color temp. It's the white balance you need to address. Consider shooting in RAW. I'll let others weigh in on the other problems.
 
The light in the restaurant was not the best so I kept changing speeds/iso.
Shutter speed, iso don't affect color temp. It's the white balance you need to address. Consider shooting in RAW. I'll let others weigh in on the other problems.
$Kim AUTO WB 10-27-12 (1 of 1).webp $Kim AUTO WB 10-27-12 a (1 of 1)-2.webp $Kim AUTO WB 10-27-12 a (1 of 1).webp

I adjusted the WB in LR4 to AUTO from AS SHOT
 
Still needs major white balance touch. Reduce the color temp slider a bit until you see the slightest bit of blue on her face, then bump back just a light touch toward yellow. You'll need to reduce the magenta tint a bit, but not as much.

I had thought you had a good foundation of the basics, right? Can you please tell me why you were changing speeds/ISO's and what your thought process was? Not being snarky... I think there is something for me to learn in order to help you in there.
 
Last edited:
One thing about white balance that you as a frequent concert shooter might not be that attuned to is that people who shoot a lot under artificial lighting, like MLeeK does, are very,very conscious about white balance adjusting and tweaking. Night time sports under weird stadium lights, indoor lights that cycle terribly from shot to shot to shot, MIXED light of dusk + stadium light, and so on all make sports/event photographers pretty attuned to white balance issues. In concert photography, the lighting is wildly divergent...blue spots, red spots, orange spots, purple spots, white-ish floods, and so on...a HUGE mish-mash of light, all deliberately weird.

In restaurants, my limited experience is that there is often a mixture of weak skylight and incandescent, as well as at times, fluorescent from the kitchen/work/food prep areas. Plus, many times seating area lighting is very,very "warm", to promote a romantic dining feeling. The single most-odd seating light setup I have ever encountered used to be at Track Town Pizza, in Eugene,Oregon. U of O's school colors are green and bright yellow, and above each booth table hung a 20 inch white parabolic light fixture, fitted with a YELLOW-colored light bulb. zOMG---the light was WEIRD!!!!!!! Best pizza, worst lighting! Anywayyyyyyy...when adjusting images in LR, or ACR, or whatever program, it's very,very EASY to sort of become habituated and to "think" that a particular WB and color toning looks good. I've many times processed a set, left it for a day or two or even a week, and come back, sat down, and opened the set up and literally said to myself, "What the duck was I THINKING?" Sooooooo....keep that in mind...
 
I need to understand more about Lightroom as well as light in general.
 
Last edited:
Still needs major white balance touch. Reduce the color temp slider a bit until you see the slightest bit of blue on her face, then bump back just a light touch toward yellow. You'll need to reduce the magenta tint a bit, but not as much.

I had thought you had a good foundation of the basics, right? Can you please tell me why you were changing speeds/ISO's and what your thought process was? Not being snarky... I think there is something for me to learn in order to help you in there.
After I posted it and read Texham's comment I had an "oh yea"moment. I did adjust ISO and speed just like I do every time I shoot a show to get the light right, I guess it is a a process I do. I get nervous when I have time, does that make sense?
 
But what is your thought process?
You know the basics:
You have to have exposure and ISO, aperture and shutter are used to do that.
Aperture still controls the depth of field
Shutter speed still controls motion blur
ISO is still your sensitivity to light.

So, in this case you had to have a shutter speed that was 1. appropriate for the live, but relatively still subject; 2. appropriate for you to hand hold and 3 appropriate for the focal length of the lens you were using.
Guessing your focal length was under 50mm, so you had to have a shutter speed of 1/50 or less for the lens.
Your subject was live so at least 1/125.
I don't know how much you shake or how steady you are so 1/125 might be OK.

You have to have an aperture that is adequate for depth of field for what you are shooting and for how close (either via zoom or actual distance) you are to your subject. F/1.8 probably would give you OK DOF, but f/3.5 would have given you a bit better depth.

That leaves you to your ISO as the last resort. You have to make exposure, so... You adjust appropriately.
 
Still needs major white balance touch. Reduce the color temp slider a bit until you see the slightest bit of blue on her face, then bump back just a light touch toward yellow. You'll need to reduce the magenta tint a bit, but not as much.

I had thought you had a good foundation of the basics, right? Can you please tell me why you were changing speeds/ISO's and what your thought process was? Not being snarky... I think there is something for me to learn in order to help you in there.
After I posted it and read Texham's comment I had an "oh yea"moment. I did adjust ISO and speed just like I do every time I shoot a show to get the light right, I guess it is a a process I do. I get nervous when I have time, does that make sense?
When that happens, STOP. Breathe.
Think: What do I NEED (besides exposure.)
I NEED to have a shutter that ________________.
I NEED an aperture to allow for _________________ to be in focus.
Then decide which of those is most important and set it.
Breathe again...
Set the other one according to what you decided you NEED.
Breathe, meter and the ISO is the only thing you have left.
 
But what is your thought process?
You know the basics:
You have to have exposure and ISO, aperture and shutter are used to do that.
Aperture still controls the depth of field
Shutter speed still controls motion blur
ISO is still your sensitivity to light.

So, in this case you had to have a shutter speed that was 1. appropriate for the live, but relatively still subject; 2. appropriate for you to hand hold and 3 appropriate for the focal length of the lens you were using.
Guessing your focal length was under 50mm, so you had to have a shutter speed of 1/50 or less for the lens.
Your subject was live so at least 1/125.
I don't know how much you shake or how steady you are so 1/125 might be OK.

You have to have an aperture that is adequate for depth of field for what you are shooting and for how close (either via zoom or actual distance) you are to your subject. F/1.8 probably would give you OK DOF, but f/3.5 would have given you a bit better depth.

That leaves you to your ISO as the last resort. You have to make exposure, so... You adjust appropriately.

Thank you, I am digesting the above.
 
Still needs major white balance touch. Reduce the color temp slider a bit until you see the slightest bit of blue on her face, then bump back just a light touch toward yellow. You'll need to reduce the magenta tint a bit, but not as much.

I had thought you had a good foundation of the basics, right? Can you please tell me why you were changing speeds/ISO's and what your thought process was? Not being snarky... I think there is something for me to learn in order to help you in there.
After I posted it and read Texham's comment I had an "oh yea"moment. I did adjust ISO and speed just like I do every time I shoot a show to get the light right, I guess it is a a process I do. I get nervous when I have time, does that make sense?
When that happens, STOP. Breathe.
Think: What do I NEED (besides exposure.)
I NEED to have a shutter that ________________.
I NEED an aperture to allow for _________________ to be in focus.
Then decide which of those is most important and set it.
Breathe again...
Set the other one according to what you decided you NEED.
Breathe, meter and the ISO is the only thing you have left.

I do this but not always in this order. Metering is an area I have been trying to get a better understanding of how to read and implement.
 
You have a Nikon D800. It has EXCEPTIONALLY GOOD High-ISO performance, and one of the absolute BEST-performing sensors in all of photography. You need to learn to USE AUTO-ISO. Unlike it was a few years ago, AUTO ISO on the top-performing Nikon bodies is an amazing, amazing thing. What MLeek is telling you above is the way a seasoned shooter approaches EVERY single photo situation: you need to determine what the necessary shutter speed is for a good, sharp shot, based on lens focal length, speed of the action, the direction the action is in relation to the lens axis, and how far away the action is, and how large the subject will be in the final image. You also need to determine the f/stop needed to get the kind of depth of field you want to have.

For example, shooting across a dinner table...with a short zoom lens...say you want enough DOF to avoid having to focus ULTRA-precisely. Set the lens f/stop to f/5.6. Focal length 20mm on FF. Shutter speed of 1/60 second, which is 3x the focal length, so, pretty safe, and a heck of a lot safer than say, 1/15 second. Your D800 using its AUTO ISO setting can elevate the ISO or drop the ISO, instantly, as needed, to make sure that f/160 at f/5.6 is the PERFECT exposure for the lighting, wherever the camera is pointed, whatever the light does.

Until I got a recent, high-level full-frame Nikon pro body, I was not sold on AUTO ISO. Also, Nikon's implementation of AUTO ISO is far better than that found in most other brands and most other camera models. THe thing that has made AUTO ISO truly useful in my opinion is the 13.7 to 14+ EV dynamic range, and the rich color saturation that the pro-level Nikon FX bodies offer at ISO levels far above the base ISO values. So...you might hear people badmouthing AUTO ISO...but pay no attention. Your camera is now MUCH,much better in performance than 95% of all other cameras in the world at high ISO values. You need to leverage that, and if you have problems with overthinking things, and it seems you do, you need to LEVERAGE the fine equipment you have, and start learning more about the cutting edge benefits the newest FX NIkons bring to the table, especially when paired with the fine lenses you have.

Once you decide on the NEEDED shutter speed, and the desired f/stop, the AUTO ISO range that the D800 has is a HUGE advantage. You need to dig into the manual, and learn how to set up the AUTO ISO settings. trust me...once you see first hand what a modern, high-end FX camera can do in AUTO ISO, when set right, you will be amazed.

 
Here's one of my posts on metering...
Here is the first tutorial I have for you. It's on metering and understanding your meter better. I am HOPING that the links in this still work:


In camera meters don't measure the light in your scene. It's not like a scale or a tape measure that measures the ACTUAL LIGHT in any quantitative measurement. It measures what the reflected light from your subject looks like. A light meter actually measures the LIGHT of your scene and tells you what proper exposure settings should be. It's a ruler for light.


Now you are saying... um... ok.... what is the difference? Let's use snow as an example: A foot of light fluffy snow could weigh 1 ounce. A foot of heavy wet snow would weigh more like 1 pound. They both APPEAR the same-it's a foot of snow!!! But in reality one is heavier. It's the same with light. Things can look the same, but they aren't.


Your camera's meter takes that reflection off of whatever you are metering-could be snow, could be a black backdrop. No matter what it is, your camera tries to make that reading equal middle of the road or middle gray on the light to dark scale. (This is changing in newer cameras, but the basics always will hold pretty true) The camera doesn't know if you are metering a black scene or a white scene. It only knows that average exposure should be middle gray.

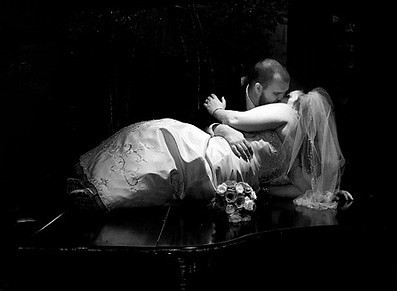
Take a look at a black and white photo.

5222347712_e624674922.jpg

If I had metered off her dress it would have made her dress middle gray... This color:
5669701760_6673f951d4.jpg

Her dress would be really underexposed at that color. If I metered the background the camera would have tried to make that middle gray. Her dress would have been blown out. On this particular image I probably would have metered skin if I wanted something to be middle gray.


Now that you know that much, you also have to consider what the metering modes are using your scene and trying to average to middle gray.
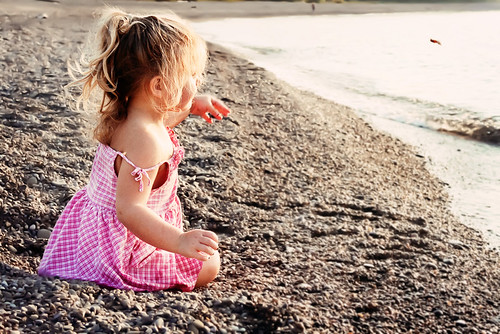
Evaluative metering is measuring the whole scene. Sky, water, child playing in the sand... EVERYTHING and it's trying to make it average middle gray. Just like a grade in school it adds all of those pixels up and tries to equal middle gray when it divides them out. On the beach with the sky and water? Probably not going to be extremely accurate. For example this photo of Haley on the beach.
5629395008_bed501f63b.jpg

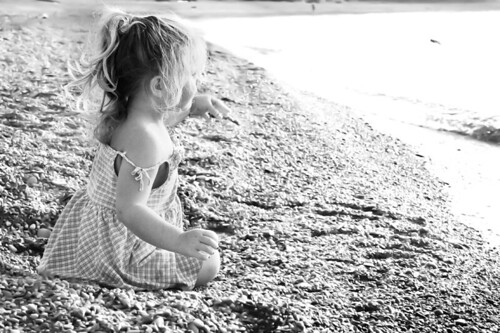
Convert it to grayscale and look at the bright and dark of it:
5557193130_1aed6a6f8a.jpg


If I average the pixels out this is the gray they come out.


5556608597_a74cebc8f7.jpg


Compare that to middle gray and it's a lot brighter tone-and there was a lot of dark stone in that one.
If you're on a white sandy beach on a bright day your gorgeous child playing in the sand is probably going to be drastically underexposed. You have lots of bright sky pixels, lots of bright sand pixels and a few dark ocean and child pixels... The bright ones win and hold the average up. In high contrast situations like my beach example evaluative doesn't really work well.
Consider an average setting like maybe your living room (assuming your walls are fairly light) with your kids playing? It might work really well!


Center Weighted average metering takes all of the pixels into consideration, but like a mid term and final test is worth more points than any other test, so are the pixels in the center of your scene. It averages all of them together and counts the center ones multiple times to make them more important than the outer pixels. It would sure help with that beach scene to make the pixels that were of your child more important. Closer at least!!!


Then there is Spot Metering. Your meter only evaluates the pixels you put your SPOT on. This works well if you can train yourself to look at the scene in terms of light and dark and decide what you want to be the middle tone. White, non-african/asian/indian etc skin is not usually middle gray It's much lighter. Think of when you convert to black and white. Is skin ever that color ^ up there? Nope. I find that your average grass is a good middle gray outside. My light oak hardwood floors indoors are a good middle of the road. For the image of Haley I would have metered Haley's skin on the back of her arm and then set my exposure to about +1 or JUST before the skin would blow out.


So, now that you understand metering a little better and have a better friendship with your meter it'll be easier to make it do what you want it to do.
 
You have a Nikon D800. It has EXCEPTIONALLY GOOD High-ISO performance, and one of the absolute BEST-performing sensors in all of photography. You need to learn to USE AUTO-ISO. Unlike it was a few years ago, AUTO ISO on the top-performing Nikon bodies is an amazing, amazing thing. What MLeek is telling you above is the way a seasoned shooter approaches EVERY single photo situation: you need to determine what the necessary shutter speed is for a good, sharp shot, based on lens focal length, speed of the action, the direction the action is in relation to the lens axis, and how far away the action is, and how large the subject will be in the final image. You also need to determine the f/stop needed to get the kind of depth of field you want to have.

For example, shooting across a dinner table...with a short zoom lens...say you want enough DOF to avoid having to focus ULTRA-precisely. Set the lens f/stop to f/5.6. Focal length 20mm on FF. Shutter speed of 1/60 second, which is 3x the focal length, so, pretty safe, and a heck of a lot safer than say, 1/15 second. Your D800 using its AUTO ISO setting can elevate the ISO or drop the ISO, instantly, as needed, to make sure that f/160 at f/5.6 is the PERFECT exposure for the lighting, wherever the camera is pointed, whatever the light does.

Until I got a recent, high-level full-frame Nikon pro body, I was not sold on AUTO ISO. Also, Nikon's implementation of AUTO ISO is far better than that found in most other brands and most other camera models. THe thing that has made AUTO ISO truly useful in my opinion is the 13.7 to 14+ EV dynamic range, and the rich color saturation that the pro-level Nikon FX bodies offer at ISO levels far above the base ISO values. So...you might hear people badmouthing AUTO ISO...but pay no attention. Your camera is now MUCH,much better in performance than 95% of all other cameras in the world at high ISO values. You need to leverage that, and if you have problems with overthinking things, and it seems you do, you need to LEVERAGE the fine equipment you have, and start learning more about the cutting edge benefits the newest FX NIkons bring to the table, especially when paired with the fine lenses you have.

Once you decide on the NEEDED shutter speed, and the desired f/stop, the AUTO ISO range that the D800 has is a HUGE advantage. You need to dig into the manual, and learn how to set up the AUTO ISO settings. trust me...once you see first hand what a modern, high-end FX camera can do in AUTO ISO, when set right, you will be amazed.

I just received Mastering the Nikon D800 by Darrell Young in hopes of doing what you have stated. I do over think the process and actually become agitated. It is much more enjoyable and successful when I am relaxed. I am hesitant to say too much more as I do not want to come across incorrectly. There is a lot of very useful information from You and MLeeK that I need to digest. Thank you both!
 
Still needs major white balance touch. Reduce the color temp slider a bit until you see the slightest bit of blue on her face, then bump back just a light touch toward yellow. You'll need to reduce the magenta tint a bit, but not as much.

I am going to try this to see.
 

Create an account or login to comment

You must be a member in order to leave a comment

Create account

Create an account on our community. It's easy!

Log in

Already have an account? Log in here.

New Topics

Back
Top Bottom