What's new

"Professional" headshots C&C requested

shefjr

No longer a newbie, moving up!
Joined
Jan 18, 2012
Messages
1,595
Reaction score
418
Can others edit my Photos
Photos NOT OK to edit
I recently had an opportunity to take some professional head shots. Oh wait! I didn't get paid for them so I'm not a pro. And I don't claim to be. And bacon... And I like turtles. And I started these sentences with and. Lol! Just having a little fun on some of the recent topics.

I am a volunteer for a my local FD and we are updating our accountability id tags. The tag photos will only be approximately 1.5X1.5 inches at most so there really is no need for perfection, hence the reason they are not in uniform. In the past we have always just used a P&S. However, this time I thought why not try this out with my gear and bring it back to everyone here to get some C&C.

The lighting setup is as follows.
Members were placed approximately 3 feet away in both directions from an inside corner (using the back of a chair to put their thighs against). The walls are a very light blue FYI. The ceilings are 8 feet and white. The lighting is florescent. The camera was about 4 feet away from the subject (rough guess) with a Fluorescent filtered sb700 on a 45 degree angle bounced toward the ceiling (ttl).

The camera settings I did adjust myself manually and did notice that the EV was on unintentionally. I also did not mean to and did not notice that the flash was set for rear curtain. These were shot in JPEG and no editing at all has been done. The final edits that will be put onto the tags will be cropped a considerable amount.

Anyway, I have another round of people to photograph this Thursday and was wondering how I may improve on these photos. I would prefer the TPF give it to me straight, unapologetic, harsh critique.

Thank you for taking the time to look and critique.:hail: Have a great weekend!:cheer::thumbup:
1.
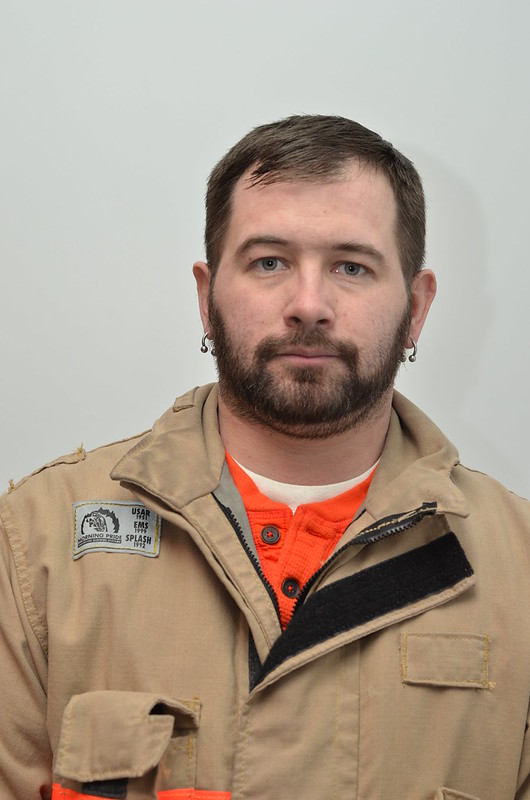
squad id 074 by Shefjr, on Flickr

EXIF for both placed here so that you can scroll up or down to view the info while looking over the images.
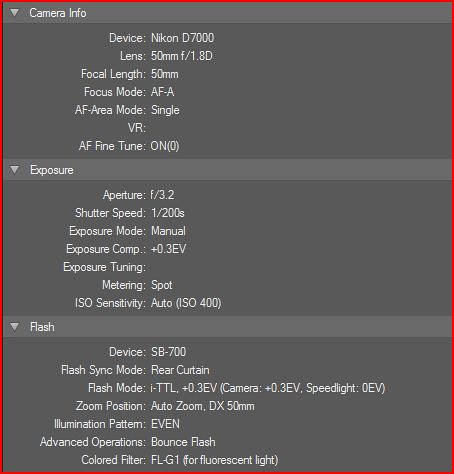
Portrait EXIF by Shefjr, on Flickr

2.
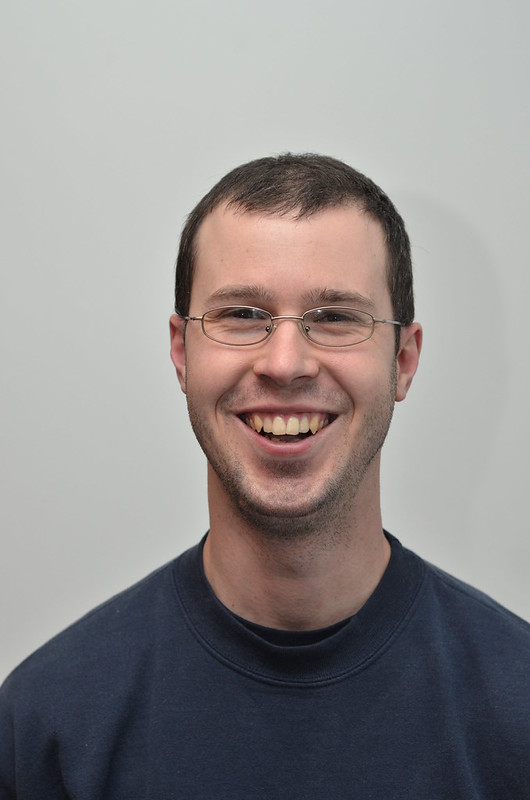
squad id 087 by Shefjr, on Flickr
 
If the main purpose of these pictures is for name badges, instead of dealing with additional lights and remote triggers to get a clean white background with no shadow cast, it would probably be a lot easier to take these into photoshop and use the refine mask tool to remove them from the background, drop them onto a pure white layer, do some minor color correction and spot edits, crop and call it a day.

If you intended to use these images for something else that would present them as larger than 1.5" square, there's quite a bit I'd change with your setup. But for ID badges, my above suggestion is probably the easiest solution...

For what you intended, these aren't bad at all. ;)
 
To prevent them from casting a shadow on the wall, bring them away from the wall about 8 or 10 ft.
Have them stand up straight (maybe even sit on a stool) with their body bladed to 45 degrees or less.
If you can, bounce the light away from them, not towards them and warm up the photo slightly.

The best thing you could do, is put that flash on a light stand with an umbrella, and a reflector of any kind to fill the other side.

7971755164_7f32328bd5_n.jpg


Here I did just that. Almost identical equipment.
D7000, sb700 on a stand to our right, fill on our left. but this is @ 150mm.

You can bring the light in front more to make it less dramatic.
 
I would agree these aren't bad for the purpose intended. The first guy is leaning, but you can crop that to straighten, so no biggy. In this situation, I wouldn't overthink it too much. It's working.
 
pic #2, perhaps not total whitening, but maybe just a shade lighter on the teeth PP he'd appreciate
bigthumb.gif


eye sockets are dark
 
It looks like you're dealing with a lot of ambient light and adding a bit of something from the SB-700, but it's not clear to me how the SB-700 is helping you. Right now, both photos feature noticeable side shadow on the background wall. This shadow comes from aiming the on-camera flash partly or completely forward and shooting in portrait (i.e., vertical) orientation, which puts the light to camera left, and the shadow camera right.

First thing I'd do is aim the SB-700 straight up or a little bit behind me. If you're shooting in portrait, depending on what you're bouncing off of, you could aim it perpendicular to the ground, and then tilt it camera left, to get the light source closer to 45 degrees above and 45 degrees camera left of the subject. In any case, be sure no part of the light is going straight at the subject from the flash head. Flag it if you have to (i.e., tape a bit of black foam or thick opaque paper or cardboard to the flash head blocking the light from going forward toward the subject.

Second, see if you can reduce the ambient part of this equation a bit (or a lot), by increasing the flash output and increasing the shutter speed (which will result more light from the flash, and less light from the ambient fluorescent).

If you want to experiment, you can create a cheap "softbox" by bringing in a big white pillowcase or white sheet, and having someone hold it up high, and then you bounce your flash off of that (i.e., aim the flash directly at that large white object). Try to put the pillowcase/sheet fairly close to the subject, and at a 45-degree-up-and-45-degree-right (or left) angle to the subject, so you get most of your light from that, and it's fairly large relative to the subject.

James is, however, correct, that these will work fine for ID badges, and you can get rid of the shadow in photoshop if you have it.
 
Ambient light? He's @ f/3.2 ISO400 1/200 with EV +.3 - That's all flash.
 
For some reason, Ballistics' firefighter shot is more appealing to me.
 
For some reason, Ballistics' firefighter shot is more appealing to me.
:lol: Granted the lighting is not fit for ID badges, the premise of the example was to show the difference that off camera flash can make.
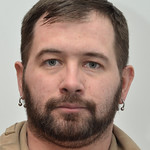
Although, I would position the firefighters the same way if being used for larger corporate shots. I actually did miss the part about them only being 1.5^2
 
Thanks everyone for commenting and helping me improve.

If the main purpose of these pictures is for name badges, instead of dealing with additional lights and remote triggers to get a clean white background with no shadow cast, it would probably be a lot easier to take these into photoshop and use the refine mask tool to remove them from the background, drop them onto a pure white layer, do some minor color correction and spot edits, crop and call it a day.

If you intended to use these images for something else that would present them as larger than 1.5" square, there's quite a bit I'd change with your setup. But for ID badges, my above suggestion is probably the easiest solution...

For what you intended, these aren't bad at all. ;)

JamesB, luckily for me I don't have to worry about the pp of these photos. One of the other members of the organization is handling the final results. I'm not proficient at photoshop yet and have a lot to learn.


To prevent them from casting a shadow on the wall, bring them away from the wall about 8 or 10 ft.
Have them stand up straight (maybe even sit on a stool) with their body bladed to 45 degrees or less.
If you can, bounce the light away from them, not towards them and warm up the photo slightly.

The best thing you could do, is put that flash on a light stand with an umbrella, and a reflector of any kind to fill the other side.

7971755164_7f32328bd5_n.jpg


Here I did just that. Almost identical equipment.
D7000, sb700 on a stand to our right, fill on our left. but this is @ 150mm.

You can bring the light in front more to make it less dramatic.

Ballistics, I'm gonna pull them away from the wall this Thursday as you suggested and adjust the flash as well. My reasoning for keeping them close to the inside corner was because of one of the lessons on either the stobist site or maybe the "nikon creative lighting system" book (I forget which). Basically the idea was to use side wall as the bounce card if you will, which is what I was trying for here. Thank you for the tip on turning them on a 45.


I would agree these aren't bad for the purpose intended. The first guy is leaning, but you can crop that to straighten, so no biggy. In this situation, I wouldn't overthink it too much. It's working.
LouR, Fortunately for these photos, I don't have to be too concerned with them too much. They will be so small I can miss focus and I don't think that I would matter.

anyone could of shot those i don't really know what you're asking the critique for
I think you are somewhat correct that they could have been shot by anyone but, I am not a people shooter. I shoot wildlife and have almost no idea how to take photos when involving flash. So my reason for critique is to learn what I could do to make these photos better. I must say that I have gotten a lot of helpful critiques.

pic #2, perhaps not total whitening, but maybe just a shade lighter on the teeth PP he'd appreciate
bigthumb.gif


eye sockets are dark
2wheelphoto, LOL! I did think about helping people out with their looks but, then I thought I would end up having to adjust a lot of photos. I am not proficient enough at photoshop and that would really cut into my time.


It looks like you're dealing with a lot of ambient light and adding a bit of something from the SB-700, but it's not clear to me how the SB-700 is helping you. Right now, both photos feature noticeable side shadow on the background wall. This shadow comes from aiming the on-camera flash partly or completely forward and shooting in portrait (i.e., vertical) orientation, which puts the light to camera left, and the shadow camera right.

First thing I'd do is aim the SB-700 straight up or a little bit behind me. If you're shooting in portrait, depending on what you're bouncing off of, you could aim it perpendicular to the ground, and then tilt it camera left, to get the light source closer to 45 degrees above and 45 degrees camera left of the subject. In any case, be sure no part of the light is going straight at the subject from the flash head. Flag it if you have to (i.e., tape a bit of black foam or thick opaque paper or cardboard to the flash head blocking the light from going forward toward the subject.

Second, see if you can reduce the ambient part of this equation a bit (or a lot), by increasing the flash output and increasing the shutter speed (which will result more light from the flash, and less light from the ambient fluorescent).

If you want to experiment, you can create a cheap "softbox" by bringing in a big white pillowcase or white sheet, and having someone hold it up high, and then you bounce your flash off of that (i.e., aim the flash directly at that large white object). Try to put the pillowcase/sheet fairly close to the subject, and at a 45-degree-up-and-45-degree-right (or left) angle to the subject, so you get most of your light from that, and it's fairly large relative to the subject.

James is, however, correct, that these will work fine for ID badges, and you can get rid of the shadow in photoshop if you have it.
ianivey, Thank you for the help here. You have given me a lot to both digest and try while I'm at this Thursdays meeting. The only problem that I have is that I am also going to be training people so while there are several things that I would like to try I don't know that I will have time to try them all. I am hoping that I can find that magic factor rather quickly. If however I don't, that is okay because the ones that I have posted here are more than sufficient for our needs.

Ambient light? He's @ f/3.2 ISO400 1/200 with EV +.3 - That's all flash.
Ballistics, how do you know this? Is there a book that you could refer to me that would help me further understand this? I am probably wrong but, I would have thought that I would want more ambient light and use the flash as fill. I honestly thought that I wasn't using a lot of flash. Oops! I guess I was wrong.

anyone could of shot those i don't really know what you're asking the critique for

A lot of people make this claim. Pull up yer boot straps and make your stand.
Kundalini, I kinda sorta thought the same thing but, took it for face value and answered the question.


This is roughly what the final image will look like.

Final id by Shefjr, on Flickr

Thank you everyone for your helpful comments. Even though these are only for small id tags I do want to learn how you all would have done them in a professional scenario so that I can at least practice doing this properly. That said, I have no illusions of doing this for pay and or for anyone else other than my department.
 
For some reason, Ballistics' firefighter shot is more appealing to me.

HELL YEAH!!! I would be in trouble with the wife if they looked like that. I have many late night meetings at the hall I can only imagine what the Mrs. would say if I had members that looked like that. LOL!
 
Ballistics, how do you know this? Is there a book that you could refer to me that would help me further understand this? I am probably wrong but, I would have thought that I would want more ambient light and use the flash as fill. I honestly thought that I wasn't using a lot of flash. Oops! I guess I was wrong.

Fill flash is when the flash is shot head on from the location of the camera, and is less or equally intense to the ambient or main light(yes, this isn't always true but for this instance it is), but since you were in TTL mode and bounced the flash, the flash compensated and became the main light. Notice how the shadow casted is off to the side?
If you shut all of the lights off, you will get extremely similar results (TTL isn't always exactly the same with every shot).
 

Create an account or login to comment

You must be a member in order to leave a comment

Create account

Create an account on our community. It's easy!

Log in

Already have an account? Log in here.

New Topics

Back
Top Bottom