What's new

Question About Getting Correct Exposure In Harsh Light

DistantSubject

TPF Noob!
Joined
Apr 29, 2013
Messages
23
Reaction score
0
Can others edit my Photos
Photos OK to edit
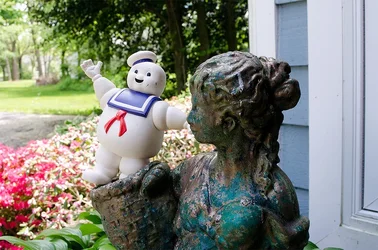
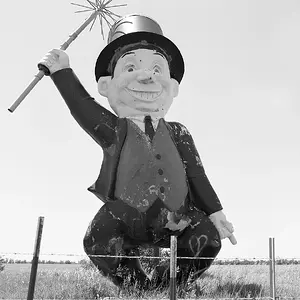
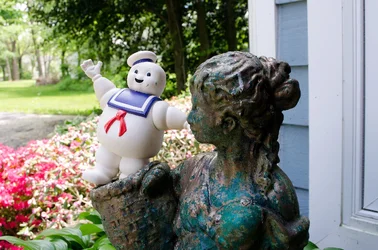
I took this picture of Mr. Stay Puft a while ago, and I like it... other than the fact that half the image is over-exposed.
$_DSC7579.webp

I ask you: How can I make the background and foreground correctly exposed?

But first, a couple of caveats:
1. I don't want to use the flash.
2. I don't want to use HDR (I tried it and was not happy with the results).

Thanks for looking! :hugs:
 
I am not sure what to suggest. One of the problems that we, as photographers, often encounter is that what we see when we look at a scene is often not what we get in our image. One reason this happens is that the human eye is capable of "processing" a larger dynamic range that our digital cameras are. The human eye is capable of "handling" about 20 stops ± (depending on who you read), whereas your digital camera is only capable of about 10 stops of light. If the dynamic range of your scene is more than your camera can capture, then you will probably end up with blown highlights, or clipped shadows. You will have at least a part of your image that is overexposed or underexposed, depending on where you take the reading for your actual exposure. You can use HDR as you have indicated you have tried (Why did you not like the results?), or you can try taking one exposure for the highlights and one for the shadows and then "merging" the two images in Photoshop. Other than that, I am not sure what to suggest. Others may have some alternatives for you.

WesternGuy
 
You may have two more options.

3. Post processing
4. Wait for the right light.
 
Graduated Neutral Density filter will work in some cases, but the geometry of the scene has to match the filter, more or less.

You can sometimes use a reflector (i.e. a largish white/shiny object, say, a friend in a light colored T-shirt) to bounce some more light onto the darker areas. Try it some time. Just put something white and flattish just out of frame, and watch the objects on that side of the frame brighten up.

Shoot RAW and squash the tone curve down. This is HDR-lite, but it doesn't have to look like HDR.

Let the highlights and shadows go. If the light is harsh, let it be harsh. You're gonna make a harsh-looking picture. That's ok, that's what was there, right? Letting shadows go generally looks better in digital than letting highlights go, but there are ways to make the highlights blow out more gracefully. Read this, for instance: The Online Photographer: 'Expose to the Right' is a Bunch of Bull (ignore the title, it's just an attention-getter).

In general, you'll use some combination of all these suggestions.
 
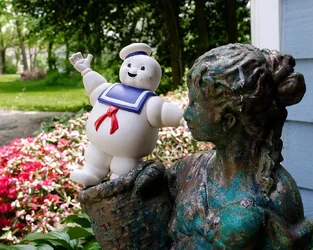
There wasn't anything especially bad about the exposure in this image. There were some lighter areas to the left side of the frame but really less than a stop, easily adjusted in photoshopwith a gradient fill and some light masking, soft brush, etc.

The issues I addressed, I also addressed in photoshop: Gave it a tighter crop to give more emphasis to the sta-puff figure and adjusted the strength of the blue on the bodice of the figurine to again, direct the eye to the Sta-Puff guy. About four minutes editing time.


$8840472774_a847e3dd12_o.webp $8839758887_7751bcaf7c_b.webp
 
Last edited:
You can try some post processing. In PSE 11 adjusting the shadows/highlights will help in correcting the over/under exposed areas to a degree. You don't want to overkill those settings either as the photos at one point begin to look unnatural. Alternatively, you can take two or three images where you expose correctly for highlights in one and shadows in the other, blending these images later will yield a better result, although this does involve more work and is not always practical obviously. However, looking at your original posted photo, it really doesn't look that bad, the subject doesn't look all that bad to me.
 
Thanks for the replies, everyone!

I'll try playing with reflectors, amolitor. I've never used them before!

I like what you did, ceeboy; I'll have to look up how to use gradient fills, light-masking, etc in Photoshop. You're right about the crop too... I noticed the wasted space on the right side after I posted the image. I don't like the 4:3 aspect ratio though! :D

Thanks again!
 

Create an account or login to comment

You must be a member in order to leave a comment

Create account

Create an account on our community. It's easy!

Log in

Already have an account? Log in here.

New Topics

Back
Top Bottom