What's new

Tazo Tea... Getting Betterss!

D-B-J

Been spending a lot of time on here!
Joined
Apr 13, 2010
Messages
9,027
Reaction score
2,175
Can others edit my Photos
Photos OK to edit
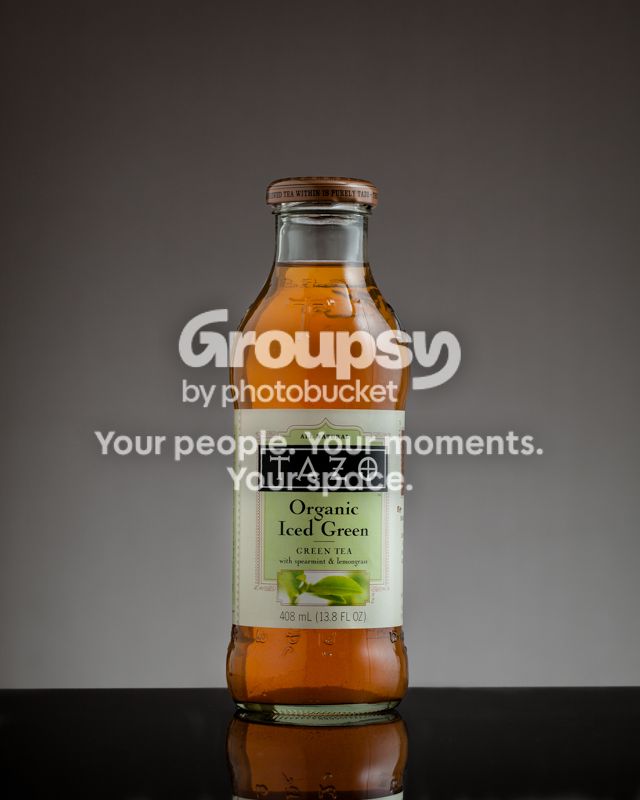
Thoughts? I'm slowly improving, bit by bit.

Tazo_ by f_one_eight, on Flickr


Cheers!
Jake

Edit: Removed "frothy" ness, which was actually a reflector behind the bottle.
 
Last edited:
Way too much highlight wrap here. Also, the tea looks, strange. Like it's thick and frothy. Is it actually like that or is it the reflection of your diffusion material?

If you don't need to see the top of the bottle for some reason (such as shooting this for the bottle cap manufacturer) then I'd suggest a lower camera angle as well to give it a more commanding presence.
Just my two cents.
 
Thats good I like it, looks like a poster ready advert
 
Way too much highlight wrap here. Also, the tea looks, strange. Like it's thick and frothy. Is it actually like that or is it the reflection of your diffusion material?

If you don't need to see the top of the bottle for some reason (such as shooting this for the bottle cap manufacturer) then I'd suggest a lower camera angle as well to give it a more commanding presence.
Just my two cents.

Mostly, it is because of my lack-of-PS-prowess. There were some horrid reflections (being in a dorm room lets the light bounce off EVERYTHING), and I tried to get rid of some, but I didn't do the best. It's a start... Also, in retrospect, a lower angle would have been better....

Cheers!
Jake


This is how it went. The excessive highlight wrapping was to try and to cut down on the highlights...

Cheers!
Jake
 
Well there's your problem right there. Get rid of that front sheet of diffusion material. If you're having an issue with random reflections in the front of the bottle you can always place a flag there to block them out.
If you're having issues getting light on the label and you don't have another light you can always use a small mirror. No need to have the diffusion material going so far in front of the bottle. You want a nice rim down the side, but not a huge wrap around the bottle. ;) You can use black flags on the sides to control the width of the highlight as well as were it starts on the bottle.
 
Well there's your problem right there. Get rid of that front sheet of diffusion material. If you're having an issue with random reflections in the front of the bottle you can always place a flag there to block them out.
If you're having issues getting light on the label and you don't have another light you can always use a small mirror. No need to have the diffusion material going so far in front of the bottle. You want a nice rim down the side, but not a huge wrap around the bottle. ;) You can use black flags on the sides to control the width of the highlight as well as were it starts on the bottle.


I'll have to try that next time. I really need more stands! All these flags and such require a lot of stands/hanging space. What about a black sheet? That would work well, right?
 
The problem with a sheet is that you need something to hang it. I just use black posterboard. You can get it in 20x30 sheets from the craft store and cut it to the sizes needed. You can prop it in place with just about anything you can put behind it. ;)
 
The problem with a sheet is that you need something to hang it. I just use black posterboard. You can get it in 20x30 sheets from the craft store and cut it to the sizes needed. You can prop it in place with just about anything you can put behind it. ;)

I'll try that next time. So my right side scrim worked perfect, but I shouldn't have wrapped the white paper around the left and front... hmm. What a noob!

Cheers!
Jake
 
You'll probably find that the subject determines the lighting pattern to be used. This includes which modifier to use. If you deconstruct product photography in ads, magazines and such, you will probably start to recognize glass bottles are generally side-lit with strip boxes on each side. This produces a nice thin specular highlight along the vertical edge of the vessel. Obviously, more elaborate lighting is also introduced, but the strip boxes help define the subject.

In your shot, you clearly have twice as much head room as you have below the bottle. Why?

Also, the stark horizon line at about 20% of the frame from the bottom is in conflict with the gradation of the light to dark at at the top. There is not a very cohesive transition.

Keep practicing. It does make more sense the more you do it.
 
You'll probably find that the subject determines the lighting pattern to be used. This includes which modifier to use. If you deconstruct product photography in ads, magazines and such, you will probably start to recognize glass bottles are generally side-lit with strip boxes on each side. This produces a nice thin specular highlight along the vertical edge of the vessel. Obviously, more elaborate lighting is also introduced, but the strip boxes help define the subject.

In your shot, you clearly have twice as much head room as you have below the bottle. Why?

Also, the stark horizon line at about 20% of the frame from the bottom is in conflict with the gradation of the light to dark at at the top. There is not a very cohesive transition.

Keep practicing. It does make more sense the more you do it.

Oh I will! I'm not giving up yet!

Cheers!
Jake


Sent from my iPhone using Tapatalk
 
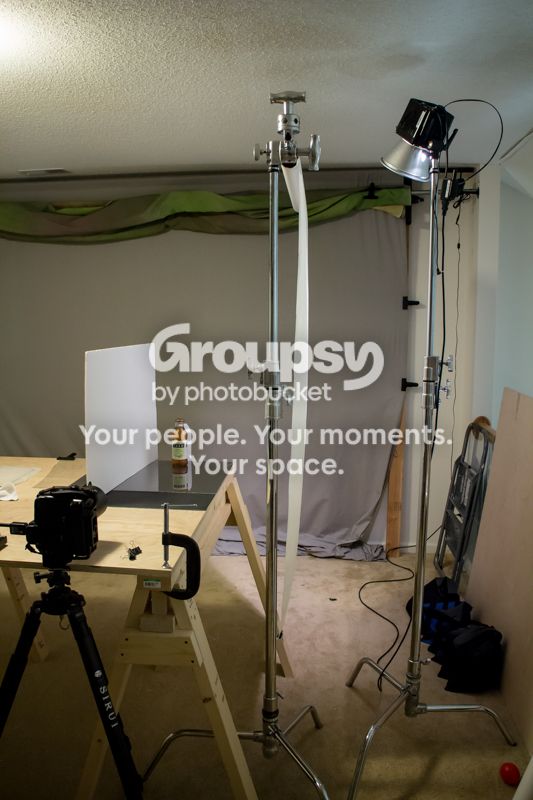
OK, so while digging around in the pantry last night for some adult beverages, I encountered a case of Tazo that has likely been there for over a year. I decided to take a bottle upstairs and try my hand at it to see if I can help give you some direction here. The first shot I did with just one light. The light has a 30* grid on it and is angled down to skim the diffusion material and bounce off the ground to give a bit of a gradient to the background. The reflector fills the other side and some copy paper works as a card for the tea. The one light set up works, but needs a bit of tweaking in post to get things evened out.
​
This is the image after a few seconds in Lr to burn down my acrylic (it's a bit foggy so tosses light everywhere) and some mild D&B to even out the bottle.


​

After that I went to my normal "bottle" set up. This is a bit more complex but allows for more fine tuning. Two softboxes feathered across the diffusion material. This gives a softer, more feathered edge to the highlights on the front of the bottle rather than the crisp edge you'd get from just a softbox. Black flags on either side to give a crisp edge to the highlight along the outer edges. This helps to give strong definition to the edge of the bottle by getting rid of the glowing highlight down the side. Granted it works better on a white sweep. :blushing: Simply moving the cards forward or backward allows you to determine how close to the edge of the bottle the highlight will start. Putting it behind the diffusion material will give a softer edge on the outside, rather than the crisp edge you get with it on the inside of the diffusion material. A separate light on the background and a speedlight pushing light through the paper behind the tea (this is needed because the flags block the light that would otherwise illuminate the card behind the bottle).


Tazo
by tltichy, on Flickr


​
One thing to bear in mind is that you're going to want to turn out all the lights in the room, otherwise any point light source or direct reflection will show up in the bottle. Take a test shot with the flashes off just to make sure you're not getting any ambient light contaminating the shot (in this case via unwanted reflections). If you want to add some "atmosphere" to the image you can wax the bottle and then spay it with water. ;) Hope this helps. Either way, it gave me something to do last night. :)
 
OK, so while digging around in the pantry last night for some adult beverages, I encountered a case of Tazo that has likely been there for over a year. I decided to take a bottle upstairs and try my hand at it to see if I can help give you some direction here. The first shot I did with just one light. The light has a 30* grid on it and is angled down to skim the diffusion material and bounce off the ground to give a bit of a gradient to the background. The reflector fills the other side and some copy paper works as a card for the tea. The one light set up works, but needs a bit of tweaking in post to get things evened out.

​
This is the image after a few seconds in Lr to burn down my acrylic (it's a bit foggy so tosses light everywhere) and some mild D&B to even out the bottle.


​

After that I went to my normal "bottle" set up. This is a bit more complex but allows for more fine tuning. Two softboxes feathered across the diffusion material. This gives a softer, more feathered edge to the highlights on the front of the bottle rather than the crisp edge you'd get from just a softbox. Black flags on either side to give a crisp edge to the highlight along the outer edges. This helps to give strong definition to the edge of the bottle by getting rid of the glowing highlight down the side. Granted it works better on a white sweep. :blushing: Simply moving the cards forward or backward allows you to determine how close to the edge of the bottle the highlight will start. Putting it behind the diffusion material will give a softer edge on the outside, rather than the crisp edge you get with it on the inside of the diffusion material. A separate light on the background and a speedlight pushing light through the paper behind the tea (this is needed because the flags block the light that would otherwise illuminate the card behind the bottle).


Tazo
by tltichy, on Flickr


​
One thing to bear in mind is that you're going to want to turn out all the lights in the room, otherwise any point light source or direct reflection will show up in the bottle. Take a test shot with the flashes off just to make sure you're not getting any ambient light contaminating the shot (in this case via unwanted reflections). If you want to add some "atmosphere" to the image you can wax the bottle and then spay it with water. ;) Hope this helps. Either way, it gave me something to do last night. :)

damn! Made mine look like crap! I'll definitely reshoot this soon. Thanks for all the input and assistance, it really helps.

Cheers!
Jake


Sent from my iPhone using Tapatalk
 
OK, so while digging around in the pantry last night for some adult beverages, I encountered a case of Tazo that has likely been there for over a year. I decided to take a bottle upstairs and try my hand at it to see if I can help give you some direction here. The first shot I did with just one light. The light has a 30* grid on it and is angled down to skim the diffusion material and bounce off the ground to give a bit of a gradient to the background. The reflector fills the other side and some copy paper works as a card for the tea. The one light set up works, but needs a bit of tweaking in post to get things evened out.

​
This is the image after a few seconds in Lr to burn down my acrylic (it's a bit foggy so tosses light everywhere) and some mild D&B to even out the bottle.


​

After that I went to my normal "bottle" set up. This is a bit more complex but allows for more fine tuning. Two softboxes feathered across the diffusion material. This gives a softer, more feathered edge to the highlights on the front of the bottle rather than the crisp edge you'd get from just a softbox. Black flags on either side to give a crisp edge to the highlight along the outer edges. This helps to give strong definition to the edge of the bottle by getting rid of the glowing highlight down the side. Granted it works better on a white sweep. :blushing: Simply moving the cards forward or backward allows you to determine how close to the edge of the bottle the highlight will start. Putting it behind the diffusion material will give a softer edge on the outside, rather than the crisp edge you get with it on the inside of the diffusion material. A separate light on the background and a speedlight pushing light through the paper behind the tea (this is needed because the flags block the light that would otherwise illuminate the card behind the bottle).


Tazo
by tltichy, on Flickr


​
One thing to bear in mind is that you're going to want to turn out all the lights in the room, otherwise any point light source or direct reflection will show up in the bottle. Take a test shot with the flashes off just to make sure you're not getting any ambient light contaminating the shot (in this case via unwanted reflections). If you want to add some "atmosphere" to the image you can wax the bottle and then spay it with water. ;) Hope this helps. Either way, it gave me something to do last night. :)

Also, what stands did you use to hold the flags and scrims? Those looks SO helpful.

Cheers!
Jake


Sent from my iPhone using Tapatalk
 

Create an account or login to comment

You must be a member in order to leave a comment

Create account

Create an account on our community. It's easy!

Log in

Already have an account? Log in here.

Back
Top Bottom