Water drop photography

SofieWagner

TPF Noob!
Joined
Jan 14, 2019
Messages
7
Reaction score
1
Can others edit my Photos
Photos OK to edit
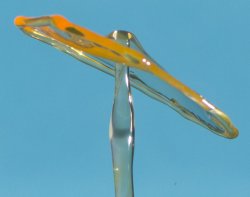
Hi! I just started trying out water drop photography but I have a problem getting the entire drop in focus. I use a pen at the centre of the water drop to set my manual focus but the edges of the droplet gets blurry. And to top it of the image gets really grainy.

See attached image!

Im using a Canon EOS 550d, Tamron SP 90mm F/2.8 Di 1:1 Macro.
The picture is taken with: ISO400, f9/0.

What f-stop do you recommend to get a sharp droplet and what can I do about the grain? Do I need more light(flashes) and lower ISO or is it my camera that is old and needs to be replaced?

Thanks,
Sofie
 

Attachments

  • Drop.jpg
    Drop.jpg
    150.1 KB · Views: 201
You're a bit close to the water drop ... this makes the depth-of-field shallower. If you pull the camera back a bit, you'll have an easier time fitting it in the frame and the depth of field will increase.

If you add more light you can decrease the ISO and/or shoot at a higher f-stop.
 
Thanks for the replies! I will try to move the camera back and add more lights. But I am a bit worried that the background wont be blurry if I shoot with a higher f-stop.
 
You can use the online tool here to calculate the Depth of Field at various subject distances or using various apertures.

Online Depth of Field Calculator

Note that subject distance is measured from the sensor position (not the front of the lens). Your camera has a mark on it to show you the distance to the sensor. It looks like a circle with a flat line through it. On your camera it is located on the top of the camera just next to where the neck-strap would connect on the left side.

If you use the tool on that website, you'll find the depth of field is extremely shallow (which is why the front & back of the splash pattern are going soft). Just make sure your background is far enough away and it will melt out of focus (the farther away the background objects are ... the blurrier they will be.)
 
Thanks again for the help :) Will try again this weekend.
 
You might find it interesting to look up Harold Edgerton who pioneered this type photography. Try resources at the second link; you might need more light and probably don't need to be in so close. I'm not sure that blurring the background is that necessary if you're using a plain solid color background.

You're actually talking about digital noise; grain is in the emulsion on one side of a strip of film. I think it's grains of silver that can show up in film images shot in lower or not enough light.
Iconic photos « Harold "Doc" Edgerton
High-Speed Imaging | Edgerton Center
 
On a side note... Tim, I'm wondering what is meant by 'higher' aperture. I've seen it phrased that way online in more recent years, but I've always know aperture to be larger or smaller.

I'm not sure if higher means a larger number which of course is actually a smaller fraction, or vice versa. High and low don't to me describe aperture so I'm never sure which is meant by those terms.
 
You can use the online tool here to calculate the Depth of Field at various subject distances or using various apertures.

Online Depth of Field Calculator

Note that subject distance is measured from the sensor position (not the front of the lens). Your camera has a mark on it to show you the distance to the sensor. It looks like a circle with a flat line through it. On your camera it is located on the top of the camera just next to where the neck-strap would connect on the left side.

If you use the tool on that website, you'll find the depth of field is extremely shallow (which is why the front & back of the splash pattern are going soft). Just make sure your background is far enough away and it will melt out of focus (the farther away the background objects are ... the blurrier they will be.)

So that’s what that symbol is.
 

Most reactions

New Topics

Back
Top