What's new

White balance and compression issues, please help

OldPro

TPF Noob!
Joined
May 18, 2012
Messages
9
Reaction score
0
Location
SoCal
Greetings,
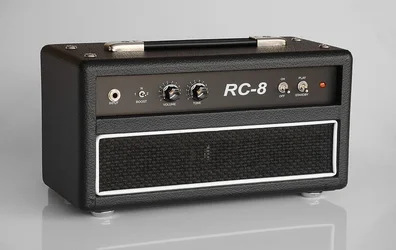
I'm brand new here and hope you all can advise me in two areas that I'm struggling with. I spent a great deal of my adult life as an editorial and then advertising photographer. I had a busy studio for 21 years, working mostly on car and motorcycle accounts (and other shiny metal products), then directed commercials (mostly cars) for a 6 years before an accident took me out of action. After 20 some years working with ad agencies I was ready to stop anyway. So, I have a lot of experience with large, medium and small format film cameras but limited experience with digital. Two issues are really giving me fits. 1: no matter how I've tried to white balance, I usually get some unresolvable cross over. I've attached an example. The background is white, but the with color corrected for the product, the background is...well, not white.
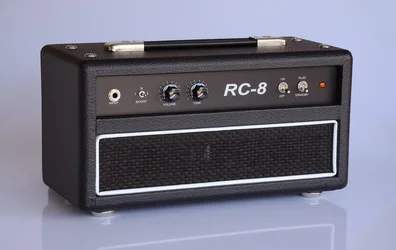
$RC8front.webp


2: When compressing photos for display on the web, they end of mushy looking. See photos all the time that are sharp and crisp and they are smaller files then mine. What am I doing wrong?
Thanks in advance for your help and advice.
OldPro
 
Welcome to TPF.

So it's kinda late and I'm a couple beers ahead of you, but maybe I can help. I took a quick look at your photo. You had the white balance set manual/shade and I'm assuming you're shooting camera JPEGs.

If you let the camera process out the JPEG it's going to screw the white balance. It's what they do. You'd like to think the camera can get it right, but it can't. So you're options are to set a custom white balance, but if you let the camera create the JPEG it'll still work overtime to try and screw you. Or you can shoot a RAW capture and set the white balance manually. You really want the white balance right? Then you'll eventually end up shooting RAW and getting it right yourself. There's a lot of photographers out there who wish there was another alternative -- they take a lot of off-color photos.

Correcting your photo's WB was easy, but software can't do it.

$rc8.webp

As for prepping the photo for internet display; you have to anticipate any action by software that's going to mangle your photo. You need to anticipate the size requirements of the host site (Facebook, Photobucket, Flickr) and avoid their resizing algorithms by beating them to it. Find out what the requirements are for wherever you're uploading the file and get there first so they won't come behind you and chew on your work.

Joe
 
Thanks for the reply,<br>So....if software can't do it, how did you do it? I looked though the info posted for this photo, I could find nothing about the camera settings, the WB setting or that the camera was set to manual, where did you find this info?
 
Last edited:
I have been using a gray card for exposure metering and will try it for WB, I have an expensive color meter, but I know nothing of using it for RGB, color temp in Kelvin is all I know. I have been using Photoshop to adjust and resize the photos to workable size for the web, I'll check out those other programs.
Thanks
 
After too long in digital without knowing the differences with film, I finally "discovered" what the lack of proper white balance was doing to me. This was after spending hours and hours and hours "fixing" color problems in an old version of Photoshop.

This past March, at my (ex) step-daughters' 2nd wedding, I trusted "automatic white balance" under some weird incandescent lighting and the results were very problematic. So, it was learn what I could about WB here and elsewhere and -finally- get it right. Or, at least, a whole lot closer to accurate WB. I first purchased an ExpoDisk, and had great results with that. Just using that reduced my color correcting time to near zero. I recently bought a grey card and have used that, too, with great results, also. So now, it's a matter of deciding what works best when I'm out shooting. I'll carry both, and probably end up using both, as the situation warrants.

In my limited experience, I used the ExpoDisk and grey card to set custom white balance in the camera. I'm fairly new to Lightroom, as well, so I'm only learning to use it, and the WB eyedropper tool, but so far, the results have been excellent!
 
If you are certain you are using a 100% neutral background the easiest way to do it is to setup all the lighting for the product, remove the product, and then take a photo of just the background and use that as a custom white balance. Most cameras allow you to set something like this. That way your camera will have the white balance pre-set then you can put the product back and start clicking away. No need to do anything more than minor adjustments in post processing.

Remember software doesn't know, it only algorithmically guesses at what you're trying to do.
 
Thanks for the reply,<br>So....if software can't do it, how did you do it?
I think he meant to say it can't do it automatically. It needs a human to either set the WB in the camera or to use the eyedropper tool in a program like Lightroom.

Myself, I usually use a gray card on the first shot, then eyedropper that in Lightroom to get the correct WB, then sync up all the subsequent shots made in the same light to that reference. Easy as pie. Other times I'll set WB in the camera, again, using the gray card. 6 of one, half dozen of the other, from my POV.

I looked though the info posted for this photo, I could find nothing about the camera settings, the WB setting or that the camera was set to manual, where did you find this info?
It's in the EXIF information that is digitally written into the file of the image when shot and/or edited with software. It's in all digital images unless purposely stripped out. There are a lot of EXIF viewers available to see what all settings and adjustments were made. I use a plugin for the Firefox Browser that allows me to right click on an image, choose View Image EXIF Data from the menu, and I get the whole list of information in a popup window. The plugin is simply called "EXIF Viewer".
 
Since no one has mentioned the resizing issue yet.

Sharpening is crucial in any digital image to partially correct the blurring effect that any processor uses to remove the mosaicing caused by the sensors. (read about this in a more verbose, better informed resource. I would be merely parroting back what I've read.) and to produce an 'edge' effect on tone transitions that improve the appearance of sharpness.

"Sharpening" is achieved with software that finds a tone transition and on the darker border, puts an artifially even darker line (or 3) of pixels. The reverse is true on the lighter edge. This emphasizes transitons.
When you resize (shrink) for posting, this 'edge' can be lost along with the apparent sharpness and so any image should be sharpened at its display size.
Don't leave it to the hosting server to resize and resharpen.

All that being said, sharpening an image is a skill set in its own and there are many articles and even a book or two on it. Here (Sharpening 101 ) is a popular and basic article.
 
Last edited:
Thanks for the reply,<br>So....if software can't do it, how did you do it? I looked though the info posted for this photo, I could find nothing about the camera settings, the WB setting or that the camera was set to manual, where did you find this info?

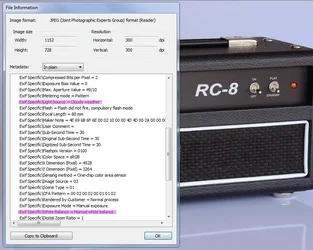
Good morning. Your camera saves a data fork with the photo -- it's called the EXIF data and I examined it for the photo you posted.

Below is an excerpt for your posted photo and I've highlighted the white balance settings:

$exif.webp

Your camera was set to one of the white balance presets. Others now have posted good info for you about how to handle white balance. Buckster noted the EXIF data and viewing utilities and did a good job translating my "two beers" comment. Software in the camera can't automatically determine the color of the light source. In a way this was actually easier back in the day with film because film had a pretty consistent white balance preset manufactured-in.

The rest of the folks gave you good info, personally I don't let the camera software post process my photos. I do that myself from the Raw files -- in your case that would be a Nikon NEF file.

Joe
 
Thank you all for this wealth of knowledge. So, Joe, as I understand it now, you used something like the eyedropper tool in Lightroom to correct the background of my posted example? Traveler, I have used the sharpening tool in Photoshop will good result. I'm surprised that the digital format requires so much "after the fact" fussing. Back in the day, when digital was just beginning, I use to lecture at Art Center College of Design, teaching invoicing and estimating to the advanced students. In the estimating assignments, as the years went on, more and more students would inquire about how much $$$ could be included for "digital" post production work, I always said "none, do it in the camera". I guess those days are gone. Makes me feel like a antique, but I suspect the business was more fun back then. After shooting for GM for years, I remember when I got a call to just shoot a new model with quality "car" light and not to worry about the background. Later, I saw the photo with 3 different backgrounds....I thought, "uh-ho, there goes that gig", no more going to the Pacific Northwest, waiting for it to stop raining so we could shoot in some magnificent location. Getting paid for all those "weather" days was cool though....
Thank you all again
 
Thank you all for this wealth of knowledge. So, Joe, as I understand it now, you used something like the eyedropper tool in Lightroom to correct the background of my posted example? Traveler, I have used the sharpening tool in Photoshop will good result. I'm surprised that the digital format requires so much "after the fact" fussing. Back in the day, when digital was just beginning, I use to lecture at Art Center College of Design, teaching invoicing and estimating to the advanced students. In the estimating assignments, as the years went on, more and more students would inquire about how much $$$ could be included for "digital" post production work, I always said "none, do it in the camera". I guess those days are gone. Makes me feel like a antique, but I suspect the business was more fun back then. After shooting for GM for years, I remember when I got a call to just shoot a new model with quality "car" light and not to worry about the background. Later, I saw the photo with 3 different backgrounds....I thought, "uh-ho, there goes that gig", no more going to the Pacific Northwest, waiting for it to stop raining so we could shoot in some magnificent location. Getting paid for all those "weather" days was cool though....
Thank you all again


Real close, but not exactly. I started by checking a number of grey points in your photo and I started making assumptions about what really was grey/neutral in the product. I used Photoshop, and I did use the eyedropper that will set a grey point. Ultimately that didn't work -- no one click solution. So I settled on the grey point that seemed to get me the closest for the product and then I manually fine-tuned both the product and background separately. Big NOTE here: I already had what was in effect a damaged JPEG -- the camera software had already done it's mangling work and that had to be undone. It's much easier to get it right from the start and a one-click solution may have been possible if applied in the correct sequence. Again as others have well noted above:

1. Set a custom WB on the camera for the specific condition (see Graystar's list of products).
2. Deal with WB during the Raw conversion process.

As I said, I prefer option 2, but option 1 can be used to good advantage -- for me it seems more tedious to do it before the shot, and I still wouldn't trust the camera software to handle the processing.

Bottom line: Software can't see.

Joe

P.S. We're both old pros. I got my start 40 years ago in a press shop where I ran a stat camera and made plates.
P.S. Good bunch of core folks here with sound info.
 
I'm surprised that the digital format requires so much "after the fact" fussing.

It doesn't 'require' it so much as you might infer from what has been said.
With film, you chose the film, thereby getting the tone curve, sharpness, colors you wanted.
Then you took the picture and the film went to the lab where variables affected the contrast, saturation, acutance, grain, etc.

Now, with digital, you can mimic that simple cycle by choosing the processing settings to be used in constructing the images, shooting jpgs, and then sending them off to be printed straight out of camera.

If, however, you chose to assert more control, you can make all of the decisions that used to be fixed in stone by processes external to you.
Shoot raw, choose iso, post-process for maximum result.

Digital is easier in some ways for the casual shooter but gives infinitely more control to those who are willing to exercise it.

Lew
 
I'm surprised that the digital format requires so much "after the fact" fussing.

...Digital is easier in some ways for the casual shooter but gives infinitely more control to those who are willing to exercise it.

Lew

That's hitting the nail on the head -- well said.

I would then offer that excellence requires that you exercise all the control you've got. My favorite from Michelangelo: Trifles make perfection, and perfection is no trifle.

Joe
 
I finally got some time and spent an hour or 2 setting up a nice tabletop setup with a diffused 3200k quartz source. Dialed in the exposure and white balance. Set the camera to record the image in the RAW (what ever Nikon calls it) and made a few exposures. Took the camera to the computer and guess what, although the photo software will open the JPEG camera files all day long, it will not open the RAW files!!!!.
The camera still works after it's collision with the wall on the other side of the room, so..... how do I get the %#@&^%# RAW files out of the camera and into my computer?
Thanks for your help.
 
Last edited:

Create an account or login to comment

You must be a member in order to leave a comment

Create account

Create an account on our community. It's easy!

Log in

Already have an account? Log in here.

Back
Top Bottom