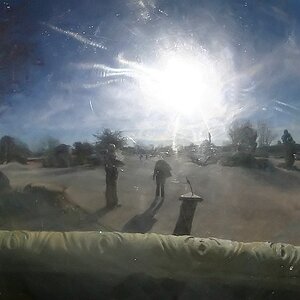
How do I avoid/correct contast extremes when taking photos in a sun/shade environment? I'm a newbie and jut doing the "point and shoot" thing at this point.
Add light. Just a little fill flash in this case. Or a reflector if you have a good angle on the sun working with you. This shot will not give you much time, but you should be able to pop up your built-in flash fairly quickly.
Thank you Designer.. I'm embarrassed to admit I'm using everything set to "automatic", including the flash.
Sounds like this may be an opportunity for me to start making some of my own decisions. I guess the best way to learn, is to go out and start experimenting.... thank you for steering me in the right direction.
Dappled sunlight is tough to deal with. It is often best to avoid it if at all possible.
Like Designer said adding a bit of fill lighting will certainly help.
Any added light is going to be added to both the parts of the scene lit by direct sunlight and the shaded parts.
With experience you will get to the point you will know how much light needs to be added.
DSLR cameras offer 3 or 4 light metering modes - Spot, Partial, Center-weighted, or Matrix/Evaluative.
If you have the time you can Spot meter the shade and then spot meter the direct sunlight and use those measurements to decide how much light needs to be added.
Yup, time to learn how to use your flash for fill. As 480sparky wrote; the camera will not always pop the flash up if it is on automatic. Read your user's manual to find out how to get all that working.
Thanks everyone, you've all been helpful. I've read the manual and am trying to read and learn what I can from the various forums... but there's a LOT to absorb. Maybe I'll make sun/shade photos my "homework" for this week and try to concentrate on one thing at a time.Being so inexperienced, I didn't realize the photo wouldn't work until I got it home and downloaded it to my computer... then attempted to edit/correct the lighting. Nothing seemed to work, which told me if was an error on my part with the original photo. You've given me some great advise, thank you all.
"Fill" flash means that rather than the flash behaving as the primary source of light, it's used to "fill" the shadow areas. This means the flash is typically set to be a bit weaker than the main source of light.
On cameras or flashes that allow you to control the amount of power used by the flash, you can usually dial the flash back to "-1" Each full "1" value means either a doubling or halving of the power level... so "-1" means you want the flash to fire at 1/2 the amount of power the camera would normally have used. This means the scene is lit by about 2/3rds natural light and 1/3rd flash. The result is an image where you still have shadows (so the image will look natural)... but the shadows are gentle rather than harsh-deep shadows.
If you have a camera that does not allow you to control the amount of flash, just set the camera to force the flash to fire. It will be an improvement over the deep shadows, but you may not notice much of the naturally occurring shadows.
Fill flashes are way off for someone beginning photography. I'd say loose the auto. Set your camera on av for a start, experience and experiment, then ease into manual with practice. Your camera can do amazing things on its own if use it to it's fullest.
This is an excellent lesson you learned about "dappled" lighting. Shooting under a tree with the sun out often causes this problem. You see it all the time when shooting in the woods. Flash only helps a little because it lightens the lighter areas as well as the darker areas so you still have this effect. This is when overcast days work for you. The sky acts like a huge light diffuser giving you even light throughout and eliminating the dappled look.
I'm not familiar with your camera but many cameras have a meter mode called spot mode. If you point the spot meter at the dark area then it will expose for the darker area. The problem being that then the bright areas will be overexposed. So look for an area that's in the middle of bright and dark and then post process. Fill flash or reflectors are still the best.

") Maybe I'll make sun/shade photos my "homework" for this week and try to concentrate on one thing at a time.Being so inexperienced, I didn't realize the photo wouldn't work until I got it home and downloaded it to my computer... then attempted to edit/correct the lighting. Nothing seemed to work, which told me if was an error on my part with the original photo. You've given me some great advise, thank you all.
Maybe I'll make sun/shade photos my "homework" for this week and try to concentrate on one thing at a time.Being so inexperienced, I didn't realize the photo wouldn't work until I got it home and downloaded it to my computer... then attempted to edit/correct the lighting. Nothing seemed to work, which told me if was an error on my part with the original photo. You've given me some great advise, thank you all.

![[No title]](/data/xfmg/thumbnail/35/35946-771bfce9b2727c9126587d96c471da80.jpg?1619737254)
![[No title]](/data/xfmg/thumbnail/39/39498-362f11d9bfd0d9e222faa85b38801745.jpg?1619739056)
![[No title]](/data/xfmg/thumbnail/42/42059-61b97bbebb00e6276672551f4e3b3e43.jpg?1619739995)
![[No title]](/data/xfmg/thumbnail/36/36658-525087f40e1bdbfe8b995ce4296ef4a6.jpg?1619737675)