What's new

Bokeh With a Canon 24mm F/1.4 L lense

Lastimoza

TPF Noob!
Joined
Jun 18, 2012
Messages
1
Reaction score
0
Location
Orange County
Can others edit my Photos
Photos NOT OK to edit
Hello Everyone.

I was wondering if anyone here can help me shorten the learning curve on using my 24mm lens.

I started with an 85mm 1.2 and have a good grasp of controlling the Aperture for the bokeh effect I want, but I am having difficulty adjusting to my wide lens for the same effect. The reason I got the 24 f/1.2 is so I can be closer to my subjects, frame the whole body and still blur the back ground.

Can anyone help me?

Thanks

Glen
 
Hello Everyone.

I was wondering if anyone here can help me shorten the learning curve on using my 24mm lens.

I started with an 85mm 1.2 and have a good grasp of controlling the Aperture for the bokeh effect I want, but I am having difficulty adjusting to my wide lens for the same effect. The reason I got the 24 f/1.2 is so I can be closer to my subjects, frame the whole body and still blur the back ground.

Can anyone help me?

Thanks

Glen

24mm will inherently have a shallower depth of field at the same aperture due to the shorter focal length.

With an 85mm lens at f/1.4, about 5 feet from your subject, your DoF is .08 feet.

With a 24mm lens at f/1.4, about 5 feet from your subject, your DoF is 1.12 feet.

You want to be farther away, with a longer lens to isolate your subject from the background with a shallow DoF. Portraits aren't ideal for shooting at 24mm anyway. I would get a 135 f/2 or a 70-200 f/2.8.
 
With a wide angle lens, you will need more separation from the background to get the bokeh you are looking for. Check this out: Depth of Field Table
At 8 feet, f1.4 with your 85mm, your DOF will be 2.6 inches. At 4 feet with the 24mm at f1.4, your DOF will be 7.5 inches.
 
The wider the lens... the harder it is to get "bokeh". I have an EF 14mm f/2.8L II lens -- there's basically no such thing as "bokeh" on that lens. That lens practically doesn't even need a focusing ring. Just set the focus to 3' and the entire universe is in focus.

The longer the focal length, the more the lens starts to exhibit properties of "compression". Compression does two things... a near and far subject don't appear to be separated by great distances in a very long lens... but also the depth of field is "compressed" so out-of-focus areas look VERY out-of-focus (not merely mildly soft). It's very easy to achieve "bokeh" with a longer lens (e.g. your 85mm would have no problem.) But at 24mm... you'll get just a modest amount of blur on the out-of-focus areas.

When you want strong bokeh... reach for a longer lens. There are photographers who will shoot portraits with a 70-200mm f/2.8 ... or a 135mm f/2 prime, simply BECAUSE the bokeh is so strong and so easily achieved (but of course you do need a lot of room... it'd be hard to use that lens inside a studio unless it's a large room.)
 
Bokeh is not adjustable.

Many use the term bokeh when they are describing depth-of-field (DoF). DoF is adjustable.

Bokeh is inherent to mechanical and optical properties of a lens - like the number, shape, and edge finish of the lens aperture blades, and the circle of confusion (CoC) the optics produce.

In other words, the only way to adjust bokeh is to get a different lens.

Lenses having 5 or fewer, straighter, and sharp edged aperture blades usually produce harsh, jarring, nervous looking bokeh. Examples would be the Canon 50 mm f/1.8 II and Nikon's AF 50 mm f/1.8D. The Nikon lens is not as bad as the Canon lens, but both produce mediocre bokeh at best.

By contrast, lenses having 9 aperture usually deliver much more pleasing bokeh.

Note that consumer grade lenses typically have fewer aperture blades than prosumer lenses do, and prosumer lenses typically have fewer aperture blades than pro grade lenses do.
 
The "quality" of the bokeh isn't adjustable. But the intensity of it varies based on focal length and focal ratio. One challenge is that while lower focal ratios (f-stops) tend to "increase" the effect, low focal lengths tend to have the opposite effect and decrease the intensity. When you want to maximize the intensity of the effect, ideally you'd select a high focal length combined with a low focal ratio.

I did some food photography where matching bokeh between images that would appear with each other (this one was for an ad) was important.

I ultimately resorted to... (wait for it) "Photoshop Bokeh". Yes, that dreaded effect that often looks as fake as it is. So here's the results.

This first shot is actually natural. This is the result of shooting the dish at f/4 with an EF 100mm f/2.8L Macro lens. This image is not edited apart from some extremely minor tweaks. Notice the intensity of blur in the background here. f/4 was deliberate -- I needed the dish to be tack-sharp and I didn't want to go overboard on the background blur -- I wanted to make sure a viewer would quickly recognize that this is a bottle of wine, the bread, the flowers, etc. (look at this on flickr if you'd prefer to see it in a slightly larger size):


Sautéed Lake Perch by Tim Campbell1, on Flickr

This next shot involved an appetizer presented in a rectangular dish placed at an angle. This forced me to increase the depth of field to ensure that the dish itself was sharp. I had to move up to f/11 to get what I wanted here. But look what it did to the background bokeh (or rather... the lack thereof):
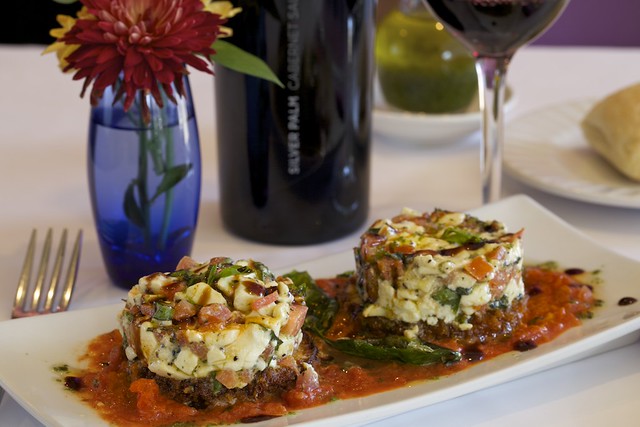

Photoshop bokeh "before" (original image as captured by camera) by Tim Campbell1, on Flickr

Since these the two shots above needed to be displayed on the same page, I didn't want such radically different effects. I decided to try the dreaded Photoshop "bokeh". I carefully selected the plate in the foreground as well as the outline of the food which goes a bit beyond the profile of the plate at the top. This went onto a separate layer. I cloned the entire image onto it's own layer so that I now have three layers. Two layers of the full photos, and one layer (on top) of just the food & plate.

I then applied a Photoshop "lens blur" to the middle layer (the layer that has the entire photo) and adjusted the intensity of the blur until it roughly matched the natural level of blur I achieved in the first image. This has one negative side-effect in that the edges of the food and plate blur into the table background in a way that looks very obviously unnatural. So the reason there are TWO copies of the background (only one of which has a lens blur effect) is so that I could use a pen to "paint" on a "clear" brush so that anything cleared would show the original non-blurred layer at the bottom. I simply needed to trace around the edges of the plate and food profile to do this and here is the result:
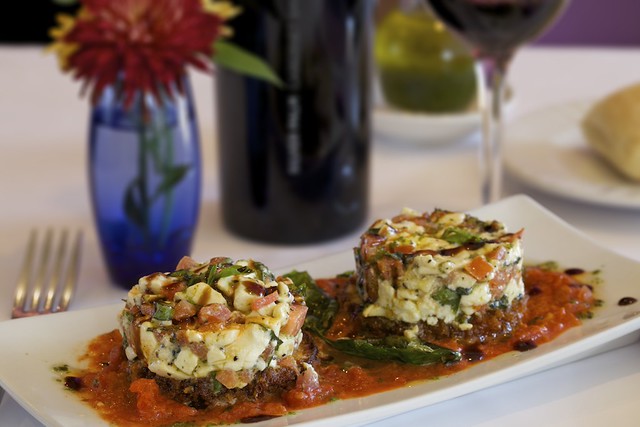

Photoshop bokeh "after" (blur filter added to background only) by Tim Campbell1, on Flickr

So there you have it... fake bokeh ala Photoshop. The only bit about the fake bokeh that really bugs me (and I am NOT a Photoshop pro... so every time I work with this, it's quite a tedious struggle for me. There are MANY people who are much better than this) is that the fork on the left side of the plate transitions from nearly focused to quite out of focus rather abruptly. I wish I had managed to blend that fork a bit better (would you have noticed it if I hadn't pointed it out?)

 
i know this is off subject but those food shots look amazing and the food looks delicious.
 

Create an account or login to comment

You must be a member in order to leave a comment

Create account

Create an account on our community. It's easy!

Log in

Already have an account? Log in here.

New Topics

Back
Top Bottom