C&C on my lighting with flash

Rgollar

No longer a newbie, moving up!
Joined
Dec 25, 2011
Messages
351
Reaction score
108
Location
Michigan
Can others edit my Photos
Photos OK to edit
april by rgollar, on Flickr

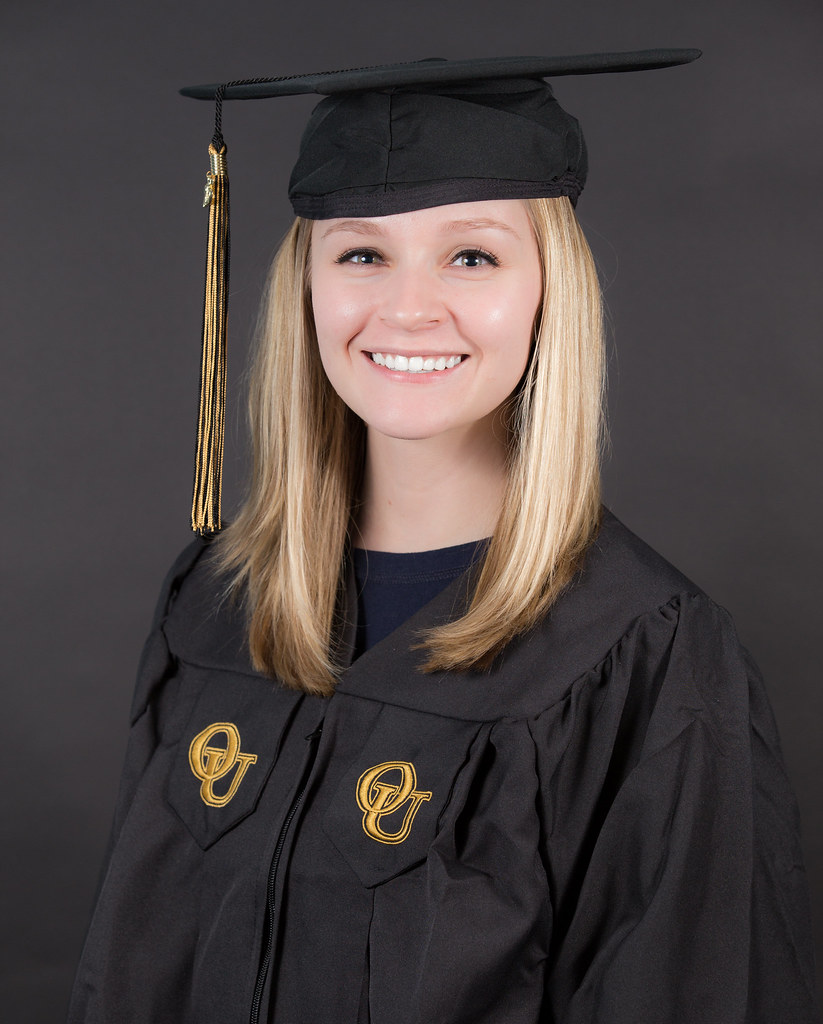
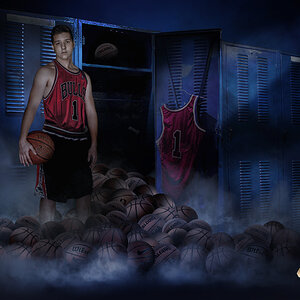
This is my first attempt at lighting with 2 speedlights. Could I please get some critique on how I can improve this picture for lighting. And does the editing look bad? I am just playing with my daughters graduating pictures for fun. So any suggestion would be much appreciated.

Looks pretty good! You can try to make one side a little bit darker (by lowering the power of the speed light on that side).

This could make the photo a bit more interesting.

Generally I would suggest to just try different things... find out what you like!

Cheers,
Andreas
 
Would makeing one side of the face have a little shadow help with the depth of face so it does not look to flat?
 
This is really pretty much "dual main lights"....or "dueling main lights" (A little photo humor there, with an emphasis on little I fear.) The left light and the right light are both creating shadows; the left light creates a very small shadow on her dimple; the right side light creates a shadow of her hair that falls on her neck. In effect, the two lights are cross-lighting her, which is a good way to light flat artwork or documents, for a relatively shadowless type of lighting that minimizes texture or shape. Her face lacks a feeling of dimension, of roundness, because the two light sources are basically each aimed in toward the center of her face, from opposite sides.

This is a simple, bright, light, airy sort of feeling, and it's not "horrible" or "ugly" lighting by any stretch, but it does lack drama and does not really convey a lot of three dimensionality. The plus or positive aspect is the relatively bright, visible eye sparkle, which is something people do tend to like.
 
Thank you Derrel for the time to c&c the photo much appreciated. I just got the Light Science & magic book so I really should read it now. Thanks again
 
One of the more challenging aspects of learning how to do portraiture using speedlights is that the shadows, and the catchlights, are not visible until AFTER an image has been shot, and then is under review on the LCD...you are in essence "shooting blind" with regard to where the nose shadow falls, where the catchlights are, etc.etc..

In many types of portrait lighting, like Rembrandt lighting, or butterfly lighting, the exact placement of the shadow created by the main light is a critical component of the success or failure. In terms of the so-called views of the face, the main light needs to be moved as the face is turned in relationship to where the lens is at, and again, with speedlights, that means each new face angle (movement of the face), or each new view of the face (shift in the camera position) means that the lighting effect SHIFTS.

The above is important to remember when doing lighting practice with speedlights. You need to look really carefully at the shadows and the highlights and where, exactly, the light or lights hit the subject--in each,specific position of the subject,lights,and the camera. This is something that many lighting books seemingly fail to mention specifically and pointedly,and I think it's one of the most important tips. I think that many experienced lighting practitioners forget some of the most-basic concepts because they have so much experience, and because the majority of them are working with studio flash units with full-time modeling lamps, and they...kind of assume a basis of knowledge that might not always be present in every student.

The more experienced a person is with lighting, the easier it is for them to put the mainlight at just the right height, or the easier it is to estimate where a light needs to be in relation to a particular head angle.

The other C&C suggestion is to put the fill light MUCH closer to the camera position. Fill light is traditionally on-axis, meaning the camera/subject or LENS axis; this is something many YouTube type videos do not convey, and it's common to see horrible cross-lighting setups diagrammed out, with the main and fill lights both raking in from counter-acting,identical angles.
 
I agree with @Derrel. The light here really lacks any form of dynamism. Having the strobes firing directly onto the face at the same power ratios is creating very flat light. There is no depth or dimension to the face. If you want to experiment with dual flashes, have a look at "clam shell" lighting. I often use it in various forms. Usually I opt for a Rembrandt style, which Derrel mentioned above. I then position another light roughly 180° degrees from this, anywhere between 1-2 stops lower in power. This creates a gentle fill and rim light (depending on the positioning of the model's head and size of modifier).

We often hear of avoiding shadows in portraits. This is primarily due to the typical family holiday snap, which tends to have god-awful lighting because there has been no forethought with regard to positioning of the subject. The truth is, shadows are as equally important to an image as the light is. Pay equal attention to both, in intensity and position. As Derrel rightly says, sometimes it needs to be very precise to achieve the desired effect. Review your shots critically at the time of capture and make adjustments as necessary. If you use monolights, you'll have a much easier time of it because you can see in real time, where the light and shadows are falling.

If you're struggling with lighting styles, I have a guide to show you some of the different types, which you can use as a foundation and build upon.
 
Thank you so much Derrel and AKUK for the helpful critiques. I will do me alot of reading and give it another go once I get a better hold on the lighting and shadows on the face for depth. I think I am going to try some monolights to help see the shadows to better educate me of where I should place the flashes. Thanks again
 
Designer said:
I have one mono light so far, and plan to get one or two more like this: Flashpoint Budget Studio Monolight Flash 120 Watt Seconds BF-120W

I looked at those, and the link for the kit with two monolights, two 40 inch convertible umbrellas, and two, 7-foot light stands for $159 seemed like a pretty good value to me. The $49 per light price is attractive. Not as flexible as the $99 Flashpoint 320M lights, which allow the use of a metal parabolic reflector and/or accessory grid and accessory barn door attachments, but for umbrella or umbrella box lights, the $49 price point for a 120- Watt-second light with modeling lamp seems like the perfect price point.
 
Your exposure is fine, and your daughter is very pretty, but the lighting is UUUUUUBER flat. Haha.

Take one of those lights out and throw up a reflector on the side of her opposite of the light you left in. Or dial down the power on one of them to create some shadow and dimension.

I'd also raise up the key light a bit (which ever light you decide to leave as the key light), and angle it down.
 
Don't get discouraged. The guys and gals on this forum are here to point you in the right direction. They have helped me tremendously! They want you to succeed. Post, post, post. The one thought that I might offer that I didn't see above, but I didn't read all the responses, maybe turn her body a little more sideways to the camera. Not completely sideways, but just a little. It slims the shoulders on female models. Beautiful young lady.
 
I forgot... If you get the itch for studio strobes, the Flahpoint 320M lights are what I use, and I love them. Granted, I haven't used any other strobes, but I'm not sure why I need to at this point. I've had the two for about two years with zero issues.
 
No I do not get discouraged especially when it helpful C&C. The more info the better. I got to admit it felt good when walmart ask for a copyright release on the pictures. Even though I know there not at a professional level it still felt good. Now practice and read alot. I just got done watching 3 hrs worth of Mark Wallace videos on lighting for photography. And I got to say it was the best $10 dollars I have spend in a long time. Now its time to practice
 
Last edited:
Mark Wallace and the Adorama Learning Center videos are very well done, and he conveys information is a very fun,friendly way.
 

Most reactions

Back
Top