What's new

Cemetery Church, Cambridge, Ma.

NancyMoranG

Been spending a lot of time on here!
Joined
May 9, 2012
Messages
2,883
Reaction score
1,055
Location
Anywhere we want! Just us And the RV
Can others edit my Photos
Photos OK to edit
Hi,
Just purchased Photomatix Pro and this is my 1st posting with this HDR program. I fooled with the basic version as a trial, and wanted to give it a go without the watermarks.
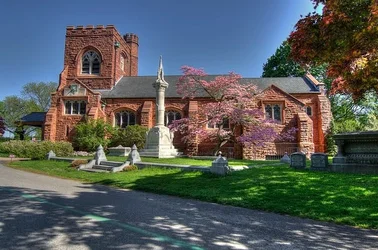
The 1st is 1 angle of the bracketed photos. As soon as I chose the 'painterly" version, it gave me the "ghosting' (?) on right side above trees. I had not done anything to it myself and it started that way. I tried "toning" down the colors ( may not be technically the right word here) and thought that would help, but didn't.
I was using 11-16 Tokina and a newer polarizer. I think some of this may be the polarizer too?

Any comments on subject is appreciated, and then on the PP.
thank you,
Nancy

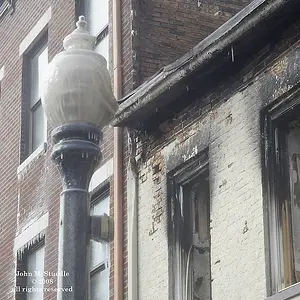
1- dark/bracket photo - No ghosting, but polarizer issue?

DSC_9634 by Nancy Moran G, on Flickr

2- 1 view -

Cam by Nancy Moran G, on Flickr

3- ghosting in trees...

Cambridge cemetary (1024x679) by Nancy Moran G, on Flickr
 
Izzie, I have PSE 11 but am new at it. How would I straighten it? I had tripod at @ 5' and tried to level the phot out I guess I missed.
Nancy
 
Izzie, I have PSE 11 but am new at it. How would I straighten it? I had tripod at @ 5' and tried to level the phot out I guess I missed.
Nancy
I use Photoshop CS5 here in my desktop. When I saw your post, I was downstairs in my laptop, I thought my view will change here in my den but it did not. I do not know PSE11. See if you can relate to this since PSE is a shorter version of the big Daddy of post processing, I will just give you a simplest solution I can think of as I do not know if PSE has a perspective option.

In the sidebar tool of your program, try to find the eyedropper. Click on it a little bit longer than usual and you may see a drop option. Look for a ruler.

Click on that ruler and find a straight line at the top of your shot. I will choose the grey roof from the first shot first. Then click outside your left frame where you can see an 'X' clearly. Hold down your CTRL button and move your mouse to the right. Make sure that the line is hitting all of the grey roof. Release your CTRL button. You can adjust if it is not straight by grabbing one end of the 'x' and move it. Then adjust to your satisfaction.

Now go to Image/Image Rotation/ click on Arbitrary. A window will open up with some numbers. Just click OK and you will see your image is straight already. Another alternative is to go at the top of the window where there is the icon of the ruler on the far left side. It will show measurements for 'x' and 'y'. Further on there will be an option that says "Straighten". Click that and your photo will be straighten. You are finished with this one.

Now the most simple way I can think of is holding down your CTRL button and look for the 8 small selection squares of your image when you select your image it is there. Hold down your CTRL button and move one of the top selection squares left to right or right to left whichever way you see that your image is straighten.

I am doing this at the top of my head using Photoshop so I do not know if this applies to PSE, but try. If all else fails, google :
1) Rules in PSE 11
2) How to straighten a photo in PSE 11

I am sure you will come up with a lot of webpage explaining this method using your software. Hope I am able to help.
Izzie

P.S. I think I remember seeing your name in Cambridge in Color at some stage. I am hanging out here now.
 
Thanks Izzie, will give that a try!
Yup, the only other forum I am on is CIC. I have seen you there too :0
N
 
I am giving CiC a rest from me at the moment. Who knows I might go back. I like it here after doing a search so I decided to stay here. I find that navigating here is much more easier and I can copy and paste stuffs, tips that I like for my personal note taking to remember it later on. In CiC I do have a problem with that...I like the format of their photo uploading though...
 
Nancy,
Good start. You might try fusion instead of tonemapping in Photomatix.
Would be good to limit haloing. Then correct for distortion (leaning back) and level the image after.
There are a lot of options in Photomatix and it takes a bit of playing to learn it.
 
Thanks Rick. I am still learning what each 'method' does to a photo. Will play with fusion and see.
I would say that this is the type of HDR result I would be looking for in 99% of my photos, instead of overlooked.
Nancy
 
Get yourself Adobe Lightroom 5 it will straighten most of your pics automatically and is not that hard to learn the basics of it.
$14058966919_0686c56683_z.webp
 
Glad I could help,you should really look into getting Lightroom and shooting in raw mode you'll be glad you did....... Actually it's big al !
 
Nancy... IzzieK pointed out how to level out the picture so that's one down.. Now let me see if I can help you with the Ghosting issue.

When you load up your bracketed photos you'll be presented with the screen for "Merge to HDR Options"
Make sure "show Options to remove ghosts" is checked.
Make sure "Reduce Chromatic Abberations" is also checked
Click on Align and Show Ghosting.... wait for it...

Now you'll be presented with the Deghosting Options.
The default is Auto with the slider all the way to the left showing ZERO
Play around with that slider until you get the desired effect you want in your preview pane.

I "usually" leave mine at Zero, but recently while doing the same type shot as you on my Oak Hills Chapel, I actually turned it up to 100 to solve my issue after 5 attempts.

I hope this little bit of advice helps, and hope to see more HDR.. they way we like it :)
 
Nancy, your colors look great and I like the overall feel of the image. I wanted to offer some advice on how to deal with the haloing problem that's inherent to HDR, especially when you're going for a more tonemapped look.

Many times, it can be a very successful strategy to take your metered exposure from the base images you capture, and bring it and your finished HDR image into Photoshop as two layers stacked on top of each other. Using your preferred selection method (my personal favorite is Topaz Remask) and select the sky areas where haloing is an issue. Then simply mask in the sky from your original metered exposure to fix the issues. Use blending modes and the opacity slider to fine-tune your results, and then you're good to go!

This method works best if you're using a tripod to capture the images originally, as it's really difficult if the images don't line up well.

Hope that helps!
 

Create an account or login to comment

You must be a member in order to leave a comment

Create account

Create an account on our community. It's easy!

Log in

Already have an account? Log in here.

New Topics

Back
Top Bottom