What's new

Close up "shots" of my main hobby. CC please

Biggs88

TPF Noob!
Joined
Oct 23, 2010
Messages
154
Reaction score
2
Location
Philadelphia, PA
Can others edit my Photos
Photos OK to edit
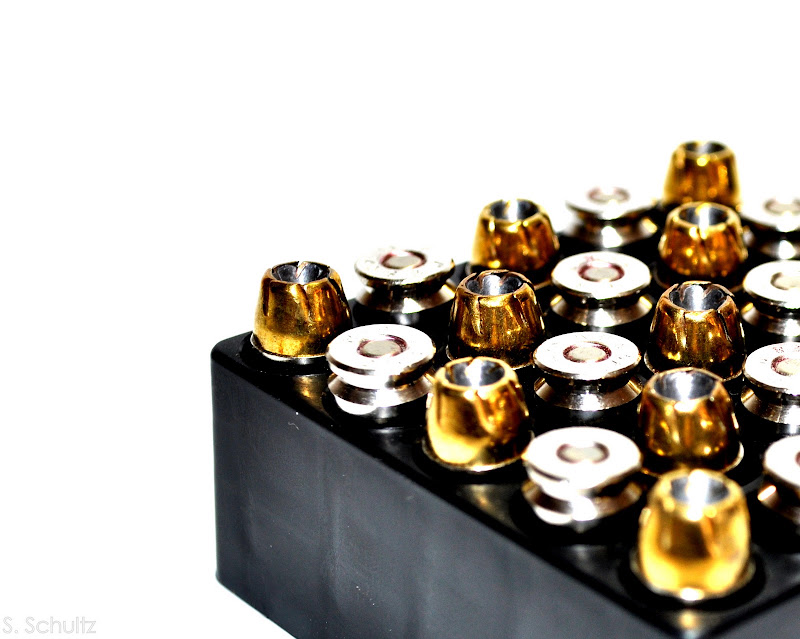
Thought i'd try useing a white poster board as a backdrop and see what came of it. Not thrilled about the photos, guessed you guys could tell me how to better the shots.

Thanks!!!

Picture%20118.jpg


Picture%20119.jpg


Picture%20121.jpg


** ok guys, I have been trying new lighting and playing around more in Picasa.

Here are a few I just did:
I tried to reduce the shadows
Picture%20127.jpg


Picture%20125.jpg
 
Last edited:
C&C per req:

1. DoF and lighting are the main issues I see here. Large, unfocused foreground elements rarely work, and I don't think they do here. I would much prefer to see the two rounds in the foreground tack-sharp, and the focus receding over the container. You also need some fill-light to illuminate the side of the box so it doesn't appear to be one large, black area. Lastly, move the subject further from the background and use a kicker to blow it out and eliminate the curve and the shadow.

2. This one's not bad, again more light needed, this time to illuminate the rear of the slide and butt and kill some of the shadows.

3. Not as fond of this one; the unfocuse foreground area of the butt and the dark area image left really kill it for me. As well, I don't think the composition is nearly as strong as #2. What's the device inside the trigger-guard?

Just my $00.02 worth - your mileage may vary.

~John
 
Throw in golf, and your hobbies look like mine. :lol:

The shots aren't bad, but I think you need better light. I'm not experienced at this type of photography, so take my advice with a serious grain of salt.

I think you need a couple of soft boxes... some cross light as well as down light to make these look more "professional" - again I'm sort of guessing based on what I've read, I really have no experience with this type of photography.
 
C&C per req:

1. DoF and lighting are the main issues I see here. Large, unfocused foreground elements rarely work, and I don't think they do here. I would much prefer to see the two rounds in the foreground tack-sharp, and the focus receding over the container. You also need some fill-light to illuminate the side of the box so it doesn't appear to be one large, black area. Lastly, move the subject further from the background and use a kicker to blow it out and eliminate the curve and the shadow.

2. This one's not bad, again more light needed, this time to illuminate the rear of the slide and butt and kill some of the shadows.

3. Not as fond of this one; the unfocuse foreground area of the butt and the dark area image left really kill it for me. As well, I don't think the composition is nearly as strong as #2. What's the device inside the trigger-guard?

Just my $00.02 worth - your mileage may vary.

~John

Thank you very much for the advice! As you guessed, the lighting was bad. One desk lamp to be exact. LOL

I will play around with apature to get everything sharp. Sad to say, I just used the "Macro" setting on my D5000.

*Still in the basics sad to say!

There is a small pocket knife in the trigger guard of photo 3 to hold the firearm up a little.
 
Throw in golf, and your hobbies look like mine. :lol:

The shots aren't bad, but I think you need better light. I'm not experienced at this type of photography, so take my advice with a serious grain of salt.

I think you need a couple of soft boxes... some cross light as well as down light to make these look more "professional" - again I'm sort of guessing based on what I've read, I really have no experience with this type of photography.

Thank you for the help. I plan on getting more lighting options like soft boxs, but I just want to get the basics covered first. I am going to get a lesson just to get a real understanding of the concepts. Then a zoom lens, then the lights.

Don't worry about picking up the softboxes until you pick up a good flash unit. The SB600 is a *phenomenal* flash used by nearly every major photographer in the world...and they can be had semi-cheap if you buy used. If you want to do photography like this you might want to look into that *first*. It'll help to provide all the light you might need and it can be bounced all over the room, if required, to even out the lighting.

Once you get a good flash unit...the rest will most likely be pretty easy. Definitely throw focus on the foreground in the first pic and if you can stretch the DoF to about halfway through the box of rounds it would look pretty great (so the rounds toward the back are almost completely out of focus). The second picture just needs a larger depth of field and maybe some off-camera lighting (to light the butt of the gun and also the front of the action). 2 flashes, or a flash on one end and a standard bright light on the other should do the trick nicely. As for the third one, basically the same thing. Need to increase the DoF enough to encapsulate the entire firearm...which usually just needs more lighting. If you have a white ceiling then a flash bounced straight down from the ceiling would do it (meaning, the flash would be pointed straight up).
 
There is a small pocket knife in the trigger guard of photo 3 to hold the firearm up a little.

Sometimes it's best to have a light tent that can either be turned or opened from the top so you can just shoot straight down at items that won't sit up easily. I've also seen homemade ones with the "camera hole" high on one side to allow a 30-60 degree angle down on the subject.
 

Create an account or login to comment

You must be a member in order to leave a comment

Create account

Create an account on our community. It's easy!

Log in

Already have an account? Log in here.

Back
Top Bottom