Cotton Candy Sunrise

JustJazzie

Been spending a lot of time on here!
Joined
Jan 21, 2013
Messages
3,793
Reaction score
1,732
Location
Bailey, Colorado
Can others edit my Photos
Photos OK to edit
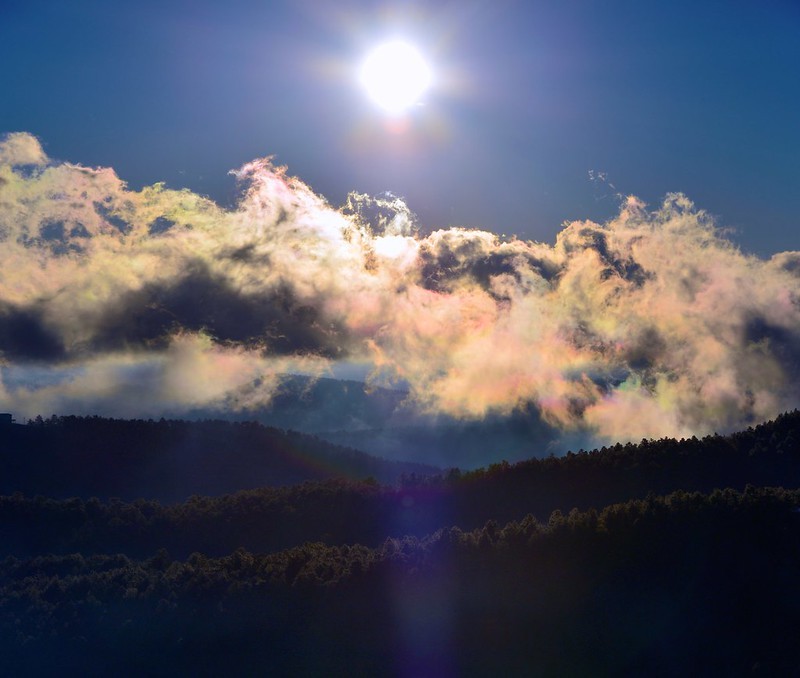
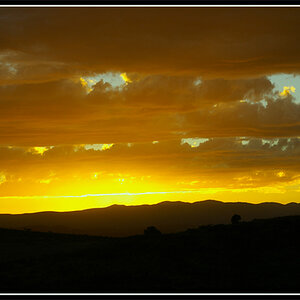
I woke up this morning to some extremely dense fog, and the sun emerging from the clouds rapidly. I ran outside without shoes on took a few shots, then ran back inside for some shoes. I suppose the frost on the deck should have been my first clue that bare feet were not appropriate. From the time I woke up, until the sun was fully over the clouds was only about 15 minuets.

I almost posted these in the just for fun section, since they just didn't come out as I wanted. I was originally wanting to try an HDR, but as usual when I attempt this it just didn't work. I am hoping one day that process clicks for me. I accidentally switched my camera into tiff mode, so no raws to work with either. Apparently my 28-105 has some awfully strong lens flare when shooting into the sun, good to note. All that said, how could I not share? It was a BEAUTIFUL morning!

Im not liking the green/yellow hue in the clouds. Any way to altar that to a prettier green without changing the other hues??

1)
16139677400_f62ef3613c_c.jpg

2)
15704508244_abfe16770c_c.jpg

3)
16300991426_b3f318d377_c.jpg
4)
16326942275_14e13bc592_c.jpg
 
Last edited:
I LOVE that first shot! Glad you didn't manage to do the HDR on that! I also hope you'll keep the blues and yellows together in that one - perfect complimentary colours!

Do you use Photoshop?

If you do, open a saturation adjustment layer and click the little finger with two arrows either side (next to the drop down that says "master"), your curser will change to a dropper. Click the dropper on the colour you want to change then push your hue and saturation slider all the way up. Now grab the little slider at the bottom with the colours above and below it and drag it in one direction or the other until just the colours you want to change are highlighted.

Return your hue and saturation sliders back to zero, now play with just the hue slider until you have the colour you want - it won't affect any of the other colours in your image :)

Do a new adjustment layer for each colour you want to change - not all in the same layer - it'll make it easier undo any if you change your mind. ;)
Thanks! I actually wasn't attempting hdr in the first shot, just the others where I was trying to get a wider angle. (Most of these are cropped a bit since the other plan failed. I'll try the method you suggested when I can get back to my desktop tonight! Thank you so much for the instructions.
 
Nice, Jazzie; I can certainly see why you wanted to capture it!

I LOVE that first shot! Glad you didn't manage to do the HDR on that! I also hope you'll keep the blues and yellows together in that one - perfect complimentary colours!

Do you use Photoshop?

If you do, open a saturation adjustment layer and click the little finger with two arrows either side (next to the drop down that says "master"), your curser will change to a dropper. Click the dropper on the colour you want to change then push your hue and saturation slider all the way up. Now grab the little slider at the bottom with the colours above and below it and drag it in one direction or the other until just the colours you want to change are highlighted.

Return your hue and saturation sliders back to zero, now play with just the hue slider until you have the colour you want - it won't affect any of the other colours in your image :)

Do a new adjustment layer for each colour you want to change - not all in the same layer - it'll make it easier undo any if you change your mind. ;)

Oooh, useful information! Because I've wondered before how to do this!
I'm sure Jazzie will get it right off, but let's pretend for a moment that I'm just a little "slower" than most… :D
I'm with you, I think, until about midway through. When I push the hue and saturation sliders up, the entire photo goes all Andy Warhol on me, even though I selected a specific area with the dropper. And I can't seem to make the slider at the bottom effectively highlight only the color I want to change.

Gonna have to play with this some more. Maybe I can find myself a simpler photo to start with.
 
Wow, beautiful view you have! Love that first one, the colors are gorgeous. Thanks for sharing.
 
The lens flare is a problem but it's a matter of angle. Try angling your lens to minimize the lens flair or so the flair works with the photo. Do you use Lightroom? The green you see is actually yellow and orange combined and can be toned down by individual color in Lightroom. Here is a quick edit to show you the clouds and I tried to minimize the lens flair but it was bad so it's still there. I will post an example of slight lens flair that I think works. Here is your photo first. Just my take so it may not be your cup of tea.

RE-touch.jpg


Here is mine with slight lens flair but depending who you ask it works.

Idaho_clouds (1 of 1).jpg
 
I LOVE that first shot! Glad you didn't manage to do the HDR on that! I also hope you'll keep the blues and yellows together in that one - perfect complimentary colours!

Do you use Photoshop?

If you do, open a saturation adjustment layer and click the little finger with two arrows either side (next to the drop down that says "master"), your curser will change to a dropper. Click the dropper on the colour you want to change then push your hue and saturation slider all the way up. Now grab the little slider at the bottom with the colours above and below it and drag it in one direction or the other until just the colours you want to change are highlighted.

Return your hue and saturation sliders back to zero, now play with just the hue slider until you have the colour you want - it won't affect any of the other colours in your image :)

Do a new adjustment layer for each colour you want to change - not all in the same layer - it'll make it easier undo any if you change your mind. ;)
Thank you! I think I figured it out. Ill have to figure out how to perfect it now!
Nice, Jazzie; I can certainly see why you wanted to capture it!


Wow, beautiful view you have! Love that first one, the colors are gorgeous. Thanks for sharing.

Thank you! That was the first shot that brought me outdoors before coffee to begin with!

The lens flare is a problem but it's a matter of angle. Try angling your lens to minimize the lens flair or so the flair works with the photo. Do you use Lightroom? The green you see is actually yellow and orange combined and can be toned down by individual color in Lightroom. Here is a quick edit to show you the clouds and I tried to minimize the lens flair but it was bad so it's still there. I will post an example of slight lens flair that I think works. Here is your photo first. Just my take so it may not be your cup of tea.

View attachment 93658

Here is mine with slight lens flair but depending who you ask it works.

View attachment 93659

Thanks. I didn't think about really angling the camera, (think before coffee? Is that even possible?) I will try to play with my angles a bit more next time!!

Thank you!
 
Nice, Jazzie; I can certainly see why you wanted to capture it!

I LOVE that first shot! Glad you didn't manage to do the HDR on that! I also hope you'll keep the blues and yellows together in that one - perfect complimentary colours!

Do you use Photoshop?

If you do, open a saturation adjustment layer and click the little finger with two arrows either side (next to the drop down that says "master"), your curser will change to a dropper. Click the dropper on the colour you want to change then push your hue and saturation slider all the way up. Now grab the little slider at the bottom with the colours above and below it and drag it in one direction or the other until just the colours you want to change are highlighted.

Return your hue and saturation sliders back to zero, now play with just the hue slider until you have the colour you want - it won't affect any of the other colours in your image :)

Do a new adjustment layer for each colour you want to change - not all in the same layer - it'll make it easier undo any if you change your mind. ;)

Oooh, useful information! Because I've wondered before how to do this!
I'm sure Jazzie will get it right off, but let's pretend for a moment that I'm just a little "slower" than most… :D
I'm with you, I think, until about midway through. When I push the hue and saturation sliders up, the entire photo goes all Andy Warhol on me, even though I selected a specific area with the dropper. And I can't seem to make the slider at the bottom effectively highlight only the color I want to change.

Gonna have to play with this some more. Maybe I can find myself a simpler photo to start with.


Going "Andy Warhol" on you is correct :)

While it's all Andy Warhol, you can change the colour slider at the bottom and the Andy Warhol will change over the image. If you look at the slider it has four little grabbable notches on it. You can widen or narrow those notches to broaden or restrict the colours that you want to change. If you pull the slider to the left, reds and magentas will remain Andy Warhol-ey, if you push it the other way, yellows and greens will be Andy Warhol-ly. Once only the colours you want to change are Andy Warhol-ly, then you can return the saturation and hues sliders to zero (we only push them up so we can more easily see which colours have been highlighted). Now when you push the hue slider to the left or right, it will colourize those areas to red/magenta (left) or green/yellow (right).

So, if you want to reduce your reds and magentas, pushing the hue slider right will colourise those with yellow/green which will cancel out the reds/magentas and vice versa.

It can take some practice to get it right - it's easy to push it too far and it can start to look blocky, so just ease it up or down until it's just about cancelled out the colour you don't want. If you find you've change some colours that you didn't want, you can always mask it off and paint it back in.

Hope that's a bit clearer! :D
 

Most reactions

New Topics

Back
Top