Dress Up - Second go at OCF, first go with the softbox

I never said anything about putting it far away. Keep it close to the subject. A softbox usually has a mid baffle to spread the light more to avoid what you were saying.

if you have only one light and dont want shadow, put the subject farther away from the background and or raise the light. That way the shadow will be below the frame and not on the wall. As far as 8"x36" softbox, why not? It is bigger than a bare flash.

Because if you get it far enough away from the subject to light anything bigger than a pop bottle... the light will be just as hard as using bare flash. The way a flash puts out light... I bet there is one big hotspot in the middle of the softbox.. with very light light at either end. Hardly optimal...

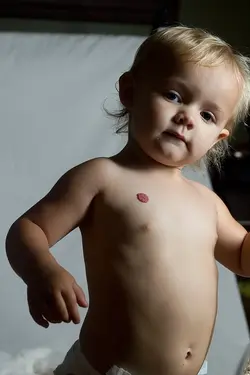
Did you notice on the kid above.. the light pattern? The light all chest width with immediate falloff as you got to the edges of the chest, can't even cover the width of one child (unless you move it farther back.. and then it gets hard)... not even soft lighting... which is why this softbox is to small to use as a Main on people or even kid size subjects...
 
I would ad a little fill from the left, maybe a reflector. Also, what size was your softbox and how far away was it? Seems like a smaller light source. Just my own opinion but the light looks a little hot and hard for nice smooth baby skin.

It is an 8"x36" as mentioned earlier in the thread. And I agree... too small for the subject, too hot center, with too much fast falloff one edges.
 
I never said anything about putting it far away. Keep it close to the subject. A softbox usually has a mid baffle to spread the light more to avoid what you were saying.

if you have only one light and dont want shadow, put the subject farther away from the background and or raise the light. That way the shadow will be below the frame and not on the wall. As far as 8"x36" softbox, why not? It is bigger than a bare flash.

Because if you get it far enough away from the subject to light anything bigger than a pop bottle... the light will be just as hard as using bare flash. The way a flash puts out light... I bet there is one big hotspot in the middle of the softbox.. with very light light at either end. Hardly optimal...

A few people here seem to be confusing a "strip light" with a "softbox". Pretty common mistake to make. Strip lights make crappy main lights. They were never designed to be "main" or "key" lights for portraiture. They are fine for lighting SMALL, and SPECIFIC areas, but they absolutely suck as broad area lights, because they are designed to RESTRICT the light beam. Strip lights were originally designed to work with "real" studio flashes, which radiate light in all directions, from a pretty big, 360 degree circular flashtube. A speedlight on the other hand, has a teensie little strip of flashtube, about the size of half a cigarette. In a shallow, cheap, Chinese-made strip box, the flashtube is often about four inches from any baffle, and there really is little "spread"of the light inside the strip box. So, while the front is 8x36, a speedlight's dinky little flashtube, aiming straight ahead, might not always work the way a strip light was designed to work.

A strip light is NOT a "softbox". A softbox has some depth between the flashtube, and the internal baffle, allowing flash to spread out some. One of the bigger problems with using speedlights in light modifiers that were never engineered for speedlights is that the device often will not really "fill" with a speedlight's output, which is at close ranges, a tiny little rectangular emission of light; in cramped spaces like inside a strip light, or even in parabolic deep-bowl umbrellas, the majority of modifiers were designed to work best with a broad, circular, 360 degree, wide-angle FLOOD of light, flooding the entire surface, and then being reflected out evenly.

As the tests at Robgalbraith.com confirm, even an inch or two difference in exactly WHERE a light is positioned can make a HUGE difference in total light output. Buff makes a speedlight-offset mounting device for its PLM parabolics which greatly increased output, by moving the flash about 1 and 3/4 inches! A butter knife is not a fillet knife.
 
Last edited:
Like this John?

Umbrella%20for%20erose%201-L.jpg


Sorry but I already had this on camera left and at a greater angle than John mentioned..

:lol: Yes, exactly like that... I never remember about that 'site!
 
OK - to clear things up.

I used an 8x36" gridded softbox, commonly called a strip softbox - like Derrel said, not an LED strip light kinda thing.

It has an inner diffuser, as Robin mentioned.

Here another when she ran closer to the light, with (I believe) same flash/camera settings. I can see the more/less (this is inverse square, right?) light as described earlier.

$_MG_7705 copy.jpg
 
adding lights to the shot is as simple as bouncing them in a Mirror from around your house. Use one to bounce the main light back from behind the subject to create a rim light, use something white or reflective camera left as a fill.. BAM 3 point light setup. now for background, I would ad another light source unless you want the muslin ruffled/wrinkled look.
 
adding lights to the shot is as simple as bouncing them in a Mirror from around your house. Use one to bounce the main light back from behind the subject to create a rim light, use something white or reflective camera left as a fill.. BAM 3 point light setup. now for background, I would ad another light source unless you want the muslin ruffled/wrinkled look.

I'm going to give it another go with a silver reflector added in.
 
Yes, you are seeing the effect of the inverse square law in this most recent shot; one side has a lot of light, while the other side of her has fallen off into blackness, across a span of the width of a toddler's face. Which is not necessarily a bad thing, it's just that a bright, light, airy feeling to the lighting is not what that modifier gives, so the white background doesn't coordinate super-well with such high-ratio lighting, dropping to gray. I think a darker-toned backdrop would look good with this higher-ratio lighting. The lighting shows a lot of shape, and gives dimension. Adding a reflector just outside of camera range should lighten up the shadowed side a pretty fair bit, as long as the reflector is actually aimed right to catch the light and bounce it; not surprisingly, I see a ton of lighting diagrams that show reflectors placed in a manner that they will not actually be doing much 'reflecting', so, make sure the angle of the reflector is where it can "see" the main light's beam.

If you want to use it as an "area light" I would most definitely remove the grid; the grid makes the light fall off EVEN-more rapidly, and prevents the light from going off to the background. The grid makes the light more-confined, makes it fall-off in intensity faster, and keeps the light "localized", so that it does not spread out much at all. A grid is useful for containing,restricting the light, and it really does help keep light from hitting the background or other nearby parts of a scene.
 
The exposure on the subject wouldn't look nearly so hot if it wasn't for the over-exposed sheet that takes up half of the image on the right side. Nothing that's not fixable in post anyways - I don't see any blown highlights on her (except for her diaper).

Assuming you had the flash in manual, I would try doubling the distance from the background to her, and then doubling the distance from her to the flash (or decreasing the flash power by a stop, maybe even a stop and a third) and leaving everything else the same. The white background would fall to a more even shade of grey, and her shadow may fall outside the frame to the left. If you wanted to keep the background white, you'd need to light it separately.

(FAIL POST - didn't notice there was more than one page until after I posted, and thus my advice has been covered and covered again, so just ignore me and move along).
 
Last edited:
With some help from our very own e.rose in the editing department, here's a new version. I didn't do nearly as much to this in post as I did in the OP.

$_1.jpg
 
It may throw the size outside of a standard print size, but I would like to see as much air space at the bottom of the pearls and the bottom of the page as you have between the hands and the top of the page.

The edit looks good except the noise in the shadow. I'm seeing hints of green and magenta, even though my reminder to recalibrate popped up today.
 
With some help from our very own e.rose in the editing department, here's a new version. I didn't do nearly as much to this in post as I did in the OP.

<img src="http://www.thephotoforum.com/forum/attachment.php?attachmentid=50311"/>

MUCH better, Chica! :thumbup:
 
No comments on softboxes or main lighting, that's been well covered (new edit has the lighting on the Princess about as close as you're going to get). After seeing the cute pic of your toddler the second thing that jumped out at me was the backdrop picture left. Stretch your muslin backdrop tight with lots of clamps, I picked up ten cheapies off Ebay for less than £5, they look cheap but they work! That sorts out the folds (they're too big to be called wrinkles) For the wrinkles that remain I use a hand held steamer picked up for £5 from a charity shop. Move your subject further away from the backdrop so shadows are softer (3 or 4 feet+). Light the backdrop separately (if the main light is subject left and I only had two lights I'd use the backdrop light subject right). If wrinkles still show (they do sometimes) I dodge them to heck and back in post. :)

From the looks of the little lady you will have fun practicing.
 

Most reactions

New Topics

Back
Top