
hartz
TPF Noob!
- Joined
- Aug 23, 2010
- Messages
- 117
- Reaction score
- 3
- Location
- Cape Town
- Can others edit my Photos
- Photos OK to edit
I decided that it is time to take the plunge and start learning how to post process to make my photos better. I took my son on a hike along with a group up Lions Head and got a few of my favorite shots, of which I decided a few could do with post processing.
I love being out doors, in nature. Mountains are possibly my favorite things in the world, and the harsher, harder, rockier, the better. I think it is probably because man can't make mountains.
The day was actually fairly overcast and created some drama. In especially the shot of the cable car house I wanted to "recover" some of that drama, and to also show the larger than life presence of the mountain.
I've been reading up about post processing online but would welcome some more suggestions for tutorials. In the mean time I am looking for C&C about the outcomes.
I've created a simple little gallery showing the originals Straight out of camera, and alternate processing outcomes, so I will just link the final results here for easier viewing and because many won't go to external sites. How would you have done it different? Do you like the end result? Sometimes I wonder whether I didn't actually just make the photo worse? Some moments I imagine someone might actually print some of these large!
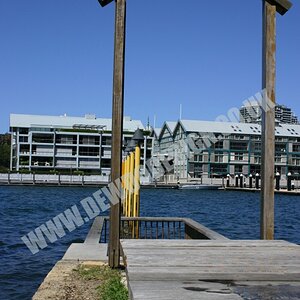
1. Cable Car House on Table Mountain.

I processed this one several times, starting over and just seeing how it came out.
The next one I thought looked much more dramatic in B&W. Did I get it right?
2. Lions Head from below in B&W

I think I should do a bit of perspective control on this one to give it more presence, essentially by giving the top more weight.
3. Kids

Again, shot from below, some perspective control is something I'm thinking about but have not tried yet...
4. Path.

You are welcome to check out the whole gallery. Sorry that it is so slow. Also feel free to C&C the photos, eg angles, technique, etc.
Thanks for your time.
I love being out doors, in nature. Mountains are possibly my favorite things in the world, and the harsher, harder, rockier, the better. I think it is probably because man can't make mountains.
The day was actually fairly overcast and created some drama. In especially the shot of the cable car house I wanted to "recover" some of that drama, and to also show the larger than life presence of the mountain.
I've been reading up about post processing online but would welcome some more suggestions for tutorials. In the mean time I am looking for C&C about the outcomes.
I've created a simple little gallery showing the originals Straight out of camera, and alternate processing outcomes, so I will just link the final results here for easier viewing and because many won't go to external sites. How would you have done it different? Do you like the end result? Sometimes I wonder whether I didn't actually just make the photo worse? Some moments I imagine someone might actually print some of these large!
1. Cable Car House on Table Mountain.
I processed this one several times, starting over and just seeing how it came out.
The next one I thought looked much more dramatic in B&W. Did I get it right?
2. Lions Head from below in B&W
I think I should do a bit of perspective control on this one to give it more presence, essentially by giving the top more weight.
3. Kids
Again, shot from below, some perspective control is something I'm thinking about but have not tried yet...
4. Path.
You are welcome to check out the whole gallery. Sorry that it is so slow. Also feel free to C&C the photos, eg angles, technique, etc.
Thanks for your time.
")


![[No title]](/data/xfmg/thumbnail/32/32161-a5da499a329f1fae945778aac75d4442.jpg?1619735234)

![[No title]](/data/xfmg/thumbnail/37/37614-3833b9d2e46075829c91cf9c0f47af69.jpg?1619738150)