Which is why good image editing software allows 'soft-proofing' so we can see a good approximation of what a print will look like before we send it off to the print lab.
To soft proof you need the ICC profile combo of the machine that will be making the print and the paper the print will be printed on.
Understanding Soft Proofing - Luminous Landscape
Soft Proofing: Matching On-Screen Photos with Prints
Soft proofing from the Course Lightroom 5: 05 Printing
Printing & Soft Proofing « Julieanne Kost's Blog
PPI is the print resolution. PPI and the image pixel dimensions determine the size of a print.
As prints get larger they are viewed from further away. Viewing from further away reduces the need fort print resolution (PPI).
Now here is kicker #1- most chromogenic print machine's raster image processing (RIP) software basically maxes out at 250 PPI.
Most of the good online labs have a minimum print resolution limit of about 100 PPI that they stake their reputation for making quality prints on.
If the photo you want them to print falls below their print resolution limit, THEY WILL REFUSE TO MAKE THE PRINT.
Upload to them as many pixels as you can.
In other words - Do your composition in the camera viewfinder so you don't have to crop (discard pixels) post process to make a photo 'work' composition wise.
That way you always have the maximum amount of pixels for the lab to work with.
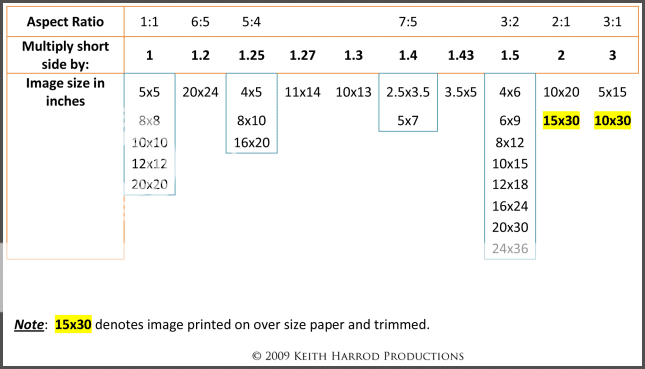
Which brings us to kicker #2 - aspect ratio. (see graphic below)
Nikon DSLRs make photographs that have a 3:2 aspect ratio - a rectangle whose long side is 1.5x longer than the short side.
Some print sizes are a different aspect ratio and the only way to make a 3:2 photo print at 5:4 is to crop (throw away some pixels) some of the 3:2 photo away.
And we will finish with kicker #3.
With most print labs, if you don't let the lab color correct your photos they do not guarantee their prints.
Some additional info on preparing a digital photo for printing:
Real World Image Sharpening with Adobe Photoshop, Camera Raw, and Lightroom (2nd Edition)
The Digital Negative: Raw Image Processing in Lightroom, Camera Raw, and Photoshop (2nd Edition)
The Digital Print: Preparing Images in Lightroom and Photoshop for Printing


![[No title]](/data/xfmg/thumbnail/31/31705-3469470a562bc1a3bad361889544af19.jpg?1734160378)
![[No title]](/data/xfmg/thumbnail/42/42067-88a229e814afcfc8848b3e293d8113d9.jpg?1734176466)


![[No title]](/data/xfmg/thumbnail/42/42066-badd1780980376f04f261f985a608adf.jpg?1734176465)


