Garbz
No longer a newbie, moving up!
- Joined
- Oct 26, 2003
- Messages
- 9,713
- Reaction score
- 203
- Location
- Brisbane, Australia
- Can others edit my Photos
- Photos NOT OK to edit
There's a lot of people who try to dab into IR photography time and time again. There's really only two options to produce fantastic IR results, shoot film, or shoot with a modified digital camera.
Digital sensors are HIGHLY sensitive to IR, so much so that there is a filter placed on the sensor that tries to block IR (called low-pass filter, or I've heard it referred to as a hot-mirror which IMO is a crap term). Putting an IR pass filter (high pass filter) on the lens like a Hoya R72 will then naturally cause problems as between the two filters you block most of the visible light. Additionally in some cases it's actually possible to get a reflection of the sensor on the IR filter leading to "hotspots" in the images.
SOMETHING MUST BE DONE!
So without further ado I present our victim for the day:

The Olympus C-730 4mpx was a beast for many years. At the time it cost me more than any entry level DSLR. It features manual focus, complete manual, A S and Auto modes, as well as ... manual white balance. The only thing missing from this now is RAW, but since I'm not made of money this will have to do.
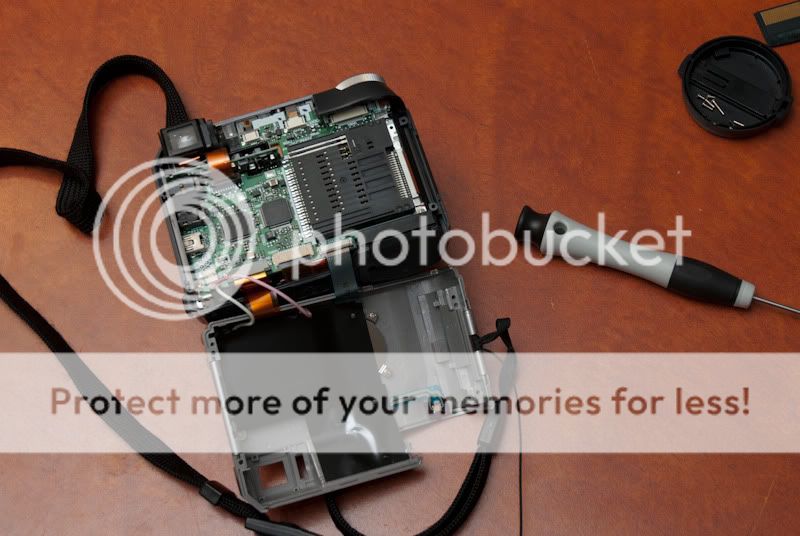
You'll need a #00 jewellers screwdriver to get the tiny screws out. Many manufactures will hide the screws in the battery compartments, under grips, and under the card cover, so open every door when looking for screws. Cameras are not iPods, they should come apart with no force once all relevant screws are removed.
DO NOT USE FORCE. Attached to the back cover will be a ribbon cable connecting electronics to the mainboards. These are incredibly easy to tear and nearly impossible to repair. At best pry the case open but never do anything that will result in suddenly opening more than 20mm or so should the case suddenly give way.
See? That's what I'm talking about. Those little ribbon cables are connected to surface connectors held in place by a piece of plastic which compresses the connectors.
NOW WE STOP! Somewhere in this case is a 330V 230uF capacitor. Fully charged. Touching them the right way hurts like all hell. Touching them the wrong will can kill you. Accidentally shorting them out with something metal will cause an ungodly bang and melt the end of your screwdriver.
You can discharge the capacitor by putting a 1kohm resistor across the terminals. My standard resistor is glued to a paddlepop stick so I'm no where near it. Or you can proceed with extreme caution. I work with this crap on a daily basis so I'm going to proceed. If you're not confident find a friend who's doing electrical engineering and seek their help. Consider yourself warned")
To remove the ribbon cables, using your screw driver very gently push those tabs away from the connector. Once both sides have slid out the cable should be free to move out.
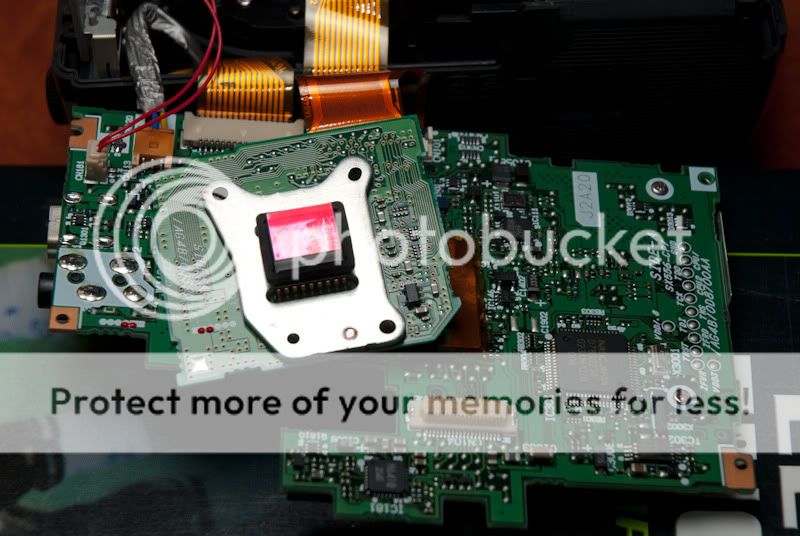
Now we must remove the motherboard. Often the sensor will be on a daughter board connected by another ribbon cable behind it. Sometimes there's only one board in the camera. YMMV. Also again manufactures like to hide screws. Again remove the board carefully so to not tear any connections off from below. Again be careful, there's a capacitor in there somewhere.
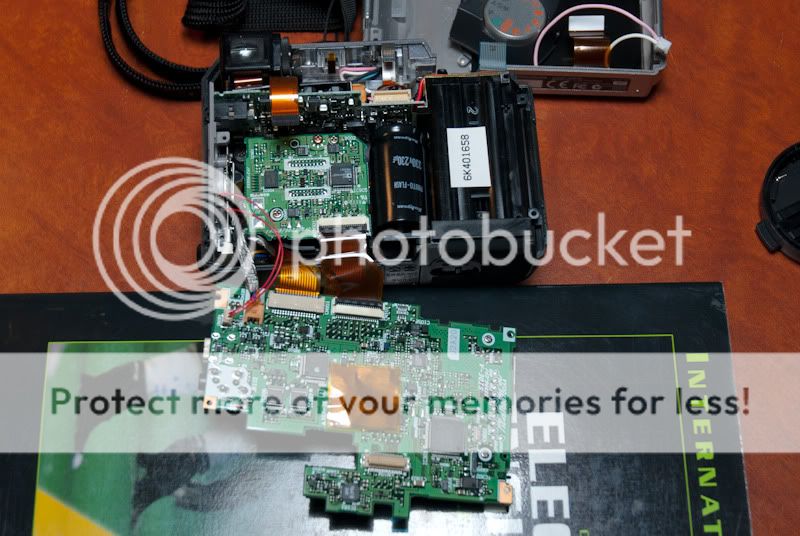
Told ya so. The big black thing is dangerous. Keep away. The big green thing is the sensor daughterboard (analogue to digital converter sits there too). I suggest you don't touch the board if you're working on carpet without an antistatic strap. Go find somewhere you can keep your feet on the ground, or go touch the kitchen tap.
One of those screws will often be an adjustment screw. The others hold the board in. The adjustment screw in this case is the red one on the top. Don't turn this as it'll pivot the sensor assembly and may throw off the focus on half the image. Now we remove the board, I left the ribbon cables intact and took care.
There's our sensor and filter. The filter will be red, or green, or clear depending on the angle you're looking at. We need to remove this filter. Sometimes it's glued in place and will need a little force. In this case it was just sitting on a rubber grommet.
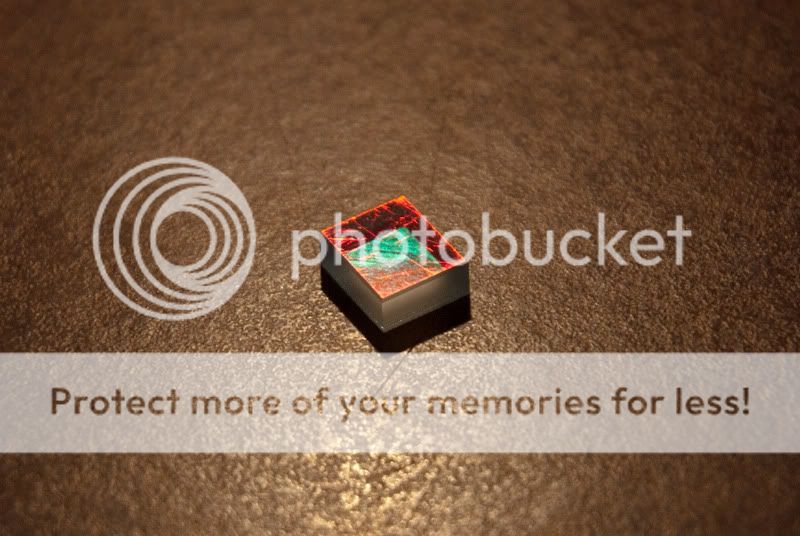
Yeah I know it's a bit scratched, I used the wrong product, read on.
Now at this point many will be tempted to close the camera and call it a day. Not so. On a DSLR or a 4/3rds camera the light will optically hit the sensor nearly parallel. The low-pass filter will also be very thin. On most point and shoot cameras this filter will be significantly thicker, will almost be directly touching the rear element, and unfortunately may employ any manner of techniques that makes it part of the focusing system.
YMMV but I reassembled my camera and found that it wouldn't focus automatically nor manually unless it was zoomed in past the 8x mark. So I had to open the camera again.
The low-pass filter is actually just a coating. It's applied and baked under a vacuum like any coating on the front of your lens elements. This means if you scratch it hard enough you hit standard glass below
Find yourself a cutting compound for a final polish finish for things like a car. The key here is the polish should be FINE. If it feels like toothpaste it's too rough, if you can feel it at all it's too rough. It needs to feel like a gel paste. Additionally to cut down to the glass we need something harder than glass. Find a polish that is based around Aluminium Oxide swimming in petroleum distillate. I used AutoGlym Paint Renovator. But also suitable will be "AutoGlym bodyshop ultrafine abrasive 02B", or if you're loaded "3M Finesse-IT Finisher". Or ask your local car shop for something similar. Remember ultrafine, usually some polish that will follow a 2000 grit or finer sand.
Then we need something flat. I suggest a sheet of acrylic, but since I didn't have one I used a kenko filter. I wouldn't recommend glass on glass though. I do have some fine scratches in the filter as a result of the surface of the glass not being perfect. But in my defence it worked quite well.
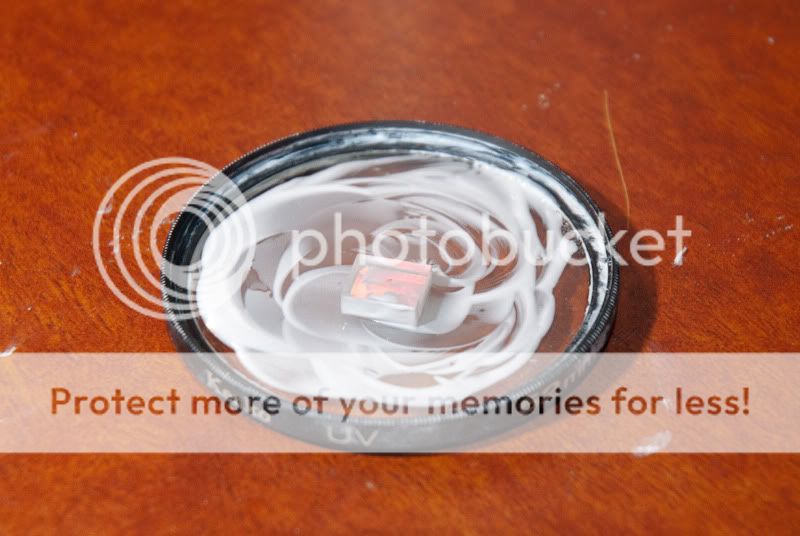
Now we rub, and rub, and rub, and rub, and break for coffee, and rub, and ... ad infinitum.
It took me more than an hour to get BOTH sides of the glass clear. The worst part is it's very difficult to see if the coating is off the top part of the glass if it's still on the bottom because the glass will reflect the green/red look regardless which side you look at it from. Anyway after a good hour of rubbing your glass should look like ... glass:

Put it back:

Box it up.
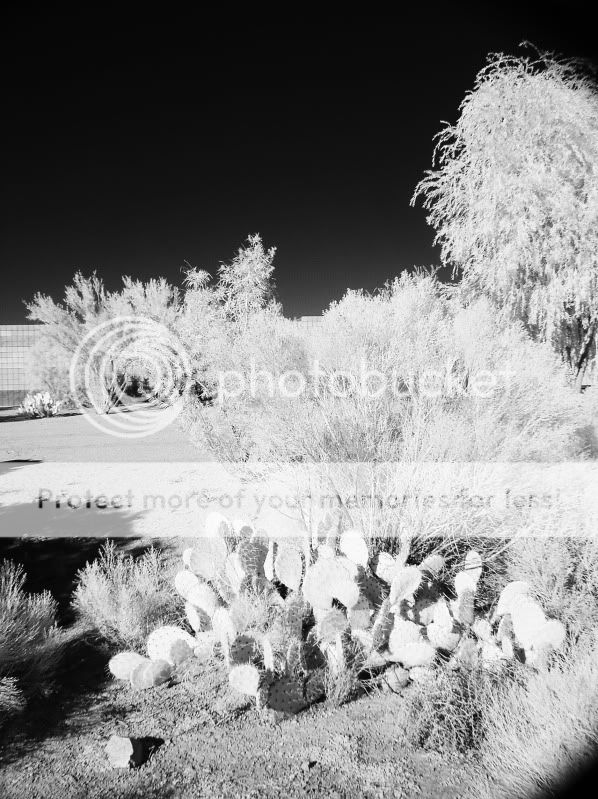
And go outside and push the button:
Smile smugly.
Then post a how to on thephotoforum.
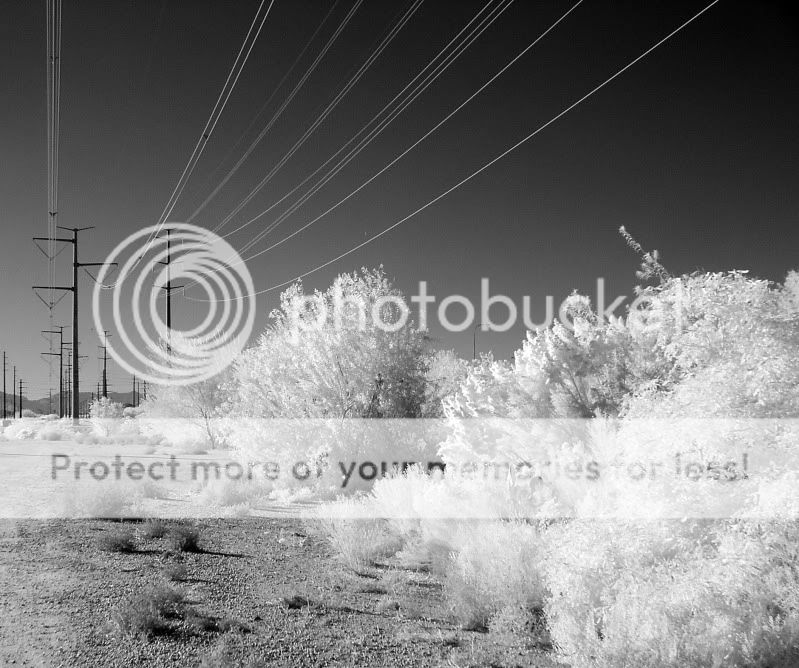
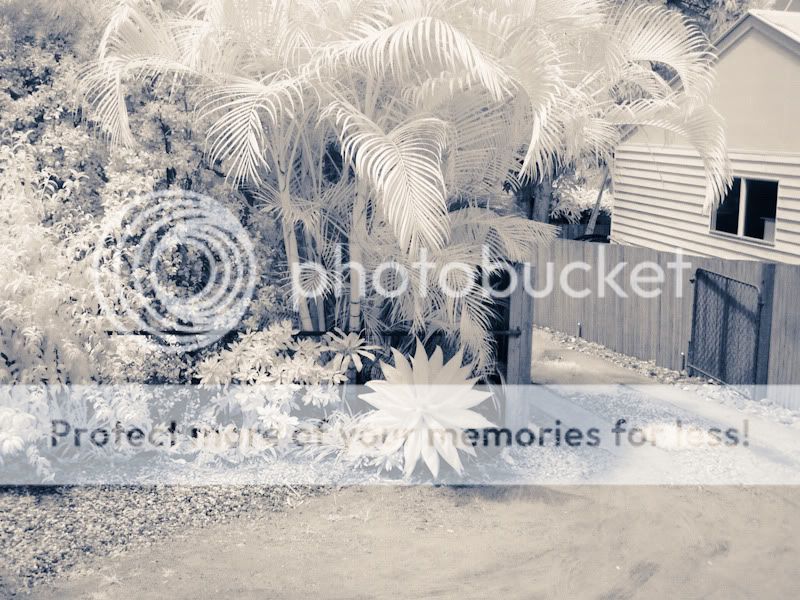
Just a tip this picture was taken through a Hoya R72 filter. The filter looks almost transparent to the camera now. The shutterspeed was insane. 1/800 at f/6.3 ISO64. Much better than the 15 seconds at f/4.5 ISO200 on the unmodified D200.
If you don't have a Hoya R72 filter to play with then you can put a couple of developed film leaders in it's place. You know the stuff with sprocket holes which comes from a lab looking brown with pictures? Yeah film. It'll come back from the lab with black ends. Use that bit
If you're enterprising enough you can cut that film leader and sandwich it between the sensor and the ... glass too.
Now go on, go get that old P&S from your cupboard.
#00 screwdriver with a chrome vanadium tip: $2
tweezers: $1.50
Autoglym paint renovator 325ml: $9.50
That 3M stuff I talked about 1L: $80 (don't bother )
Digital sensors are HIGHLY sensitive to IR, so much so that there is a filter placed on the sensor that tries to block IR (called low-pass filter, or I've heard it referred to as a hot-mirror which IMO is a crap term). Putting an IR pass filter (high pass filter) on the lens like a Hoya R72 will then naturally cause problems as between the two filters you block most of the visible light. Additionally in some cases it's actually possible to get a reflection of the sensor on the IR filter leading to "hotspots" in the images.
SOMETHING MUST BE DONE!
So without further ado I present our victim for the day:
The Olympus C-730 4mpx was a beast for many years. At the time it cost me more than any entry level DSLR. It features manual focus, complete manual, A S and Auto modes, as well as ... manual white balance. The only thing missing from this now is RAW, but since I'm not made of money this will have to do.
You'll need a #00 jewellers screwdriver to get the tiny screws out. Many manufactures will hide the screws in the battery compartments, under grips, and under the card cover, so open every door when looking for screws. Cameras are not iPods, they should come apart with no force once all relevant screws are removed.
DO NOT USE FORCE. Attached to the back cover will be a ribbon cable connecting electronics to the mainboards. These are incredibly easy to tear and nearly impossible to repair. At best pry the case open but never do anything that will result in suddenly opening more than 20mm or so should the case suddenly give way.
See? That's what I'm talking about. Those little ribbon cables are connected to surface connectors held in place by a piece of plastic which compresses the connectors.
NOW WE STOP! Somewhere in this case is a 330V 230uF capacitor. Fully charged. Touching them the right way hurts like all hell. Touching them the wrong will can kill you. Accidentally shorting them out with something metal will cause an ungodly bang and melt the end of your screwdriver.
You can discharge the capacitor by putting a 1kohm resistor across the terminals. My standard resistor is glued to a paddlepop stick so I'm no where near it. Or you can proceed with extreme caution. I work with this crap on a daily basis so I'm going to proceed. If you're not confident find a friend who's doing electrical engineering and seek their help. Consider yourself warned
To remove the ribbon cables, using your screw driver very gently push those tabs away from the connector. Once both sides have slid out the cable should be free to move out.
Now we must remove the motherboard. Often the sensor will be on a daughter board connected by another ribbon cable behind it. Sometimes there's only one board in the camera. YMMV. Also again manufactures like to hide screws. Again remove the board carefully so to not tear any connections off from below. Again be careful, there's a capacitor in there somewhere.
Told ya so. The big black thing is dangerous. Keep away. The big green thing is the sensor daughterboard (analogue to digital converter sits there too). I suggest you don't touch the board if you're working on carpet without an antistatic strap. Go find somewhere you can keep your feet on the ground, or go touch the kitchen tap.
One of those screws will often be an adjustment screw. The others hold the board in. The adjustment screw in this case is the red one on the top. Don't turn this as it'll pivot the sensor assembly and may throw off the focus on half the image. Now we remove the board, I left the ribbon cables intact and took care.
There's our sensor and filter. The filter will be red, or green, or clear depending on the angle you're looking at. We need to remove this filter. Sometimes it's glued in place and will need a little force. In this case it was just sitting on a rubber grommet.
Yeah I know it's a bit scratched, I used the wrong product, read on.
Now at this point many will be tempted to close the camera and call it a day. Not so. On a DSLR or a 4/3rds camera the light will optically hit the sensor nearly parallel. The low-pass filter will also be very thin. On most point and shoot cameras this filter will be significantly thicker, will almost be directly touching the rear element, and unfortunately may employ any manner of techniques that makes it part of the focusing system.
YMMV but I reassembled my camera and found that it wouldn't focus automatically nor manually unless it was zoomed in past the 8x mark. So I had to open the camera again.
The low-pass filter is actually just a coating. It's applied and baked under a vacuum like any coating on the front of your lens elements. This means if you scratch it hard enough you hit standard glass below
Find yourself a cutting compound for a final polish finish for things like a car. The key here is the polish should be FINE. If it feels like toothpaste it's too rough, if you can feel it at all it's too rough. It needs to feel like a gel paste. Additionally to cut down to the glass we need something harder than glass. Find a polish that is based around Aluminium Oxide swimming in petroleum distillate. I used AutoGlym Paint Renovator. But also suitable will be "AutoGlym bodyshop ultrafine abrasive 02B", or if you're loaded "3M Finesse-IT Finisher". Or ask your local car shop for something similar. Remember ultrafine, usually some polish that will follow a 2000 grit or finer sand.
Then we need something flat. I suggest a sheet of acrylic, but since I didn't have one I used a kenko filter. I wouldn't recommend glass on glass though. I do have some fine scratches in the filter as a result of the surface of the glass not being perfect. But in my defence it worked quite well.
Now we rub, and rub, and rub, and rub, and break for coffee, and rub, and ... ad infinitum.
It took me more than an hour to get BOTH sides of the glass clear. The worst part is it's very difficult to see if the coating is off the top part of the glass if it's still on the bottom because the glass will reflect the green/red look regardless which side you look at it from. Anyway after a good hour of rubbing your glass should look like ... glass:
Put it back:
Box it up.
And go outside and push the button:
Smile smugly.
Then post a how to on thephotoforum.
Just a tip this picture was taken through a Hoya R72 filter. The filter looks almost transparent to the camera now. The shutterspeed was insane. 1/800 at f/6.3 ISO64. Much better than the 15 seconds at f/4.5 ISO200 on the unmodified D200.
If you don't have a Hoya R72 filter to play with then you can put a couple of developed film leaders in it's place. You know the stuff with sprocket holes which comes from a lab looking brown with pictures? Yeah film. It'll come back from the lab with black ends. Use that bit
If you're enterprising enough you can cut that film leader and sandwich it between the sensor and the ... glass too.
Now go on, go get that old P&S from your cupboard.
#00 screwdriver with a chrome vanadium tip: $2
tweezers: $1.50
Autoglym paint renovator 325ml: $9.50
That 3M stuff I talked about 1L: $80 (don't bother
)")