I will c&c your work for you, beginners welcomed.

Thank you! That was very interesting for me to see. What editing program do you use? Photoshop? If so do you use the newest version?

I have another photo for you to c&c and change. It's a photo I took when I was doing a photo shoot of my friend. I have always been interested to see how photographers get those really AMAZINGLY lit and colored photos. I was never sure if it's actually setting the camera and lens certain ways or if some of it was the editing done after? Maybe this will help solve some of my wondering. Thank you in advance! I love what you do and hope to be able to edit like you someday!
DSC_2168.jpg

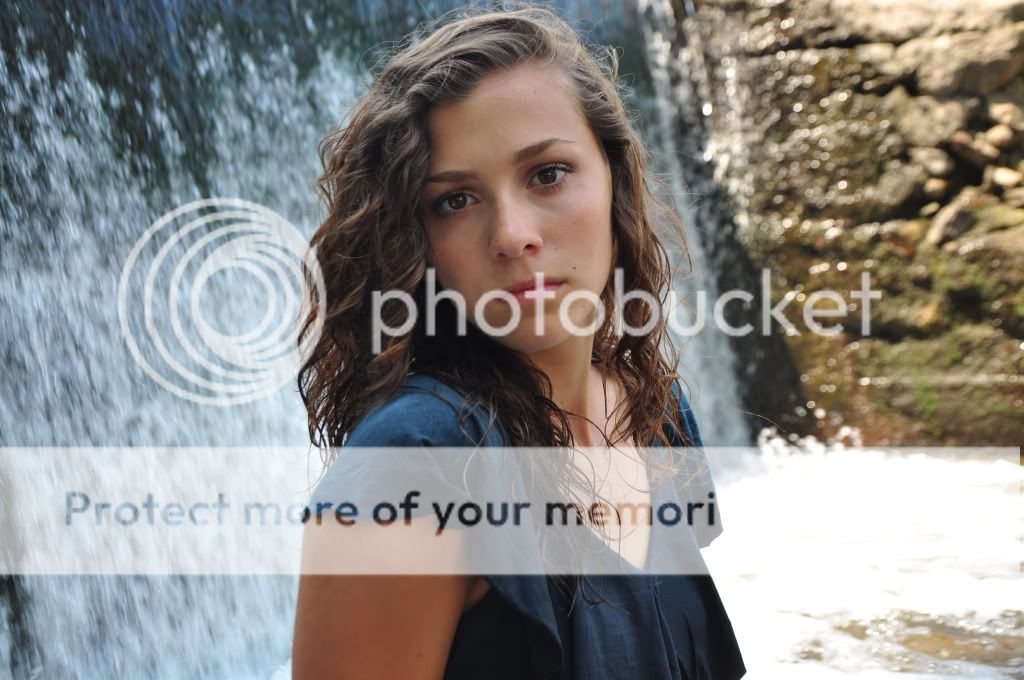
I hope you dont mind but i done a little... (technically speaking) edit
this is a great model.
Ill leave the C&C to the topic OP
editymm.jpg

I have the .PSD with 19 layers... i just noticed banding in the blur though :S most likely cause jpeg compression

here is an second edit:

editvmq.jpg

I think i might be pping too much...

Basically what i done:

opened image
Create new layer, Select clone tool, Check Sample all layers, Clean up the face and fore head of spots, dark areas and hairs
Create new layer, Apply image (Image > apply image) then used the liquify tool to thin her arm and nose, I used the bloat tool to make her lips full and make her eyes larger
Used the twirl tool to shape the corner of her lips and fix her eye position a little
New layer > Apply image
Duplicate image, Clone above the model (fill the layer with the back ground) then lens blur it beyond recognition.
Mask it to show only the model (this is where i got the halo from...)
Apply image
duplicate image 2 times
to the 1st duplicate: Guassian blur until skin is silk smooth, mask the gausian blur so it only affects the skin and clothes / anything else you want smooth (looks very fake this part)
Dodge, burn and sponge tool as needed.
2nd duplicate: Lower the fill and the opacity to get some texture back in the skin and clothes (this brings back the reality) or you can mask out w/e you wanna keep smooth.

Lighting and colour toning:

Black to white gradient map on softlight at opacity 20%
Purple green orange gradient map on softlight at 40%
Curves: use the eye dropper tools to select white point, grey and dark (gives a better colour)
photo filter - Sepia at 100% then change opacity to 30%
new layer fill with yellow and set to softlight at 10% opacity
Repeat 3 times with the following colours:
Blue, Red, green (blue and red being 20% opacity)
Create a new layer, Fill with black, set to softlight and choose a soft brush with white colour and click above your focal point (click it a few times for a hard light, i prefer the fresnel look)

External plugin actions:
new layer, apply image, Skin tune and choose one you like...
new layer, Apply image, nik soft sharpener, mask out whatever you dont want sharpened
new layer, fill with black set to softlight then change opacity until it looks good (just darkens the image) Edit 1 doesn't have this layer and edit 2 is too stron (100%, 60% is efficient)
 
Last edited:
Thank you! That was very interesting for me to see. What editing program do you use? Photoshop? If so do you use the newest version?

I have another photo for you to c&c and change. It's a photo I took when I was doing a photo shoot of my friend. I have always been interested to see how photographers get those really AMAZINGLY lit and colored photos. I was never sure if it's actually setting the camera and lens certain ways or if some of it was the editing done after? Maybe this will help solve some of my wondering. Thank you in advance! I love what you do and hope to be able to edit like you someday!
DSC_2168.jpg

Usually one photo per photographer please.

good

-beautiful model
-great backdrop
-color, contrast and detail all look good
-great DOF
-exposure at model's face is right on

nit

-model is on center
-to much negative space
-clipped water is a bit of a distraction
-the eyes are a tad dark
-there is a shadow on the left side of the model's face
-model can use some pp touch ups (stray hair etc)
-model is a little to close to the top of the photo (can't fix in pp)

tweak

-cropped photo so model is off center and to get rid of some of the
negative space (chose a right side comp so I could crop out some
of the clipped water on the right) distraction

-added a tad of soft focus (gaussian blur) to model's face and arm
-lightened (dodge) the model's eyes

-added selective USM (sharpening) to just the model's eyes, lips and hair
-lightened (dodge) the model's hair colored highlights

-lightened (dodge) the shadows on the model's face and some areas of
her shirt

-darkened (burn) the top left of the falls to add contrast between the
model and backdrop

-darkened (burn) the clipped part of the water on the right so it is not
as much of a distraction

-added a tad of selective color saturation to the model's shirt

-healed out some stray hair and freckles on the model's face

PS I use Nikon Capture NX2 software for all of my work but PS will do
all of these tweaks also.

Hope this helps and thanks for posting.

Take care,

Dwayne Oakes

p312605407-3.jpg
 
Last edited:
Already edited in Photoshop CS3. :)

Abandoned_Beauty_by_TeeEmTwentyTwo.png
 
Last edited:
WOW! Thank you both for fixing and editing them. All the pointers were great. I'm going to try and edit like that sometime!
 
Dwayne -

The edits you have done look great! Here is a photo I took recently that I really like. However, I know there are things that could be done to it. I am new to photography, so I don't have the pp-eye yet.

Any suggestions would be greatly appreciated.

Thanks!

3779030742_3c73b52ce5_o.jpg

Thanks for the comments ! I am glad I can help.

good

-good eye (one spike is raised) different than the others, keep that in
mind for future photos (things that are out of place) it will pay off

-good contrast and detail
-exposure is right on
-the shallow DOF works here
-the comp is ok (good choice for vertical)

nit

-the colors are a tad on the orange side (personal choice) the red
channel is clipped

tweak

-switched photo to black and white (personal choice) bw excells at showing
textures, rocks etc

-added a tad of global contrast boost

-lightened (dodge) part of the rail to add some light drama
-darkened (burn) the rocks in the top left to add some light drama

-added a tad of selective USM (sharpening) to just the areas that
are in focus (spikes and part of the rail) to get over the AA filter

-healed out the stray grass

Hope this helps and thanks for posting.

Take care,

Dwayne Oakes

p40910532-4.jpg
 
Last edited:
Hey Dwayne-
Glad to see you started another thread like this. I really enjoyed following your last one. I'd like to see what you would do with this photo. Thanks in advance!

Original:
ORIGINAL.jpg


Modified:
MODIFIED.jpg
 
Already edited in Photoshop CS3. :)

Abandoned_Beauty_by_TeeEmTwentyTwo.png


Evenknow there is slight clipping, this photo is both artistic and
technically sound. Great job ! No nits or pp needed. The subject
matter might not be that interesting to some but the slope comp
gives this photo a nice artistic look.

Take care,

Dwayne Oakes
 
Last edited:
Hey Dwayne-
Glad to see you started another thread like this. I really enjoyed following your last one. I'd like to see what you would do with this photo. Thanks in advance!

Original:
ORIGINAL.jpg


Modified:
MODIFIED.jpg

Thanks for the comments ! I am glad I can help.

It just goes to show you how powerful composition is. Your first photo
went from a snapshot photo to a great artistic piece of work in just one simple off center crop. Great job !
Here are two tweaked photos, your black and white one and a desaturated one.

You just desaturate the colors using the global saturation slider then use
selective color saturation in this case the shirt and popcan. Both versions
I have added a tad of contrast boost and USM (sharpening) to get over the AA filter.

Also I cropped a little off the top of your photo to make it more of a 4x6
format photo.

Hope this helps and thanks for posting.

Take care,

Dwayne Oakes

p369943032-3.jpg


p502116947-3.jpg
 
Last edited:
I really enjoy looking at all your edits its amazing how much it can change an image im new at photography and dont do any pp work yet so its really great that you show us what can be done. Once i get my self some software i look forward to learning the techniques you are showing.
Thanks Ryan

If you cpould take a look at this one for me I dont seem to be able to get the results I'm looking for when I try b&w

DSC_0285.jpg

Thanks again

Hi Ryan,

Thank you very much for the comments, I appreciate it ! I am gald you like the edits.

good

-good comp (good FG placement which gives the photo good depth)
-nice shadows
-low noise and no sensor dust (sky)
-good detail (can see the fishing line)

nit

-photo is a tad underexposed (still room left on the histogram)
-photo is a tad flat (lacks contrast)

tweak

-in (levels) I moved the white point slider over to take up the space
still left in the histogram to improve overall exposure

-added a tad of contrast boost

-no USM (sharpening) needed

PS Here is a great gem for editing software that most people don't
know about. It was my first software I learned on before switching
to Nikon Capture NX2.

PhotoImpact X3 - Photo Editing

Hope this helps and thanks for posting.

Take care,

Dwayne Oakes

p1063354420-4.jpg
 
Mr. Oakes... You are the man! :hug::
 
You are my Idol DWayne! My future goal is to edit photos as naturally as you do. Here is a photo I took that feel the colors are a bit off, I can't quite find the right ones. Please help!
Original
3788327491_1abd55de78_b.jpg


Tweaked
3789142648_083e3d78b2_b.jpg
 

Most reactions

Back
Top