Lighting set-ups.

ronlane

What's next?
Joined
Aug 3, 2012
Messages
10,224
Reaction score
4,961
Location
Mustang Oklahoma
Website
www.lane-images.com
Can others edit my Photos
Photos OK to edit
Thought I'd start this over in lighting and hardware.

I've been really putting in some time working on lighting in a studio environment. Having built a background stand out of PVC pipe and using a velour backdrop, I have been working on 2 and 3 light set-ups. The key is camera left with a 38" octabox, the fill is either a speedlight in a 2 foot softbox or a reflector and a studio strobe with a snoot for a hair light. I have shared some selfies with this set-up but I thought I would start this thread to help get some feed back and for others that are starting on this path.

I will start this thread with some photos of a styrofoam head and wig as my "new model" to spare @tirediron from having to see that "old broken down" model that I was using. (Also lets me work a little faster.)

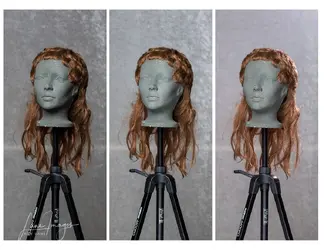
1. Here is the lighting set-up as I built it up. The first image is the Streaklight 360 with a 38" octabox set up in a clamshell type lightest up about 4 feet. It was metered with a Sekonic L-308 to 1/200, ISO 200 at f/5.6. The second is adding a silver reflector set up underneath the key light. And the third adds a hair light that is also metered at 1/200, ISO 200 at f/5.6
lightingsetup.jpg

2. This second set up images is using the above set-up with the silver reflector but added a gel to the hair light. The first is metered at f/5.6. The second is turned up to about f/8.0. The third is a blue gel going back to f/5.6.

colored hair light.jpg

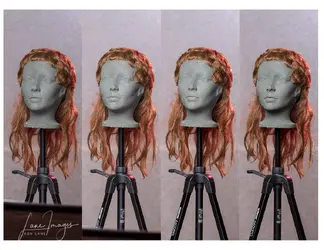
3. These four images are all with the same metering with the red gel but this time I used the white side of the reflector. The difference is the location of the reflector. As you can see in the images, I moved it up and down. The final image of this set is with no reflector at all.
white reflector.jpg

My thought is that I like the white reflector on the third image best because of the lighting ratio.

For those of you that are experienced, do I seem to be on the right track with these images? If not, what suggestions do you have?

Oh I did forget to mention that post processing is in LR only. I set the WB to the same on all of the images and I did auto in the basic panel and then zeroed out the exposure for all images.
 
I suggest looking for a RUBBER head.
  • The primary reason is you can put clear nail polish on the eye, so that it would reflect light similar to a human eye. Then you can work the catch light.
  • The secondary reason is the surface/skin is smooth, so easier for me to view when trying to figure out shadows. The styrofoam surface is textured so creates its own shadows. Maybe painting it with latex paint might fix that.
I have one (off eBay). The only issue that I have is that the nose is too short, so shadows around the nose is not realistic.
 
Last edited:
I suggest looking for a RUBBER head.
  • The primary reason is you can put clear nail polish on the eye, so that it would reflect light similar to a human eye. Then you can work the catch light.
  • The secondary reason is the surface/skin is smooth, so easier for me to view when trying to figure out shadows. The styrofoam surface is textured so creates its own shadows. Maybe painting it with latex paint might fix that.
I have one (off eBay). The only issue that I have is that the nose is too short, so shadows around the nose is not realistic.

Thank you @ac12. I did paint his head as suggested by Tony Corbell. I am going to start looking for a mannequin upper body that I can use.
 
Good idea Ron.
When I got my head, I was looking for one with a shoulder, so it could hold a top/blouse, so that I could do a head and shoulder shot. But no luck.
 
I was just looking at Amazon this afternoon and they have some heads that are for hair and make-up practice that are under $30. They have eyes and eyelashes and hair. May have to get one of those and just the torso of the mannequin to pull this off.

Just not sure if I want to spend a lot of money one a subject to practice on for a period of time. Know what I mean?
 
Be careful, it can get expensive fast.
If you can get something from a store shutdown that would probably be cheapest.
The other is getting separate head and torso to mate properly or at least decently.
 
Great progress! Interesting idea painting the head gray - I have one I got for $8 at a local craft store (that I probably could have gotten for $3 online), but I typically need to underexpose the subject by 1 stop as compared to a real person to avoid blown out highlights on the white styrofoam, and of course don't get to see what the catch lights look like in the eyes.

Something I have noticed when using the silver side of a reflector - it reflects more light when you want a more even key/fill ratio, but it also tends to add a 2nd catch light, whereas the white side acts more as a subtle highlight in the eyes. Some people obsess over this, while others don't mind or simply edit it out in post. I prefer to just use the white side and move it closer if I need more light.
 
Now that I'm seeing these on a better monitor, the one comment I will make is that the under-chin shadow seems a little deeper than I would expect for a clamshell set-up, but that might well be due to the properties of the model.
 
Great progress! Interesting idea painting the head gray - I have one I got for $8 at a local craft store (that I probably could have gotten for $3 online), but I typically need to underexpose the subject by 1 stop as compared to a real person to avoid blown out highlights on the white styrofoam, and of course don't get to see what the catch lights look like in the eyes.

Something I have noticed when using the silver side of a reflector - it reflects more light when you want a more even key/fill ratio, but it also tends to add a 2nd catch light, whereas the white side acts more as a subtle highlight in the eyes. Some people obsess over this, while others don't mind or simply edit it out in post. I prefer to just use the white side and move it closer if I need more light.

Thank you. I agree with you about the silver vs the white. I prefer the white myself but on the CS, I may have to use the silver to get things like I want them.

Now that I'm seeing these on a better monitor, the one comment I will make is that the under-chin shadow seems a little deeper than I would expect for a clamshell set-up, but that might well be due to the properties of the model.

I don't think it as much the properties of the model as it is the placement and possibly the color of the reflector. The reflector really isn't that close to the subject and may not be positions properly to include the neck in it

It is still a work in progress and I am thinking that my favorite set up for this space is going to be the key on the camera left at about 45 degrees and 4 foot from subject and then to use a reflector (white or silver) to the camera right to fill in the shadows.
 
Something I have noticed when using the silver side of a reflector - it reflects more light when you want a more even key/fill ratio,

In addition to more light, I've also found the silver to help alleviate red (rosacea, and other red problem areas). I use a 22" silver beauty dish both with and without a sock and grid as well as a large 5 in 1 with a silver side.

@ronlane I'm curious as to why you're using 1/200 and ISO 200 as your go to settings, as opposed to say 1/125 and ISO 100. I can't really determine any significant difference in the faster shutter, as the flash stops any motion. Granted there probably isn't a lot of difference in noise between 100 and 200.

Using the 1/200, 200 to kill any ambient light in the space and to make sure that there is not motion in the images it gave me the f/5.6, which gives me enough DOF and not worry about the face not being in focus. There really isn't much difference in ISO 100 and 200 in noise, as far as I have seen. The other thing is that with ISO 200, I can use lower flash power settings and get a little quicker recycle time for the studio strobe I'm using for the hair light.

Those are my reasons for the settings. The other reason is that this is close to settings that I have seen in a number of youtube videos that I have watched on lighting.

I could drage the shutter to 1/125 or even 1/100 with the 85mm and probably set the aperture to f/8.0 but just didn't do that.
 
Using the 1/200, 200 to kill any ambient light in the space and to make sure that there is not motion in the images it gave me the f/5.6, which gives me enough DOF and not worry about the face not being in focus

I've never had an issue with ambient light and studio lights, except when I tried to use the Dean Collins technique of turning a white background to pure black, but I guess it could create issues depending on location. I try to stay at F/8 on the 70 ltd, because it seems to be the sweet spot for that lens, unless I'm specifically looking for a shallow DOF. Main thing is whatever works well for you, thanks for responding.

On the styrofoam head, I've run into the surface finish problems also. Works great for leaning how shadows fall, but isn't realistic for skin texture. Haven't tried it yet, but I've heard that you can mix Elmer's Glue and a little dye and get a more realistic skin look.
 
I could drage the shutter to 1/125 or even 1/100 with the 85mm and probably set the aperture to f/8.0 but just didn't do that.
I hope I'm not pointing out the obvious here, but shutter speed shouldn't matter once you've killed the ambient light - your effective shutter speed becomes the flash duration. 1/60 and 1/250 should yield the same results from a flash-only perspective.
 
your effective shutter speed becomes the flash duration

Correct me if I'm wrong, but doesn't this also apply to motion concerns?
 

Most reactions

New Topics

Back
Top