Moon

bvjgcigh

TPF Noob!
Joined
Apr 9, 2013
Messages
55
Reaction score
2
Can others edit my Photos
Photos OK to edit
I've been trying to take a few pictures of the moon and they didn't turn out too great. Anyone have any advice? I used a canon t3 body with a ef75-300mm f/4-5.6 III lens. The only other lens I have is the kit one.
$Moon.JPG
 
I think the biggest mistake people make about shooting the moon is believing the moon is visually huge in he sky. Fact is, it's the same angular size as a quarter that's 8' 6" away. So even 300mm lenses can only get the circle of the moon to about 8% of the frame. So in order to 'get closer', most will crop an image. Obviously, this just magnifies the pixels once a certain point is reached.

However, you avoided the other big mistake...... using the camera's on-board meter to set exposure. Shoot in manual, using the Sunny 16 Rule.

And, of course, a good tripod helps.
 
Don't think it is bad at all, like said, needs to be cropped. If you shot it in RAW, be curious to see it cropped tight, maybe tweak up the light a bit, and re-posted sized to about 1200px
 
This isn't bad. I tend to see a lot of people who are fooled into over-exposed the moon by allowing the camera to meter the black sky -- and they get a blown-out moon.

I did notice you used f/5.6, ISO 640, and 1/1000ths... for the moon you can safely drop the ISO to 100 (a daylight exposure because the moon IS in daylight -- think about it) to reduce noise and then bring the shutter speed down. You could also bring up the f-stop a bit if you'd like.

The moon is tinier than most people think. I've mentioned that astronomy is my "other" hobby -- I'm also a planetarium operator & presenter and do public outreach presentations. When I ask people to show me, with their hands & fingers, how large the moon is (making sure they're in a place where they cannot SEE the moon) they tend to give me exaggerated sizes... holding their hands as if to hold a soccer ball... or even a baseball.

When I then tell them that the angular width of the moon -- as seen from Earth -- is only about 1/2º from edge to edge, and that your THUMB is about 1.5ºs wide if you fully extend your arm and hold up your thumb, they don't believe me. Next time you're outside and can see the moon... extend your arm fully. Hold your thumb next to the moon. You'll see that the moon is only about 1/3rd of the width of your thumb. This guideline tends to work no matter how old you are... children have smaller thumbs, but they also have shorter arms so the angular width of their thumb is actually about the same for a child as it is for a fully grown adult.

With that in mind, if you want a better view of the moon, you'd need to take the photo through a telescope.

This image was taken with my camera mounted to an apochromatic refractor (a Meade 80mm f/6 ED triplet apochromatic -- 480mm focal length). An "apochromatic" refractor telescope has at least 3 elements (three lenses) for significantly sharper, higher-contrast, views with extremely low chromatic aberration. Most refractors are "achromatic" and only have 2 elements. The point is... I'm using special equipment -- not a regular camera lens -- to get this result.


Copernicus Crater by Tim Campbell1, on Flickr

Note that this image is cropped and processed a bit... the moon is enlarged about 2-1/2 times bigger than it appeared in the uncropped version of the image.

Also note the high contrast and shadow details... shooting the moon when it's only half in sunlight really helps because it means the sun casts strong shadows of mountains and craters that you wouldn't be able to see if you took the shot during a full moon. Also... apochromatic telescopes are particularly sharp and high contrast (they're EXCELLENT for imaging work). An achromatic telescope (a typical refractor) would not have been this sharp.
 
Thanks for the wonderful response! I must ask, how do you determine what iso and f-stop I used? Can you tell by just looking at it? Next time I see the moon, I hope to use your tips!
 
Thanks for the wonderful response! I must ask, how do you determine what iso and f-stop I used? Can you tell by just looking at it? Next time I see the moon, I hope to use your tips!

The image files contain meta data called EXIF.

Exposure Time (1 / Shutter Speed) = 1/1000 second ===> 0.001 second
Lens F-Number / F-Stop = 56/10 ===> ƒ/5.6
Exposure Program = shutter priority (4)
ISO Speed Ratings = 640
EXIF Version = 0230
Original Date/Time = 2013:01:18 08:08:57
Digitization Date/Time = 2013:01:18 08:08:57
Components Configuration = 0x01,0x02,0x03,0x00 / YCbCr
Shutter Speed Value (APEX) = 655360/65536
Shutter Speed (Exposure Time) = 1/1024 second
Aperture Value (APEX) = 327680/65536
Aperture = ƒ/5.66
Exposure Bias (EV) = 4/3 ===> 1.33
Metering Mode = pattern / multi-segment (5)
Flash = Flash did not fire, compulsory flash mode
Focal Length = 300/1 mm ===> 300 mm
User Comment Character Code = not defined
Last Modified Subsecond Time = 40
Original Subsecond Time = 40
Digitized Subsecond Time = 40
FlashPix Version = 0100
Colour Space = sRGB (1)
Image Width = 4272 pixels
Image Height = 2848 pixels
Focal Plane X-Resolution = 4272000/905 ===> 4720.44
Focal Plane Y-Resolution = 2848000/595 ===> 4786.55
Focal Plane X/Y-Resolution Unit = inch (2)
Custom Rendered = normal process (0)
Exposure Mode = auto exposure (0)
White Balance = manual (1)
Scene Capture Type = standard (0)
 
Last edited:
I haven't reached the level of Hexadecimal Master to be able to read a picture straight from a text file...
 
I haven't reached the level of Hexadecimal Master to be able to read a picture straight from a text file...

That's just a comment. Not the image data.
I took the hex stuff out since it's pretty useless.
 
I haven't reached the level of Hexadecimal Master to be able to read a picture straight from a text file...

That's just a comment. Not the image data.
I took the hex stuff out since it's pretty useless.

It's not useless with the right software.
 
Wow that is amazing. I never knew that. I'm pretty surprised that it can store my focal length. Do you get similar information with video?
 
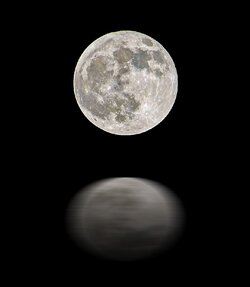
I shot this with the Nikkor 70-300. I think my ISO was 100, F/8 and I adjusted shutter accordingly to expose for the moon. After some post processing, this is the most detail I could get out of it. The key is to keep the camera as steady as possible and some post processing is usually necessary to bring out the texture and contrast. I know the reflection is cheesy and unnecessary but I was just messing around with effects on PSE.
$Full moon April 26, 2013.jpg
 
Thanks for the wonderful response! I must ask, how do you determine what iso and f-stop I used? Can you tell by just looking at it? Next time I see the moon, I hope to use your tips!

I missed this reply when you posted it (sorry -- didn't mean to ignore this.)

When I take a photo of the moon I _always_ start with the assumption of a "daylight" photo. There's an old rule (which is _very_ handy to know because there are lots of occasions to use the rule) from the days in which cameras didn't have built-in meters. It's the "Sunny 16" rule - it describes a baseline exposure whenever you're taking a photo of something in full/direct sunlight.

The rule says that you can set the f-stop to 16, and then set the shutter speed to the "inverse" of the ISO. Since full-sun is quite bright, you don't need an increased ISO... the base ISO 100 is totally adequate. So that would give you an exposure of f/16, ISO 100, and 1/100th of a second. But that's just a "baseline". You don't really need to use f/16.

The _reason_ it's called the Sunny 16 rule and not the Sunny 11 rule or the Sunny 5.6 rule is because at f/16 (and only at f/16) the shutter speed will coincidentally work out to always be the "inverse" of the ISO. If you were at ISO 400, then shutter would be 1/400th. If, on the other hand, you were at f/11, then the shutter would no longer be the inverse of the ISO... it would be 2x the inverse of the ISO. So they call it the "Sunny 16" rule because it's _easy_ to remember the baseline exposure.

The rules of the exposure triangle are that once you know any valid exposure, you can play with it by trading off a stop of exposure in one part of the triangle for a stop of exposure in another part of the triangle). The triangle is ISO, shutter, and aperture. So if I'm using a telescope (let's just assume I have an f/8 telescope because f/6 is a fractional stop), then f/8 is TWO full stops more light than f/16 (f/16 -> f/11 -> f/8 are all "whole" stops... they are based on powers of the square root of 2 and remember that photographers and cameras always round these values). That means I can decrease light by 2 full stops ... either in ISO or in shutter speed. If I was at ISO 100, I probably cannot reduce the ISO any more (most cameras have a base ISO of 100... some can go down to 50). So likely I'll have to speed up the shutter to decrease the amount of light collected... instead of 1/100, I'll use 1/400 (1/100 -> 1/200 -> 1/400 -- each time you double the speed, you collect half the light.)

So we've established the moon is in full sun and we're using a Sunny-16 equivalent exposure, and in my example it's ISO 100, f/8, and 1/400th.

It turns out, the atmosphere of Earth does eat up some of the moonlight and I find that it tends to be "about a stop" (there's a factor that astronomer's measure in the atmosphere called "transparency") That means rather than actually using ISO 100, f/8, and 1/400th, I might increase the exposure by 1 stop -- usually by just slowing down the shutter speed ... so I'd use ISO 100, f/8, and 1/200th (rather than 1/400th).

Since I don't necessarily know what the actual transparency will be on a given night, I'll have to take a few test shots and adjust. Keep in mind you're trying to get nice contrast and that typically means you don't want the moon to appear too bright.

Also notice that in this whole discussion, I never brought up the topic of taking a meter reading with a light meter. That's because I wouldn't expect the meter to be accurate. All that black sky will tend to make the meter want to bump up the exposure and result in a blown-out moon. I have not attempted to take a "spot" meter reading off the moon, but that might work -- the moon might qualify as a nice "middle gray" target, but I'm speculating... usually I do the base Sunny-16 rule and "salt to taste" on my exposure.
 
I shot this with the Nikkor 70-300. I think my ISO was 100, F/8 and I adjusted shutter accordingly to expose for the moon. After some post processing, this is the most detail I could get out of it. The key is to keep the camera as steady as possible and some post processing is usually necessary to bring out the texture and contrast. I know the reflection is cheesy and unnecessary but I was just messing around with effects on PSE.
View attachment 43375

That's a great exposure! Lots of contrast and detail!

It can be tough to get a lot of detail out of an image of the moon or a planet (planets are MUCH more difficult because their angular size is smaller -- meaning you have to magnify them more and that also means the effects of "seeing" are magnified.

Here's a video I shot of the moon to demonstrate the effects of "seeing". This clip shows a magnified section of the moon and you can see the surface distorting... as if you're looking through water.

 
Last edited by a moderator:

Most reactions

New Topics

Back
Top