Photos look blurry when zooming in on screen

annamaria

Been spending a lot of time on here!
Joined
Sep 18, 2013
Messages
3,595
Reaction score
978
Location
Milledgeville, GA
Can others edit my Photos
Photos OK to edit
I have a silly question. I have been practicing taking photos of my back yard birds and of course some are sharper than others and some with a touch of blur, others very blurry. Anyhow when viewing some of the photos that are decent, I notice that when I zoom in it looks blurry. So basically what I want to know is, that if a decent photo looks blurry when zoomed in, means it is actually blurry or is it because it's zoomed in?
 
So basically what I want to know is, that if a decent photo looks blurry when zoomed in, means it is actually blurry or is it because it's zoomed in?
It depends on how blurry it is that we're talking about, and how picky you are. :lol:

Post a picture that you think looks good until you zoom in on it.
 
What you see on the monitor is a very small JPEG version of the image.
 
It depends on how blurry it is that we're talking about, and how picky you are. :lol: Post a picture that you think looks good until you zoom in on it.

I will do that as soon as I can. Thank you :)
 
What you see on the monitor is a very small JPEG version of the image.

I will have to check, but was looking at RAW as well as JPEG. So does that mean it will look blurry regardless? Just trying to understand what you meant.
 
was looking at RAW as well as JPEG. So does that mean it will look blurry regardless? Just trying to understand what you meant.

This gets a bit complex if you want to actually understand what you are looking at, but to really become proficient at photography you have to at least understand some of it! So lets dig into it a little.

First, you can't look at the RAW data as opposed to a JPEG! Impossible! But the RAW file does contain an embedded JPEG image, and that is what you see when you "view" a RAW file. Just another JPEG!

So to view it, the RAW data has to be interpolated to generate an RGB image. The RGB image has three color channels, one each of Red, Green, and Blue and that can be printed or displayed on a monitor. There are several different formats to save an RGB image to a file, such as TIFF, PNG, GIF and JPEG. The file is in one of those formats but what you see is not! The data in the file is read in and expanded/adjusted or whatever before it is displayed. The catch is that some formats compress the data and some don't. Of the ones that compress the data some are lossless and some are lossy. If the compression is lossless then when it is read in and converted to just RGB data it will be exactly the same data that was originally compressed. But if it is lossy, it will not be exactly the same. However, another significant difference is that lossy compression usually does a much better job of compressing. Hense JPEG has lossy compression but the image files are much smaller. TIFF does not compress nearly as well and the file are much larger, but the recovered data is precisely the same because it has a lossless compression. JPEG compression is designed to throw away data that is not visually important, hence despite lossy compression the image looks the same when viewed.

So that is basically the difference between RAW, TIFF and JPEG.

Now lets think about your original question in regard to blur. The camera has separate Red, Green and Blue sensor locations, but doesn't have one of each for every pixel. The color of each pixel is determined using at least a 3x3 (and usually 5x5 or larger) matrix from the RAW data file. What's the significance? Well, if you have a color transition in the image that is very sharp, going say from Red to Blue along a very distinct line... the camera cannot record it as a distinct line. You might expect one pixel in your image to be Red and the one next to it to be Blue, but the camera can't do that. If it uses a 5x5 matrix to determine the color of those to pixels then the first pixel that should be Blue will have some Red in it due to the color recorded 2 pixels to the left. And that last Red pixel will have some Blue due to color 2 pixels farther along the line! Hence, pure Red will only show up 2 pixels on left side and pure Blue will only show up 2 pixels on the right side if the actual Red to Blue transition! That is "blur". With a 9x9 matrix the blur will be 8 pixels wide.

Except that is what the unedited image looks like. What it means is that every image needs to be "sharpened". Sharpening essentialy makes edge transitions shorter. Instead of 8 pixels, that might be changed to only a 4 pixel transition. But obviously it still is not a 1 pixel transition, so it is "blurred".

If we view it in such a way that there are at least 300 pixels to the inch on the display it happens that our eyes can't distinguish the difference in sharpness from a 1 pixel edge transition and a 2 pixel edge transition. Or for that matter a 4 or 5 pixel edge transition.

But while printers can print a 300 pixels per inch, our computer monitors use about 100 pixels per inch. So to get an idea of just how sharp an image really is we need to first crop it down to a size where each pixel in the image is displayed as 1 pixel on the screen. If it is any other size the display software will either duplicate some pixels to make the image larger or it will combine some to make it smaller. If we have a nice 1600x1200 pixel monitor, we can perhaps look at the image in a 1000x800 pixel window. And we want to crop out a section then that is 1000x800 to look at. That is the only way to accurately judge sharpness of an image viewed on a computer!

And then you need to check tone transition edges to determine about how many pixels wide the transition is. If it is 1 pixel wide, it was made with an image editor, not a camera! If the edges are all 4 to 6 pixels wide, it is about as sharp as a camera can recorde them. If the transitions are wider than that, the image is relatively "blurry".

It really is that "simple"! You can find dozens of books with all the simple details too! Don't get too frustrated, just have fun learning.
 
I have a silly question. I have been practicing taking photos of my back yard birds and of course some are sharper than others and some with a touch of blur, others very blurry. Anyhow when viewing some of the photos that are decent, I notice that when I zoom in it looks blurry. So basically what I want to know is, that if a decent photo looks blurry when zoomed in, means it is actually blurry or is it because it's zoomed in?

Well without seeing the actual images it's hard to be certain, but normally blur is caused by a couple of different things - usually in a lot of wildlife images the blur will be a result of motion. Either the motion of the camera or the motion of the subject. With smaller birds in particular they are almost constantly moving - so a high shutter speed is the key to eliminating this kind of blur.

The other thing I found with my D5100 is that the area focus modes really aren't that great and figuring out what to focus on, if I let the camera decide it will usually pick the tree rather than the bird. So I set my camera for single point focus, and whatever focus point I choose is what the camera focuses on - this will make a big difference when your shooting smaller targets like birds.
 
This gets a bit complex if you want to actually understand what you are looking at, but to really become proficient at photography you have to at least understand some of it! So lets dig into it a little. First, you can't look at the RAW data as opposed to a JPEG! Impossible! But the RAW file does contain an embedded JPEG image, and that is what you see when you "view" a RAW file. Just another JPEG! So to view it, the RAW data has to be interpolated to generate an RGB image. The RGB image has three color channels, one each of Red, Green, and Blue and that can be printed or displayed on a monitor. There are several different formats to save an RGB image to a file, such as TIFF, PNG, GIF and JPEG. The file is in one of those formats but what you see is not! The data in the file is read in and expanded/adjusted or whatever before it is displayed. The catch is that some formats compress the data and some don't. Of the ones that compress the data some are lossless and some are lossy. If the compression is lossless then when it is read in and converted to just RGB data it will be exactly the same data that was originally compressed. But if it is lossy, it will not be exactly the same. However, another significant difference is that lossy compression usually does a much better job of compressing. Hense JPEG has lossy compression but the image files are much smaller. TIFF does not compress nearly as well and the file are much larger, but the recovered data is precisely the same because it has a lossless compression. JPEG compression is designed to throw away data that is not visually important, hence despite lossy compression the image looks the same when viewed. So that is basically the difference between RAW, TIFF and JPEG. Now lets think about your original question in regard to blur. The camera has separate Red, Green and Blue sensor locations, but doesn't have one of each for every pixel. The color of each pixel is determined using at least a 3x3 (and usually 5x5 or larger) matrix from the RAW data file. What's the significance? Well, if you have a color transition in the image that is very sharp, going say from Red to Blue along a very distinct line... the camera cannot record it as a distinct line. You might expect one pixel in your image to be Red and the one next to it to be Blue, but the camera can't do that. If it uses a 5x5 matrix to determine the color of those to pixels then the first pixel that should be Blue will have some Red in it due to the color recorded 2 pixels to the left. And that last Red pixel will have some Blue due to color 2 pixels farther along the line! Hence, pure Red will only show up 2 pixels on left side and pure Blue will only show up 2 pixels on the right side if the actual Red to Blue transition! That is "blur". With a 9x9 matrix the blur will be 8 pixels wide. Except that is what the unedited image looks like. What it means is that every image needs to be "sharpened". Sharpening essentialy makes edge transitions shorter. Instead of 8 pixels, that might be changed to only a 4 pixel transition. But obviously it still is not a 1 pixel transition, so it is "blurred". If we view it in such a way that there are at least 300 pixels to the inch on the display it happens that our eyes can't distinguish the difference in sharpness from a 1 pixel edge transition and a 2 pixel edge transition. Or for that matter a 4 or 5 pixel edge transition. But while printers can print a 300 pixels per inch, our computer monitors use about 100 pixels per inch. So to get an idea of just how sharp an image really is we need to first crop it down to a size where each pixel in the image is displayed as 1 pixel on the screen. If it is any other size the display software will either duplicate some pixels to make the image larger or it will combine some to make it smaller. If we have a nice 1600x1200 pixel monitor, we can perhaps look at the image in a 1000x800 pixel window. And we want to crop out a section then that is 1000x800 to look at. That is the only way to accurately judge sharpness of an image viewed on a computer! And then you need to check tone transition edges to determine about how many pixels wide the transition is. If it is 1 pixel wide, it was made with an image editor, not a camera! If the edges are all 4 to 6 pixels wide, it is about as sharp as a camera can recorde them. If the transitions are wider than that, the image is relatively "blurry". It really is that "simple"! You can find dozens of books with all the simple details too! Don't get too frustrated, just have fun learning.

Wow!!! Lots of information will have to read it again to digest it all ;-) Thank you for taking the time to explain it.
 
Well without seeing the actual images it's hard to be certain, but normally blur is caused by a couple of different things - usually in a lot of wildlife images the blur will be a result of motion. Either the motion of the camera or the motion of the subject. With smaller birds in particular they are almost constantly moving - so a high shutter speed is the key to eliminating this kind of blur. The other thing I found with my D5100 is that the area focus modes really aren't that great and figuring out what to focus on, if I let the camera decide it will usually pick the tree rather than the bird. So I set my camera for single point focus, and whatever focus point I choose is what the camera focuses on - this will make a big difference when your shooting smaller targets like birds.

Thank you Robbins for your input. I will post the most recent photo I took as soon as I can, and will post the settings I used as well. I am having problems with focusing. When I have a problem focusing on the bird I try to focus lets say like on a tree trunk then back to the intended bird subject, having a time with that, but working on it and trying to learn more about the D 5100. Would you mind if occasionally I asked a question about your techniques with the D5100?

Ask away - I'm no pro, just a dedicated amatuer - but I'll be more than happy to share any information I might have that might help. Generally for wildlife shots I set the autofocus to AF-C and single point, I keep the autofocus point in the center for anything that is a fast mover (such as birds) and then I shoot a little wide so I can recompose the shot later in post. If I'm shooting at something like a leopard that isn't jumping around like crazy and is more or less stationary then I'll actually use the menu selector on the back and select the autofocus point and try to aim for the eyes and compose the shot pretty close to what I want in camera.
 
A couple of quick comments...some pictures might look ok until they are enlarged on a screen of enlarged in a print. So whether or not they will be "decent" by your standards might depend on how large the file or print is when view.

Another thing to consider when trying to make sharp pictures is camera shake. Even the slightest movement when the shutter is pressed can cause an image to be a little blurred.

Lastly, try using your cameras spot metering mode sometimes. This way, your subject will probably be in focus rather than things around it. However, also consider your camera's aperture setting. When shooting at larger aperture openings, less of your image will be in focus.

Keith
Easy Basic Photography
 
Ask away - I'm no pro, just a dedicated amatuer - but I'll be more than happy to share any information I might have that might help. Generally for wildlife shots I set the autofocus to AF-C and single point, I keep the autofocus point in the center for anything that is a fast mover (such as birds) and then I shoot a little wide so I can recompose the shot later in post. If I'm shooting at something like a leopard that isn't jumping around like crazy and is more or less stationary then I'll actually use the menu selector on the back and select the autofocus point and try to aim for the eyes and compose the shot pretty close to what I want in camera.

Thank you I most certainly will ask away :) I will check my camera settings, I think that is how I have it setup, but will double check. Will take your suggestions.
 
A couple of quick comments...some pictures might look ok until they are enlarged on a screen of enlarged in a print. So whether or not they will be "decent" by your standards might depend on how large the file or print is when view. Another thing to consider when trying to make sharp pictures is camera shake. Even the slightest movement when the shutter is pressed can cause an image to be a little blurred. Lastly, try using your cameras spot metering mode sometimes. This way, your subject will probably be in focus rather than things around it. However, also consider your camera's aperture setting. When shooting at larger aperture openings, less of your image will be in focus. Keith Easy Basic Photography

Thanks for your pointers and information I appreciate it. What would you consider to be too large of an aperture setting?
 
Hi Spanishgirleyes,

You are going to have a few things to condend with, however rest assured that if you zoom in as far as you can go your pictures will allways look a bit blurry. How much depends on a few things but the quality of the lens is a big factor if everything else is equal. I use a pretty standard consumer zoom lens and sometimes I find it difficult to tell in camera what's blur and what's just the limit of my IQ. But there are a few things you can do to give you a bit of room.

First I make sure my shutter speed is adequate, for birds and fast moving stuff I tend to shoot at 1/1000 sec and for practice I shot some common gulls and some geese. They glide quite a lot so are easy to shoot and good for practice. Depending on the bird though you may have to go faster, to freeze a hummingbirds wings you need some high speed flash for example.

Then I'll check my apeture, lenses are rarely the sharpest wide open so I stop down a couple of stops if I can, this usually sees me go from f5.6 to f8, this also means that I usually have an adequate depth of field.

If these two are ok then if there is still obvious blur then chances are it's a focus issue.

As robbins.photo says, make sure you use continuous focus and track your subject along with your maximum frame rate. I wouldn't recommend using spot metering, chances are it'll give you more problems than it solves, centre weighted average or partial metering would be a better choice though you may need to dial in some exposure compensation if shooting dark or white birds.

I'm no expert on this, just these are my observations from trying myself
 
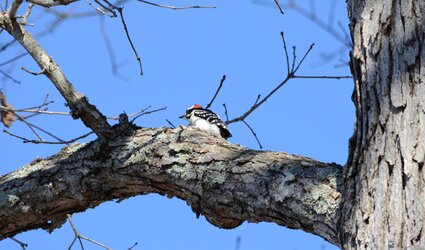
Here is one of the photos I was referring to. I just did a quick crop in PSE 7. Still learning. Please feel free to check if it looks blurry on your end. I have more photos that are decent as well as blurry, but this is all I had time to post for now. I know it's not the greatest photo just posting it to check for blurriness. Btw I used a 55-300 lens and the woodpecker was a good distance from me and way up in the tree. This is the closest I could capture.

$DSC_3062 (2) cropped.jpg

Settings used:

Device: Nikon D5100
Lens: VR 55-300mm F/4.5-5.6G
Focal Length: 300mm
Focus Mode: AF-C
AF-Area Mode: Dynamic
VR: ON
AF Fine Tune:
Exposure
Aperture: F/8
Shutter Speed: 1/800s
Exposure Mode: Aperture Priority
Exposure Comp.: 0EV
Exposure Tuning:
Metering: Spot
ISO Sensitivity: Auto (ISO 500)
Flash
Device:
Image Settings
White Balance: Auto, 0, 0
Color Space: sRGB
High ISO NR: ON (Normal)
Long Exposure NR: OFF
Active D-Lighting: OFF
Image Authentication:
Vignette Control:
Auto Distortion Control: ON
Picture Control
Picture Control: [SD] STANDARD
Base: [SD] STANDARD
 

Most reactions

New Topics

Back
Top