Photoshopping Background for correct exposure

Vautrin

No longer a newbie, moving up!
Joined
Jun 26, 2008
Messages
927
Reaction score
58
Location
It changes
Website
www.withoutamapphotography.com
Can others edit my Photos
Photos OK to edit
Hi,

I've made the mistake of buying a fabric background instead of paper or something thicker and heavier.

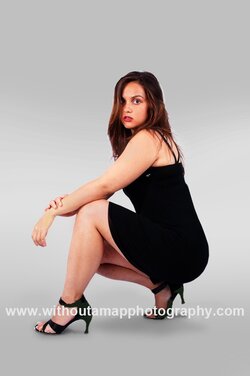
You can see the problem I have in the below photos:
$models-1.jpg$models-2.jpg

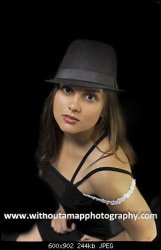
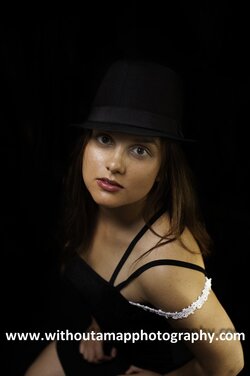
In the image on the left, the model is well exposed... The problem is the background is distracting... It has this distracting texture (I should have ironed it) and it's not the really dark black I'd like.

The image on the right exposure is 3EV less. Great for the background. Not so great for the model.

What's the best way to combine the images, or alter the images so my background is true black, and my model is properly exposed?

(and btw, any c&c welcome!)

Thanks,

Dan
 
The best solution is to get it right when shooting, rather than trying to fix it in post.

The most likely reason that your background isn't looking dark/black like you want it to, is simply because you're putting too much light onto it. The first thing to do, is move your subject (and your light) farther away from the background. In terms of diffuse reflection, the reflected light will drop off exponentially as you move the light farther away. In other words, if you move the light twice as far away, the reflection would be 4 times darker. Three times farther away...nine times darker.

And of course, if you can just prevent the light from hitting the backdrop, by placing something between them, that will help as well.

As for fixing what you have, it should be pretty simple, just use a layer mask (in software that allows that) so that you can edit the background separately from the model. Might be tough in this case, because of her black hat and dark hair against the dark background. We usually like to have some separation between model and background, which can be accomplished by lighting either the back of the model or the background itself.
 
Some suggestions:

Iron or steam your background prior to using it for shoots.

Roll it rather than fold it when transporting or storing, to reduce wrinkles from folds.

Stretch it with gaffer's tape, clamps, or whatever works for you to pull the wrinkles out when you hang it.

Get your model further away from the background.

Control your light in zones; Light the background (or not at all) separately from lighting the model. Use flags to control spill onto the background if necessary.

These both look WAY too underexposed. Check your monitor calibration.

Software can help quite a lot in post, when you need it. I use Topaz Remask Plugin for Photoshop to remove and replace or manipulate backgrounds after the fact if I need to, and it works fabulously.
 
Yeah i kind of went cheap on the background which was a big mistake. so it was too short to get a full body shot and have the model step away. on top of that my apartment is too small to allow me to go too far back

the interesting thing is the white background was no problem as i set up a flash behind it so its so overexposed its white....

i just have this problem with the black since i
have to make her stand farther
away for underexposing it :(

im thinking of going for paper but im wondering if i wont just have the same problems and be unable to iron creases
 
If you want to do this in post, duplicate the image and apply highlight/shadows to the duplicate. Apply layer mask and brushout the background. Go to the background layer and adjust with levels to make it very dark.
 

Attachments

  • $models-1.jpg
    $models-1.jpg
    32.8 KB · Views: 177
Learn how to use lighting and you wont have a problem you can get away with 2 lights and reflctor for this shot she needs to lit from behind with a flagged light to stop light from hitting the background
 
Just to summarize - Most of your problems with the background in that photo were caused by using poor lighting techniques.

Buckster hit the salient points:
  • subject further from a well maintained background
  • block (flag) light from spilling onto the background to make it darker
  • be mindful you can use shutter speed to make the background (ambient light) darker too
  • lens aperture controls strobed light exposure.

Like Mike says, the goal is to learn how to get it as close to right in the camera as possible.

A hand-held light meter that can meter strobed light is very useful for someone new to doing that type of photography.
 
$models-1.jpg

As the others have said, getting it right during the shoot is your best bet, however, if you wish to post process;

Here is what I did to the image in photoshop:

Duplicated background layer and set blend mode to overlay with a layer opacity of 69%
Masked out parts of the model from the duplicated layer via a layer mask.
Created a levels adjustment layer again masking out the model. On the levels adjustment layer my settings were: 0 | 0.56 | 255
And for a bit of a colour boost I added a vibrance layer and increased the vibrance to +45

edit: Im not sure what the forum has done to the colours, but it has heavily desaturated them, they look much better in photoshop :D
 

Attachments

  • $models-1.jpg
    $models-1.jpg
    79.8 KB · Views: 151
  • $models-1.jpg
    $models-1.jpg
    79.8 KB · Views: 151
Thank you so much for your reply! It's quite informative

edit: Im not sure what the forum has done to the colours, but it has heavily desaturated them, they look much better in photoshop :D

I noticed that to. On my monitor with lightroom, on zenfolio, on my iphone, colors look fine but the forums colors are muddy and dark

Could be I'm using ProPhoto and it's a wider gamut then forum supports, maybe?
 
Vautrin said:
Thank you so much for your reply! It's quite informative

I noticed that to. On my monitor with lightroom, on zenfolio, on my iphone, colors look fine but the forums colors are muddy and dark

Could be I'm using ProPhoto and it's a wider gamut then forum supports, maybe?

ProPhoto color space should only be used in very specialized applications, like if your lab wants you to use it. sRGB for web, CMYK s. op ver. 2 for most print uses.

Lightroom wants to use ProPhoto unless you tell it otherwise. Don't know why...
 
Here is what I did to the image in photoshop:

Duplicated background layer and set blend mode to overlay with a layer opacity of 69%
Masked out parts of the model from the duplicated layer via a layer mask.
Created a levels adjustment layer again masking out the model. On the levels adjustment layer my settings were: 0 | 0.56 | 255
And for a bit of a colour boost I added a vibrance layer and increased the vibrance to +45

I've been able to process another pic using your technique:

Thanks!
Before:
$photoshopexample-2.jpg
After:
$photoshopexample-1.jpg

(C&C welcome -- also any tips on any screw ups I might be doing :D)
 
The ProPhoto RGB color space is used for editing.

ProPhoto RGB is capable of preserving after processing in Lightroom all of the color information that the camera's image processor interpolated in the original Raw file.

Understanding ProPhoto RGB

The editing color space in Lightroom is not user adjustable like it is in Camera Raw or Photoshop.

In the Lightroom External Editing preferences dialog, ProPhoto RGB is set as the default, because ProPhoto RGB is fairly close to the chromaticities of the native Lightroom edit workspace.

Note: Raw files don't have color space profiles, but a color space profile has to be assigned for edit or output outside of Lightroom.
 
Last edited:
I find your last image too light. Also the heels of her shoes are missing and maybe you should put some shadows underneath so she won't look like she's floating.
 

Attachments

  • $photoshopexample-2.jpg
    $photoshopexample-2.jpg
    65.3 KB · Views: 124
Last edited:
here's my quick go at editing the background

$tps help bg 2.jpg

if i really put some effort in i could make it almost perfect, but this is my 5 minute job
 

Most reactions

Back
Top