What's new

Same Young Lady, Different Portrairt

Obviously the exposure in the original was off and needed to be corrected before taking the picture. Looking at the neck compared to the face she is wearing enough makeup to see the difference, and I don't know if a little lighter application might have been better. The editing starts making her look less than real, I think it needs to not be too heavy handed.
 
@Derrel Thank You. Somehow Sony and C1 tend to be magenta-heavy most of the time. I probably need to deviate from its Auto ICM and consider using the Linear Response
@smoke665 Yours even more magenta, however love how gentle you went with the processing (except the denim -- I reckon the blues there became a bit too much) :)

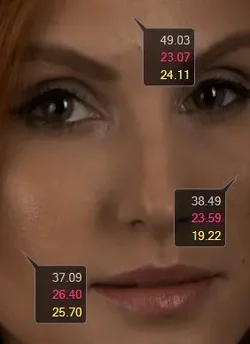
Since the girl is Brazilian with a saturated skin the B should be over A. The other way around is rare :)

Both screenshot via the snipping tool, so the colours are wrong since the tool is not ICM-aware. Just note the readouts.
upload_2019-9-29_13-35-50.webp

upload_2019-9-29_13-38-19.webp
 
Last edited:
Yours even more magenta, however love how gentle you went with the processing (except the

Lacking a defined white, black or gray reference point, any adjustment to WB was a guess at best. I tried sampling the white of the eye and the pupil, which pulled the image to far to the cool side which in reality may have been closer. The other factor is hue being a function of luminosity, makes having a good exposure up front important to color rendition. I have a library of RGB skin color settings that I refer to if I'm really in need of drastic change, but most times I shoot for a pleasing look by eye, as on this.

As to processing the only real adjustments in Lr other then raising exposure, and shadows, was to set the WB, decrease highlights, set the white and black points and apply a mild contrast curve. Once I'd made these adjustments there were only a few minor blemishes left for the spot removal tool. I used the lite skin softening tool to brush the skin lightly and the shadow tool on her right cheek to define the cheek bone. Most the brush work was on the hair to the right to even out the color from the hot spot. After that an ND gradient from the left to pull down the spill on the background and a radial filter to isolate her more from the background. Never touched the denim.

Your basic image was good, very well composed, and you nailed the focus on the eyes, so no sharpening anywhere required. Again, just my opinion but I believe raising the lights, bringing them just a little more toward on camera axis and balancing them for 2:1 ratio, moving her forward slightly from the background, and adding a kicker on the hair, would have done much to highlight the features.

 
Yours even more magenta, however love how gentle you went with the processing (except the

Lacking a defined white, black or gray reference point, any adjustment to WB was a guess at best. I tried sampling the white of the eye and the pupil, which pulled the image to far to the cool side which in reality may have been closer. The other factor is hue being a function of luminosity, makes having a good exposure up front important to color rendition. I have a library of RGB skin color settings that I refer to if I'm really in need of drastic change, but most times I shoot for a pleasing look by eye, as on this.

As to processing the only real adjustments in Lr other then raising exposure, and shadows, was to set the WB, decrease highlights, set the white and black points and apply a mild contrast curve. Once I'd made these adjustments there were only a few minor blemishes left for the spot removal tool. I used the lite skin softening tool to brush the skin lightly and the shadow tool on her right cheek to define the cheek bone. Most the brush work was on the hair to the right to even out the color from the hot spot. After that an ND gradient from the left to pull down the spill on the background and a radial filter to isolate her more from the background. Never touched the denim.

Your basic image was good, very well composed, and you nailed the focus on the eyes, so no sharpening anywhere required. Again, just my opinion but I believe raising the lights, bringing them just a little more toward on camera axis and balancing them for 2:1 ratio, moving her forward slightly from the background, and adding a kicker on the hair, would have done much to highlight the features.

Thank You! This thread has been a great discussion to highlight a point that proper everything is important. Since I went underexposed, it didn't help at all. Some further research on the Internet suggested that luminosity in highlights with a caucasian female should be at 75% with everyone else going down from there... I reckon the only exception would be newborns.

I reckon denims shifted as part of the WB adjustment, but, well, you were working on a compressed JPEG anyway. I personally wouldn't used eye as the source for WB since the whites are not neutral... If not mistaken, Dan Margulis had a deliberation on this point, suggesting in such situations the WB needs to be eye-balled (or maybe that's his mention of Denims in a chapter of his book, where he was dissecting a photo taken on a street in Italy).

Personally in such situation, I would focus on getting the skintones, using the LAB readouts getting the A/B ratios correct for the subject provided their skintone looks right.
 
in such situations the WB needs to be eye-balled

In the absence of a known white (or preferably medium gray for color) you have no choice but to eyeball, but then you are at the mercy of the color perception of the individual, quality of the monitor and it's calibration, or the AI of the software like Lr. I find the AI to be more then capable of getting close in most cases.

Some further research on the Internet suggested that luminosity in highlights with a caucasian female should be at 75% with everyone else going down from there...

Not sure where you're seeing this, but I've always been taught (and practice) to bump Caucasian skin anywhere from +.75 to 1-1/3 stop, above my combined meter reading. Underexposing skin creates unnecessary touch up.
 
the AI of the software like Lr. I find the AI to be more then capable of getting close in most cases.
That's I won't be able to test until Capture One decides to add one (that I don't think will happen).


Not sure where you're seeing this, but I've always been taught (and practice) to bump Caucasian skin anywhere from +.75 to 1-1/3 stop, above my combined meter reading. Underexposing skin creates unnecessary touch up.
Sorry I wasn't clear enough. I was speaking in terms of pixel luminosity, not the exposure. 100 is max you can ever get and something we avoid since L100 = 255,255,255 in RGB. In curves, my white point is set at 97% brightness so when I print there is never non-inked areas. If you were to use RGB values, that means the brightest point of the skin highlight won't be greater than 575 as the sum of all luminosities -- e.g. R=240, G=200, B=130
 
Straight out of camera, the image looked severely underexposed to me. I have no idea how you could be so far off on the in-camera exposure. Smoke's inclusion of the histogram in his post showed me what I surmised just by looking, namely significant underunderexposure at the time of shooting.

The more I look at this photo the more distressed I am between the cheekbone rendering on her right side, which has a fairly small bit of very bright highlight, while her left cheekbone has no highlight whatsoever.
 
Last edited:
@ebyelyakov I don't believe in blown whites even in a high key, I'll pull back. On the highlights and shadows of a portrait, it's more about before you snap the shutter and less about the numbers sampled from the image after. Hitting the sweet spot on light placement and settings, make sampling irrelevant, because the closer your image is to perfect SOOC, the less post production you need. Unless I'm doing a composite matching multiple images, or heavy editing of skin that requires rebuilding color and texture, I dont worry much about sampling. Even then I still want the best exposure I can achieve. The old computer adage "garbage in, garbage out" could apply to digital images processing. Severely underexposing an image limits the data available to work with.

In your image as I stated earlier, my thoughts are that your key and fill are to low, need to be more on camera axis, metering the key for f/8 incident reading is a good starting point for the highlights, the fill needs to be metered for a 2:1 ratio incident reading for a little shadow definition, and open up a stop on the exposure reading taken under the chin. That should have you close enough to dial it in from there based on your histogram. As a footnote there was a lot of spill on the left side of the background. Moving your subject forward or adjusting the angle of the lights will help that. By taking a reflective reading of the subject and the background you can adjust the difference of your background to turn white at +4 stops over, or black -4 stops or anywhere in between. Here's a handy chart I use Dean Collins method Dean Collins Chromo Chart.pdf

Bottom line, take the time to do it right up front and the numbers will line up without adjustment.
 
@ebyelyakov I don't believe in blown whites even in a high key, I'll pull back. On the highlights and shadows of a portrait, it's more about before you snap the shutter and less about the numbers sampled from the image after. Hitting the sweet spot on light placement and settings, make sampling irrelevant, because the closer your image is to perfect SOOC, the less post production you need. Unless I'm doing a composite matching multiple images, or heavy editing of skin that requires rebuilding color and texture, I dont worry much about sampling. Even then I still want the best exposure I can achieve. The old computer adage "garbage in, garbage out" could apply to digital images processing. Severely underexposing an image limits the data available to work with.

In your image as I stated earlier, my thoughts are that your key and fill are to low, need to be more on camera axis, metering the key for f/8 incident reading is a good starting point for the highlights, the fill needs to be metered for a 2:1 ratio incident reading for a little shadow definition, and open up a stop on the exposure reading taken under the chin. That should have you close enough to dial it in from there based on your histogram. As a footnote there was a lot of spill on the left side of the background. Moving your subject forward or adjusting the angle of the lights will help that. By taking a reflective reading of the subject and the background you can adjust the difference of your background to turn white at +4 stops over, or black -4 stops or anywhere in between. Here's a handy chart I use Dean Collins method Dean Collins Chromo Chart.pdf

Bottom line, take the time to do it right up front and the numbers will line up without adjustment.

Thank you so much, @smoke665 for all the insightful feedback and the time you put to elaborate and explain it all. Really appreciate it. Now need to find another model ! :)
 
Like the original but the one in the first post looks like a plastic doll to me. A pretty plastic doll but a plastic doll none the less.
 
Like the original but the one in the first post looks like a plastic doll to me. A pretty plastic doll but a plastic doll none the less.

Thanks mate, appreciate your feedback. Lesson learned, feedback received and processed :D
 

Create an account or login to comment

You must be a member in order to leave a comment

Create account

Create an account on our community. It's easy!

Log in

Already have an account? Log in here.

New Topics

Back
Top Bottom