What's new

So, I took it out of Auto..

mostly sunny

TPF Noob!
Joined
Dec 18, 2009
Messages
445
Reaction score
0
Location
Northridge, Ca
Can others edit my Photos
Photos OK to edit
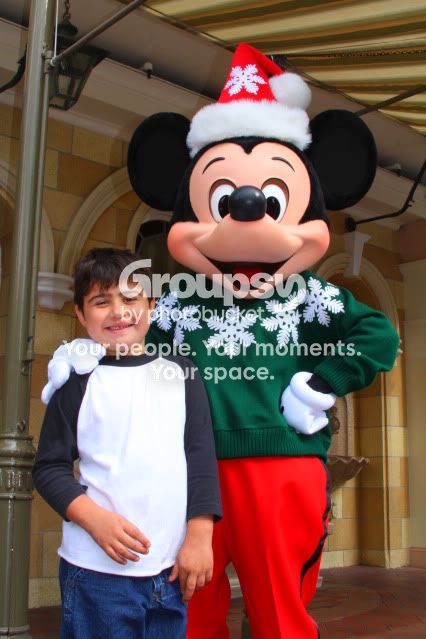
It's a simple snap shot with Mickey Mouse.. I only had one chance..
I did use the flash.. because when I took a "practice" shoot (not with Mickey) it was to dark without the flash.
So, tell me how the color looks..
IMG_5712.jpg


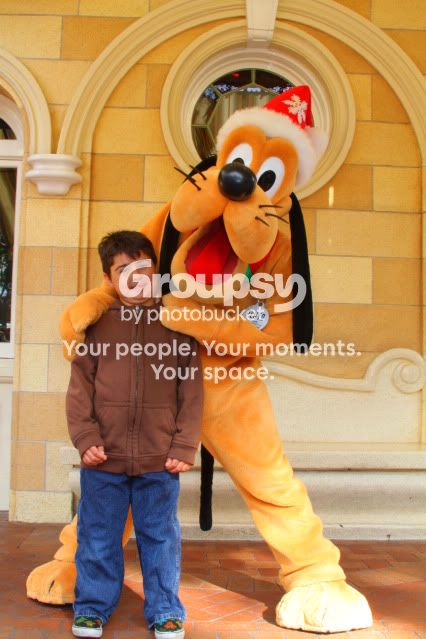
Oh this one... I think the color is a little off.. but I "want" to think it''s cause of the color of Pluto..
IMG_5697.jpg
 
Did you shoot in raw? You need to change you white balance in the last one.

Edit: I went ahead and did that for you so you can see the difference it makes.

IMG_5697.jpg
 
Last edited:
red looks a bit oversatturated in the first one, but im on my work computer so it could just be me.


at least you got your kid looking and smiling at you. my 5 year old is quite hard to get any halfway decent shot of him lol.
 
Ak, I didn't edit my pictures at all..

ISO was set at 500-- too high?
 
yeah you had your iso at 400 and f stop at 22 and only at 1/13 shutter speed. Why? You could of lowered you f stop and up your shutter speed and would of gotten a sharper picture. Looks like a little motion blur in it. But that doesnt effect your white balance.
 
Ok, I am going to try to say this as "un-harshly" as I can, because I really do not mean any offense to this, but its been a long day. This isn't your first time at the rodeo, you have been around for a while, pretty much with the same problems plaguing you. You have never stopped and took the time to learn the basics. If you do not understand ISO, Aperture and Shutter speed, it does not matter what mode you shoot in ( aside from Auto, but even that gets it wrong many times ). You were shooting at nearly the max aperture for your lenses which pretty much equals "garbage image quality." Your ISO should never leave 100 (not auto ISO....not 200......not 500.....not 3200...........1-0-0!!!!!!! ) unless you simply cannot get enough light into the camera using a slower shutter speed ( ie. you need to shoot fast to freeze actions not enough light is getting in ) or wider aperture ( ie. the lens won't go any wider, or you really need the deep depth of field for the shot you are taking. Thats it. You keep coming back over and over again with the same tired questions and C+C with the same problems. Learn the basics. There is nothing else anyone here can tell you because if you don't understand those, it doesn't matter what mode, white balance, or fancy pants camera you are shooting with, you will end up with garbage.
 
Your ISO should never leave 100 (not auto ISO....not 200......not 500.....not 3200...........1-0-0!!!!!!! )

That is very misleading information.

Not really in regards to the context of the rest of his argument which was basically that you want to be shooting at the lowest possible ISO you can to produce the desired results. Obviously there are some exceptions here and there, but in general this holds true.
 
When I get unharsh feedback.. I just want to put the camera away and not use it.

I won't be sharing.. You're right I don't get it.. and I have read all the books.. I just don't get it. I have no idea if I ever will.

I really thought these pictures were a vast improvement.. oh,well, I am happy with my slow progress, very slow progress..
 
Since you're not getting it, can I suggest experimenting with your camera. Take an object that has a lot of color and detail, fake flowers or wine bottles for instance, and put your camera on manual or aperture priority or whatever and shoot it; maybe even get an 18% grey card to be able to get the correct lighting. Then Start with the lowest ISO and change things - if in manual - change shutter speed, and then aperture and then both; if in aperture priority mode - change the priority. After you do this, stop and look at the photos on your computer and see what the results are. Then learn how to get the correct expose at different apertures and shutter speeds; again look at them in the computer. After you got that down, change the ISO and do that again. Get comfortable to get the ability to change ISO, aperture and shutter speed to get the correct exposure.

Your photos look a little out of focus and I would use the same setup as above to get used to focusing as well.

Remember that to start getting good , sharp photos the shutter speed has to be at least 1/focal length which on most cameras today it is the shutter speed number. For example if you have a focal length of 50mm you need to set your shutter speed onto at least 1/50 (50 on some (most?) cameras; for 135mm it's at least 1/135. But the faster the shutter speed for each focal length the better.

I'm going to disagree a little with the ISO 100 idea as my camera the lowest native ISO is 200 but can go to 100; your camera may be ISO 100 as it's lowest native ISO so it may be true for your camera.

As far as not shooting at f22 ... I guess that depends on how good your lens is, yes a lens may have a "sweet spot" at f8 or f11 but if you need to use a smaller aperture I would use it.
 
^^^ I agree with most of what Vinny has said.

First, do not get discouraged, sometimes one needs to discipline their child, and you have been disciplined the same way, with kindness and consideration. If I was you, I would be thankful that someone has the consideration to tell you straight out what you should start doing.

You have purchased a great camera, now it is time to learn some of it's functions and capabilities.

Start with the boring stuff first. Most people skip boring stuff and harder topics and move on, learning very little.

Get a subject, such as has been mentioned, like fake flowers (I thought that was a really good idea). Set your camera to auto. Take a couple of shots. Remember for this exercise not to shoot into the sun, try and have the sun to your back. Now, print this photo or place it on your screen. Look a the data the camera provides you and write it down. Oh, did I mention to get a notebook and set it up for keeping data of all your shots? thats right, make sure you detail which photo and what the details were. (sunny, shading, time of day, etc..)

Now, use your auto photo info as a starting point. Set your camera to manual and starting "fiddling" with the settings, changing them and recording all of what you set for each photo. As you do this, you will find yourself reveiwing the images and seeing what the different settings will result in the image. THIS WILL TAKE TIME. Do not expect to do this all in a day.

***Do not forget to RTB - which is 'read the book' - meaning the manual.

What you will notice is, at some point a light will go on in your head, and you will finally start to understand all of this good stuff...one step at a time.

Good luck, don't be discouraged or frustrated...Happy Thanks Giving!

And yes, these photos are an improvement from some of your earlier posting.:)
 
I'm going to repeat some of the advice previous posters have already given you, so my apologies to both you and them.

Danielle, don’t give up. It is frustrating. Some people “get it” quickly, other, not so much. In any case, nothing replaces getting a “feel” for what you’re trying to do. And getting the “feel” requires experience, which comes from practice and making lots of mistakes. Mistakes are good, if you take the time to understand why they are not successful. So consider taking a focused approach to learning. Take one topic at a time, and then beat it to death. Don’t move on until you’ve got that topic under your control and on autopilot. When you don’t have to think about it, because you’re internalized it, then you’ve got the feel.

We all have different styles of learning. Some need to see an example (visual learners), some need to hear the instructions (auditory learners), some need to read the instructions (reading learners), and some need to physically do the exercise (tactile learners). If you’re in the third catergory, then “READ THE MANUAL” works great. But if you’re primarily one of the other types of learning, then it’s not so useful. It would help if you can identify how you learn stuff, and then structure your learning efforts along those lines.

While tutoring some beginning photographers, I’ve noticed they try to change too many things at the same time, and consequently have no idea what effect those changes make. So, I ask them to change only one variable at a time, and take a series of shots while changing that variable. For instance, put your camera on Program exposure and see what reading it gives you while shooting a scene. Say it’s 1/500 at f/8 at ISO 100. Now change your exposure control to manual and set the very same settings yourself. Take the shot. Compare with the previous shot done on Program. They should be the same. Now start changing the shutter speed by a full stop – say, 1/250. Now your picture will be overexposed. You get the correct exposure back by closing down the aperture by one stop (f/11). If you repeat this exercise, you will see that you have a set of correct exposures (1/60 at f/22, 1/125 at f/16, 1/250 at f/11, 1/500 at f/8, 1/1000 at f/5.6, 1/2000 at f/4).

Which of those is the “correct” exposure for your particular situation? That’s where the photographic intent comes in. Are you trying to show motion? Then a slower shutter speed (1/30 or less) would allow some motion blur. Are you trying to freeze action? Then a higher shutter speed (above 1/500) is more appropriate. Are you trying to isolate your subject from the background? Then using a wide-open aperture (f/4 or less) will give you a shallower depth of field and keep more of the foreground and background out of focus. If you want everything pin-sharp from front to back, then a small aperture (f./16 or f/22) is more appropriate.

Along this journey, you need to learn at what shutter speed you can hand-hold your camera without unacceptable blur due to hand-shake. That varies by focal length, but a common rule is that your shutter speed should not be less than the inverse of the focal length. On a full-frame camera body, with a 50mm lens, that would be about 1/50 sec (actually 1/60 sec is the closest to that). If you’re using a 200mm lens, that would be at 1/200 sec (or 1/250 which is the closest shutter speed to that). Any time your shutter speed falls below this value you risk getting blurred shots due to hand-shake. So, you can increase your ISO, or you can minimize hand-shake by using a tripod, or you can put a flash on and blast your subject with enough light to make hand-shake irrelevant. Again, your photographic intent will guide you as to which option is the most appropriate one.

Despite having over 40 years of experience in photography, I find that I am still actively learning every time I go out and take photographs. You’ve got to get the mechanics (exposure, focus-setting, focal length choice, external lighting) behind you to allow you to explore composition, texture, emotion, colour, and dramatic light. It’s like any motor skill, whether you are playing a sport or a musical instrument, or engaging in a skilled activity such as cooking, woodworking, driving, etc.

This forum, used in the right way, can help you tremendously in your learning process. For instance, if you identify what you’re trying to do in a photographic sequence, the other readers can give you feedback on whether you’re achieving it, and whether there is another way or ways to achieve your result. If you then incorporate this advice and re-post with your next series of shots, then you can see whether you’re “getting it” and give your audience a feeling of participation in your journey. On the other hand, random posting with no background information mean that the audience has no context within which to critique, and therefore you will not get much benefit from the reaction.

Sorry for the long post, but this topic comes up often, and the degree of frustration of both posters, and readers is obvious.

 
When I get unharsh feedback.. I just want to put the camera away and not use it.

If this is your honest feelings, posting up for C&C from this point on will really be counter productive. You will never improve so our replies will always be "harsh".

My reaction would be the exact opposite. When I get "harsh" feedback, it makes me want to go grab my camera and fix what is wrong and learn from my mistakes.

If you want warm fuzzy reactions to your photos, show them to the little guys grandparents. If you want to improve in the field of photography, continue to post here and grow from others suggestions.


p!nK
 
Last edited:
Sorry, Danielle, I do not mean to discourage you, but in fact the exact opposite. Those who disagree with my ISO advice, to each their own. Her camera is a 7D. Its lowest ISO is 100. While you may need to up ISO in situations such as manual flash, for most cases and especially beginners cases ( and ESPECIALLY with the notoriously noisy 7D ) she shouldn't be leaving ISO 100 because all she will be doing is degrading the image quality unless its absolutely necessary. From this post and every other post, her main problem seems to be that she is unhappy with the pictures she is getting.

As for Fstop and Aperture you may in fact get what they do, but not the goods and bads of them. In most lenses you want to stay below F11 ( you can go higher but typically its due to some sort of specialty circumstances like macro or something like that ) Most lenses lose image quality at really small apertures ( small opening, not small number F2.8 is wide/large while f22 is small. ) Shutter speed for the most part has two functions, either to freeze action, or to let some action blur. They ALL, including the ISO, help form the exposure for each frame in equal amounts. If you lower the speed one stop ( from 1/500th down to 1/250th ) but up the Fstop 1 stop ( F/2.8 to F/4 ) your exposure stays exactly the same. However, because you upped the Fstop, your depth of field will be just a little deeper, and since you lowered the shutter speed, you may not freeze the action as well as you would have at 1/500 (depending how fast the action is in the scene, it may not matter at all ) ISO is also "stops" so going from ISO100 to ISO200 to ISO400 to ISO800 to ISO 1600 etc. is increases of one "stop" a piece.

As others stated, practicing will help you alot. Especially understanding how depth of field in relation to Fstop/Aperture number. Also depending how close the subject is to the camera, that can effect this as well. On your pictures f/22 was way deeper than you needed. F5.6 would have probably been fine and probably yielded a much sharper picture.

As a disclaimer, my advice is aimed at the beginner. There are exceptions to everything mentioned and all of these settings can be used in very creative ways. However, that is not the purpose here, so there is no need on a physics lesson or recital of some advanced photography theories just to help Danielle get the basics.
 

Create an account or login to comment

You must be a member in order to leave a comment

Create account

Create an account on our community. It's easy!

Log in

Already have an account? Log in here.

Back
Top Bottom