Softball picture

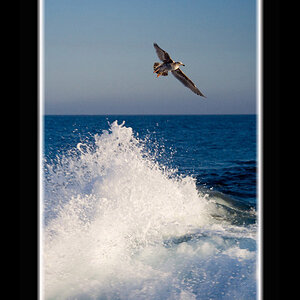
Shutter speed needed to stop motion depends on magnification/size of the action subject; angle of action in relation to the film plane; speed of the actual action (a base runner is 'slow', but a baseball leaving the pitcher's hand is 'fast'); the distance to the action (this is sort of like magnification/size). At times, 1/1000 second is PLENTY fast; at other times, 1/2500 second is better. it depends on a number of factors. Keep in mind that much of the time, a slight amount of blurring on the extremes (feet, hands,ball leaving bat,etc.) of a shot can convey a feeling of movement. A baseball leaving the bat is often a little faster than a softball; youth sports speeds are slightly slower in many cases than NCAA or pro-level athletes. So...you need to check the shutter speed and HOW, exactly, it is rendering the actual subject you're shooting. A slide into 3rd base could be shot at 1/640 second with not too much issue; if you want to absolutely FREEZE a ball leaving the bat, even 1/1000 is often a tad slow...
 
re: The bottom shot of the catcher is one you can shoot during practice.
Go right in front of her, about half way between the pitchers mound and home plate.
And make sure you get her eyes.

Go behind the pitcher and just to one side, and get the ball in mid air, about to be caught by the catcher.

Obviously, these shots need to be coordinated with the coach, because you will be in the middle of their practice.
Although the first can be done on any time, since it is just a posed shot of the catcher.

As for exposure, use the "sunny 16" rule. f/16 at 1/ISO. Then adjust to the equivalent exposure, to get the shutter speed you want.
Most day games have pretty constant lighting. So find the correct exposure, and you can go manual.

As I said before SHOOT a lot.
You need to develop a feel for how fast or slow you want to shoot at, to get the motion effect you want.
There is no substitute for experience, AND KEEPING NOTES.
 
The darker pic is before i set the ISO on auto.

The second pic, I believe the dark spot pin the right is the fence blurred.

Id love to get a crisp shot like yours.

warning, long post

You need to work on several things, and they will take time and practice. So hang in there, you can make it.

Good sport photographers are not born, they learn their trade and skills with a LOT of experience/practice.

I was asked by someone why I was shooting so many soccer games. I told him, like an athlete, I have to train myself to learn to shoot a sport (they are all different), and then I have to practice to build to a level of proficiency that I want. I cannot just go out and shoot a sport that I have never shot before. And some sports are just more difficult for me to learn to shoot and get good at than others. For me, soccer is MUCH harder to shoot than football.

Planning
Sometimes I spend a few games just figuring out where to shoot from, and what lens to use.
Example1 - My 1st water polo game was a complete bust, from a photo image point of view.
However I learned enough that I got several good photos out of the 2nd game.
Example2 - Shooting from the hill just beyond the outfield fence to infield requires a 300+mm lens, my 200mm (on a DX body) was not long enough. The distance to the infield was just too far.​
Depending on the sport, if I can, I will do a scouting trip to study the field in advance, so that I can plan the shoot, and not waste so many game day shots. Google Earth has been helpful in this, but does not replace an actual scouting trip with a camera, notebook and pencil.
Sometimes you have little or no choice. You cannot determine the lighting of a night game during the day. You have to wait for the night game itself. Or if you are going to an "away" game, at a field that you have never been to. You try to learn as much as you can BEFORE the game starts, then in the first part of the game, so that by the 2nd quarter or 2nd half of the game you are OK.
Sometimes you don't learn things until AFTER the game, when you are editing the images. Then you apply that knowledge to the subsequent games. TAKE NOTES of what you learn.

STUDY YOUR NOTES.
ISO
Set your ISO high enough so that you can set you shutter speed high enough to eliminate camera motion blur. Which for now, lets say is 1/1000 sec. Forget what people say about shooting at a low ISO for maximum image quality. If you can't shoot with a fast enough shutter speed, you will have blurry image. What good is a high quality low ISO image, if the image and subject are blurry from camera and/or subject movement.​

Now what shutter speed to use?
The longer the lens, the faster the shutter speed needs to be to compensate for magnification. The general guide is
1/(focal length * crop factor)​
So a 300mm lens on a Nikon DX camera with a 1.5 crop factor = 1/(300 * 1.5) = 1/450 rounds UP to 1/500.
This is just a guideline, and there are instances where I want to use a faster shutter speed, such as when I am being blown around by the wind, or I am tired and can't hold the camera steady.

The above is just YOU, not the subject.
Add a moving subject into the picture and you have to compensate for it also, so you have to raise the shutter speed higher. So maybe 1/1000 instead of 1/500 sec.
Support
For a long lens, like a 300mm, I suggest using a monopod to help hold the camera+lens.
I usually use a monopod when shooting a 300mm lens, cuz I CANNOT hold it steady enough. And my arms get tired holding a long lens up for any significant length of time.
A monopod only provides vertical support. If it is windy, you will still get blown around.​

Set the exposure mode.
READ the manual to learn about the various modes.
On my camera Auto Exposure = closest subject focus. This means the camera will focus on anything between me and my subject. This is why I do NOT use Auto. I want to control what the camera focuses on. So I use P (program), S (shutter priority) or A (Aperture priority), depending on what I determine that I want to use.
For sports it is usually S or A. Sometimes I will use M (manual) when the lighting is troublesome, and I want full control over the exposure.​

Set the Auto Focus (AF) mode.
READ the manual to learn about the various AF modes.
First is AF-S vs. AF-C
There is AF-Single and AF-Continuous.
For sports, I use AF-C, because the players are in motion and I want the AF to track them.​
Next there is the AF mode of single point or area/group/zone focus.
How area focus works depends on the camera.
On the Canon T5 and T7i at my school, the area focus uses closest subject logic. This is fine for a SINGLE player, but when you have multiple players in the image, the camera will choose the closest player to focus on. It is for this reason that I do NOT use area focus in sports where the players will mingle or be in the image at the same time.
IOW area focusing would be fine for singles tennis with ONE player, but terrible for basketball where many players are intermixing, because the camera has no way of knowing which of the many players is YOUR subject, instead will focus on the closest player to you.
In softball, if you are near 3rd base, and you look towards 1st base; you have in your viewfinder, the 3rd baseman, the pitcher, then the 1st baseman. The Canon on area focus, will focus on the 3rd baseman, NOT the 1st baseman.

I use single point, center AF.
  • This means I focus with only the center AF point.
  • This also means that I don't have to look for where the camera thinks it wants to focus on.
  • Instead, I set the center point on whatever I want in focus. KISS principle.
Finally, when the action is moving, you do not have time to fuss with moving AF points for a tight crop. The second rule in sports photography is to get the shot. You can do your cropping later in the computer. (The first rule is to not get hurt, while you are taking pictures.)​

This leads to another topic, cropping in the camera.
Do NOT crop tight in the camera, except for static subjects.
My experience is that it is hard to follow moving action if you are zoomed in tight. And you cannot see developing action. I pull back and give myself room around the subject, so that it is easier for me to follow the action and see something that will happen.
Example, runner going from 1st to 2nd, the 2nd baseman just caught the ball and is positioning to tag the runner out. If you are tight on the runner, you won't have enough image area to get the 2nd baseman doing the tag, and maybe not even know that the 2nd baseman was going to tag the runner out.​
We have enough megapixles in the camera that we do not have to crop tight in the camera. I do my cropping on the computer.​

gud luk
Now go out and shoot.
 
Last edited:
You got a good subject to really get great at this sport, @SquarePeg might be able to give you some tips too, as she does this as well.
 
Great tips given already. Not much to add other than I always found myself cropping so now I stick with the longer lenses for softball. Knowing the batting order and players helps. Know who is lefty vs righty so you can be on the side of the field that gives the better vantage point. I like the right side of the field around 1st base for shots of right handed at bats and left handed pitchers - and vice versa for 3rd base side. Know who/when you’re likely to see a bunt or a steal so you can be ready for that.

Don’t forget to enjoy the game! Watch that home run for a few seconds then grab some shots of the celebration and high fives at the plate. Capture the player’s love of the game. This is one of my new favorites because you can see the grin on her face BEFORE she hit the HR. She knew she was going to crush it.

 
Sorry, no examples since I don't have them with me. I will add a couple of tips that I've picked up.

1. Shoot in high speed continuous drive mode, as Canon calls it anyway. Things happen so fast that it's hard to time a single shot just right. I know, it's kind of 'spray and pray', but I'm not into working THAT hard at the ball park (shooting for fun, not for work). Even at 7 fps, I feel lucky if I catch that exact moment the ball contacts the bat.

2. Just like the players, learn to anticipate the next move. Shooting the first baseman is best done from the third base line, not up close from the first base line, unless you want a shot of the ball coming straight in (then you hope they catch the ball). As the action is happening, they are facing the ball, which will probably be somewhere between first and third bases. But then there's that pesky pitcher that keeps getting in between you and the first baseman. So, which way do they normally move off the mound when the ball is hit? Pitchers especially are creatures of habit and should be pretty predictable.

3. Pay attention to the fence height. At many of our local parks, the height changes by park, by field, and by location around the field. At many of the fields my daughter is playing on, I can stand a ways down either baseline and it's just the right height to rest my camera on the top of the fence and shoot over with a clear view. But then, being 6'7", I probably have a few more options than most.

4. Respect the crowd. Nothing like a crazy softball momma bear with you on her bad side. Even if I'm sitting on the ground well in front of them sitting in their seats (clearly able to see over me), I'll often still check just to make sure I'm not in their way. Unless they are from the other team, then it's fair game (read with sarcasm).
 
I don't have a whole lot to add as far as technical suggestions but I will say this: don't be afraid to shoot through a fence or net. This photo was shot through a net:

Spokane Indians 2012_0711_35.jpg
 

Most reactions

New Topics

Back
Top