What's new

Some tips for a beginner please.

Andronachi Alex

TPF Noob!
Joined
Oct 19, 2014
Messages
7
Reaction score
0
Can others edit my Photos
Photos OK to edit
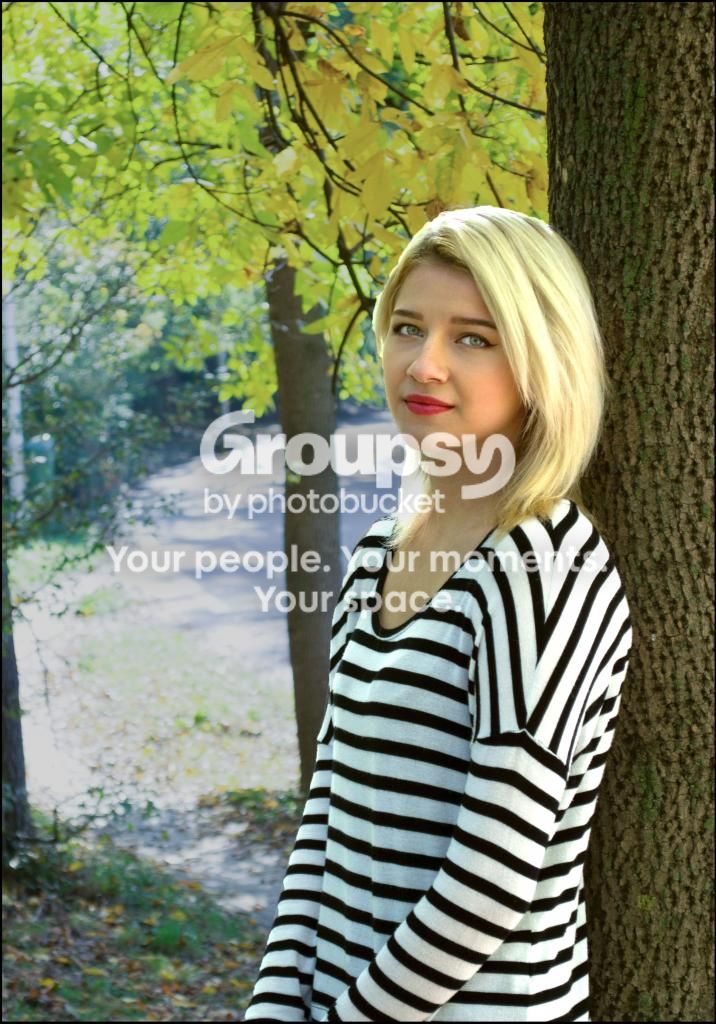
I bought my first camera 1 month ago. It is a Nikon D3100 with kit lens ( AF-S NIKKOR 18-55mm) and i made around 1000 pics. And one of my friend wasn't pleased with the photos that i took for her and now i'm curious to know what i should change in my next photos. I will upload a photo for example.
 

Attachments

  • _DSC0807.webp
    _DSC0807.webp
    1.9 MB · Views: 240
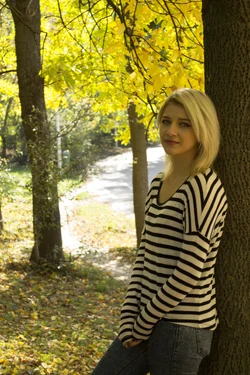
The background is far too bright for a portrait. It causes her face to be underexposed and is distracting.

If possible, move to your right and have her turn with you. Maybe the background to the left isn't as overpowering.

Also, move closer or crop more. The girl is your subject, not the background. So make her the most prominent object in the image.

Also, her hands just scream insecurity and discomfort. Evidenced by the way she's pulled the sleeves are down across her palms.
 
To add to that, her skin looks a little yellow. That is probably because of the light reflecting off of the yellow leaves, but you can fix that in post. Lightroom is my favorite for adjusting the color temp.
 
Like all Nikon DSLRs your D3100 has 3 light metering modes you can choose from.
For making portraits Center-weighted or Spot metering works best,
See pages 79 - 82 of your D3100 Reference Manual. The manual is a PDF file on the software disc.
Next read about White Balance on pages 87 and 88.
You D3100 should have been set to Shade.

I edited your photo.
I corrected the white balance and globally (the entire photo) sharpened the photo using the Photoshop CC 2014 plug-in Adobe Camera Raw (ACR).
Using CC 2014 I cropped the photo so her camera right eye is on the upper right rule of thirds power point.

I then selected just the girl and the tree trunk using the Quick Selection tool and with the selection active I added an Exposure adjustment layer. I added 1.25 EV of exposure.
I then inverted the selection so everything except the girl/trunk was selected and I subtracted 6 EV of exposure.
So at that point the total lighting ratio adjustment was 7.25 EV.
All my other edits were then local edits to her facial features.
I lightened the whites of her eyes, sharpened her eyes, nose, lips and the hair around her face..
I added vibrance to her iris and lips and lastly I added a very narrow black border.

Edit_DSC0807.jpg
 
Last edited:
Can I ask a question here? How do you know what the skin tones SHOULD be? What are the rules and where can I read them? I am a beginner and trying to learn. When I try to edit something, I don't know up to what point I should edit. How do you know you should add 1.25 EV of exposure, then subtract 6 EV of exposure?
 
Can I ask a question here? How do you know what the skin tones SHOULD be? What are the rules and where can I read them? I am a beginner and trying to learn. When I try to edit something, I don't know up to what point I should edit. How do you know you should add 1.25 EV of exposure, then subtract 6 EV of exposure?
How you edit is subjective, but think about it.... have you ever seen someone with yellow skin? If so, then they probably had jaundice. You don't want your people to look sick. As for the +1.25 and -6.... again, its looking at it and figuring out what looks right or better. There is no manual on how to develop your eye to see what would make something look better. Study pictures that you like and ask yourself why you like them. Keep submitting pics for critique. Eventually it will become second nature to you, but like anything else it takes time.
 
Makes sense. Thank you
 
When i did the photo the white balance was set on cloudy. and maybe that was one of the biggest problem ?
 
KmH ... thanks for the tutorial.

comparegirl.webp
 
Like Amada said experience has a lot to do with it.
But there is indeed at least 1 manual we can access for portrait retouching guidance:
Professional Portrait Retouching Techniques for Photographers Using Photoshop (Voices That Matter)

But there are some other guidelines and tools.
ACR (Photoshop Lightroom's Develop module and Photoshop Camera Raw) have a White Balance tool that looks like an eyedropper.
We can click on an area of the photo that is supposed to be white and ACR will automatically adjust the WB.
I adjusted the Temperature and Tone sliders until I thought it looked 'right', instead of using the WB tool.

Another key to making portrait photos is light direction, quality, and control.
Direction & Quality of Light: Your Key to Better Portrait Photography Anywhere
On-Camera Flash Techniques for Digital Wedding and Portrait Photography
Off-Camera Flash: Techniques for Digital Photographers
Minimalist Lighting: Professional Techniques for Location Photography

Strobist: Lighting 101
• flash photography techniques - Tangents
 
Last edited:
i have the PS but it's kinda complicated to use it. is it lightroom easier to use ?
 
Last edited:
To add to that, her skin looks a little yellow. That is probably because of the light reflecting off of the yellow leaves, but you can fix that in post. Lightroom is my favorite for adjusting the color temp.

Yes. All I could think was "Big Bird" Just way too much yellow. Did not look natural at all. I like the way someone edited it though and then gave a little "how to" to get those results. I think I'm going to like this forum.
 
All good advise from everyone here. I will add that if you're shooting in JPEG, change to RAW. RAW gives you MUCH MUCH more control than an already compressed JPEG file. A RAW file is your digital "negative" so to speak. It is the photo as the camera's sensor captured it with no changes or in camera processing applied to it.

Along with the many books available about photography, and Photoshop, there's also several tutorials on YouTube on how to use Adobe Photoshop, and Adobe Lightroom. This is how I learned most everything I know with regards to photography, and photo editing.

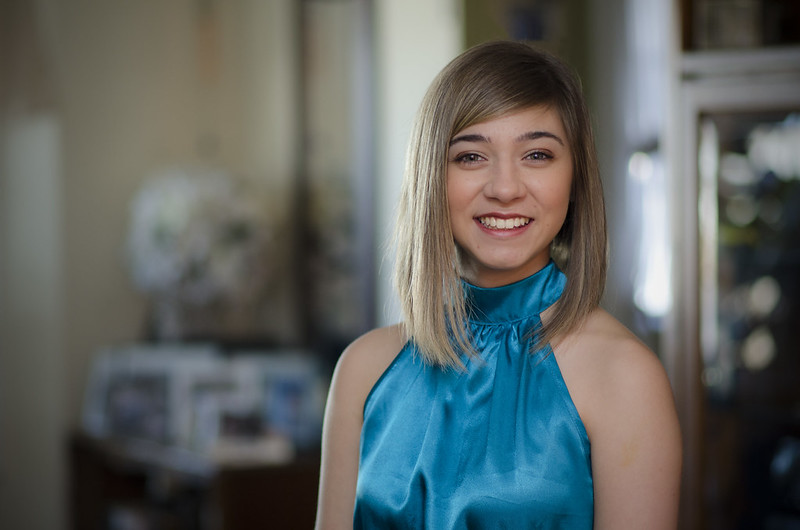
I wanted to also add that while the 18-55 VR lens is a great little lens, a fast aperture prime (fixed focal length) lens of at least 50mm is ideal for doing portraits. The wide aperture on prime lenses can blur out the background so that your focus is drawn to the subject of the photograph, and not distracted by the background. Although there's no rule about having a nice background in a portrait, it is more difficult to make it so that it doesn't distract your eye away from the main subject.

Another thing to remember is typically longer focal lengths typically make good portrait lenses. Going back to the background topic, a longer focal length lens will compress the background so that less of it is visible behind the subject. This can be used to great effect when you're photographing in an area with horrible backgrounds.

As an example of what a fast aperture longer focal length lens can do for you I've provided a portrait that I took with my Nikon 85mm 1.8G lens. The photo was taken in the house which didn't have the nicest of backgrounds, so by shooting the lens at f/1.8 I narrowed the depth of field to keep only her in focus, and totally blur out the background.

DSC_7763 by Gary C's Photography, on Flickr
 
Last edited:

Create an account or login to comment

You must be a member in order to leave a comment

Create account

Create an account on our community. It's easy!

Log in

Already have an account? Log in here.

New Topics

Back
Top Bottom