I have the Nikon D5300. With a zoom lens and a 50 mm. Tonight is my first portrait shoot in the golden hour. Tip for aperture or lighting at all? Little nervous. I know trial and error is a big deal. I have been reading up a lot and s3ems like spot metering is a big deal with this time of day. Small or large aperture seems to be confusing. Many say one thing or another. Tip?
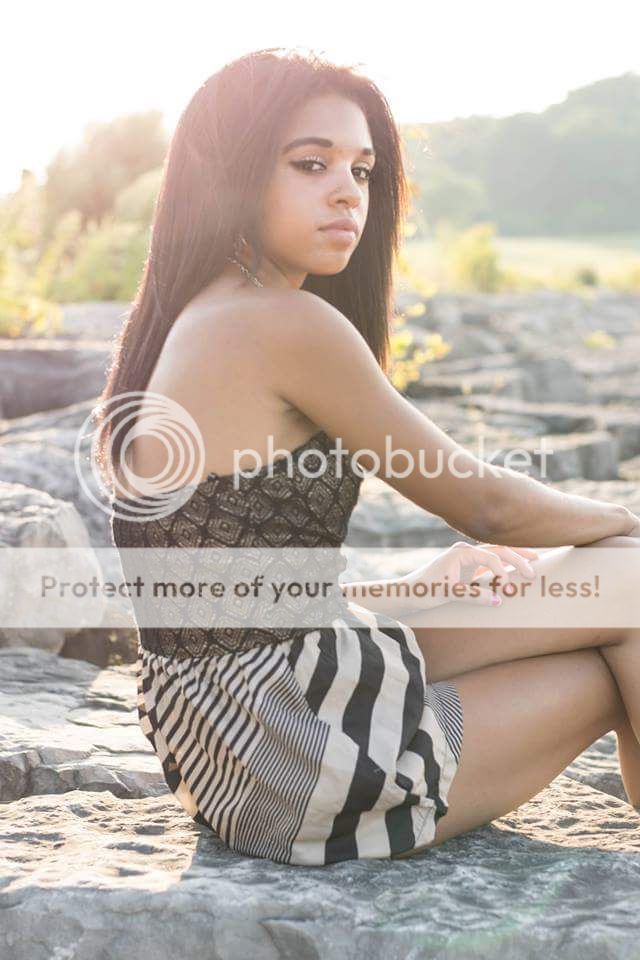
Great info! Thanks so much! I have taught myself to only shoot manual. Learning iso is so important. Great points. I think I lacked some clarity from moving too much. Next time I would bring a tripod. I would shoot more angles. I don't know if you can see the picture I added above. Thoughts?
Ain't that the way it is with all photography? One person says this and the other person says something different. It's confused me for forty years!
But, then, I've never even understood why cars have four wheels rather than three when three points define a plane and a plane defined by three points will find its own level.
I tried taking one tire off my car but that didn't work. Go figure.
Pythagoras must have not figured out the rules for tires.
I think you're finding out that everyone who writes on line shouldn't have the same amount of weight applied to their ideas. Read on and you'll see why ...
I also think you're finding out that everyone with a camera falls into one of several camps which define how they think about their shots.
I'm going to assume you do not wish to fall into the "sheer dumb luck" camp.
And, you'll eventually realize there is no perfect formula for every shot because every shot is somewhat to completely different than all the rest.
Add to that the fact "golden hour" lighting is constantly variable and hard and fast rules sort of go out the window from shot to shot.
And you're basically asking for hard and fast rules.
Since, IMO, there are few rules which universally fit any one situation, you must do two things ... at least to avoid the pure dumb luck category.
First, understand the basic rules of photography and how they apply to your camera.
I'd say the exposure triangle is the most basic rule everyone should acquaint themself with when it comes to photography. It's as simple as turning the steering wheel to the right makes your car go right. (Which, of course, doesn't apply when you're driving a motorcycle. Turn the handlebars right at 70 mph and you'll kill yourself. Go figure!) However, the exposure triangle gives you the basic rules when closing down the aperture to achieve DOF. Doing so will subsequently mean you must have a work around which compensates for the lower light levels entering the lens as you close down the aperture. The work around is accomplished by either increasing the amount of time during which the shutter remains open or increasing the light sensitivity of the image recording media.
Longer shutter speeds risk image blur due to camera shake or subject movement. Tripods and remote shutter release systems (which can be as simple as using the built in timer of your camera) minimize the first but cannot compensate for the latter) are work arounds here.
The second "to do" you should learn and comprehend is to recognize how you prefer to work as a photographer.
How do you think when you view a potential shot?
What are you seeing as the final result of your efforts?
If you cannot reach the point where you are visualizing the final result, your initial efforts will certainly be mostly trial and error. Probably more error than anything else - like forgetting you're on a motorcycle when you turn the handlebars. KA-BLOOOOOWWWWIEEEEEEEE!!!
Comprehending these two things will apply to all your photographic efforts, not just to one application.
Realizing you shoot, say, in aperture priority mode in most cases translates into someone who predominantly thinks of a photo as having a depth of field. DOF is directly related to your aperture setting (plus distance between lens and subject). If you think in terms of DOF, then you have the option to alter either shutter speed or ISO as required by the scene.
You should realize the pros and cons of longer or shorter shutter speeds for any one shot and the result you envision. Is this a workable change to your perceived result? If not, then you still have ISO to work with. Or, in some cases, you forgo aperture priority and alter your perception of the final image.
If you are in a situation where you tend to first think of shutter speed priority, then you have the aperture and the ISO to work with.
Why are your thinking shutter speed first?
What do you see in your head that suggests shutter speed will make or break this shot?
It's all in how you work and how you "pre-envision" the results.
photographers vision - Google Search
Where many photographers do not work is in the application of ISO. It has been drilled into our head that low ISO values result in the best image quality. This is certainly true but also relative to other values.
Not only the exposure triangle comes into play but so too does the print size of your final image. Therefore, in your favored technique of operation, it pays to think ahead to the final print size. There is a fairly wide range of ISO values which result in relatively insignificant changes in image quality when compared to altering either aperture or shutter speed. Do not fear raising ISO.
Metering a scene is relative to how you see the result and how your camera actually defines its various options when it comes to metering. It would do you well to fully understand the options your camera presents and fit those into your vision of the final image.
Spot metering is often discussed as a more advanced technique for the more sophisticated photographer. Yet, it can easily be learned in a few hours time with practical practice.
I often relate learning photography to learning to play a musical instrument. In this respect, anyone learning to play should have a familiarity with what is termed "practical music theory for guitar (or whatever instrument you've chosen)". This simply means there are rules which are relevant to understanding how to play a guitar vs, say, a flute. Musicians do not need to understand all of music theory, only those few rules which apply directly to their instrument.
Make your education in photography similar, learn what you need to learn as you need to know the application of the rules.
If, say, you are interested in spot metering, it might be useful to know that your camera typically combines metering functions with focusing functions. Learning how to lock those two functions independently from each other will provide greater flexibility in the use of both. This is your "practical" application of theory to your specific camera. If you do not at this point understand the functions and how to achieve both independently, try a search engine with your camera's model number into a "tips and tricks" search engine.
Lastly, your vision of the final result should be based upon light and shadow plus composition. If light is limited, then additional light sources are beneficial. With any DSLR how to achieve adding light is how you envision the final result.
Since your shoot has come and gone, how do you feel you've done?
Have you learned from the experience?
What would you do differently on your next try?


![[No title]](/data/xfmg/thumbnail/37/37413-e579e9da185db973d8cb34300b9f0eb9.jpg?1734170438)


![[No title]](/data/xfmg/thumbnail/39/39469-3f2d242112dec8dc3e7b2836cc85afec.jpg?1734173560)
