Tony From Louise's Restaurant (C&C please)

Global changes won't do it here because the issues aren't global.

According to the picture frame the image isn't vertical
That big bright thing attracts my eye no matter how dark it is
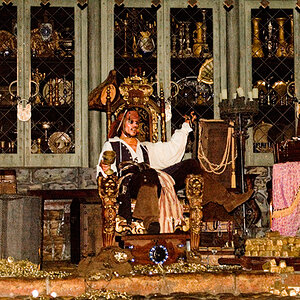
The wall is brighter than his lower face.
His forehead, cheekbones, nose are almost blown out.
His hands, arms and the apron are brighter than his face.

Editing all that to a good relationship with his lower face makes everything more substantial.

OK, cool ... so what did you actually do? I see the rotation, and that we came down about a half stop? Did you dodge/burn/change the color balance, anything like that?
 
I selected each of the portions that I thought needed changing and moved them to their own layer, made the changes and then merged them to one layer to show here.
 
LAYERS???!!! MERGING??!! That sounds like a lot of work and effort and learning and stuff!

Isn't there just some plugin I can use? :)

Seriously, though ... I'm just trying to follow the technique ... Now I've read in Kelby's books where he creates a soft-light layer filled with 50% gray, then adds black or white to dodge & burn. That kind of thing?

Or just a matter of physically cutting and pasting into different layers? And then adding an adjustment layer?

Do you have a link that discusses the technique(s) you used for adjusting different sections?

I'm sorry to be a pain, I'm really serious, and I want to learn to fish :)

Thanks in advance!
 
Since the original isn't really an environmental shot, and he is the subject, then this is how I would do it, The minor work necessary was done in LR5.
YOQP8W8.jpg
 
Last edited:
There are lots of ways to do virtually everything in PS.
I don't use dodging and burning on an overlay layer too much because it isn't precise; it is difficult to use when I want to make specific uniform brightness changes to a specifically circumscribed area.

In a picture like this, the most important thing to do is to learn to see the defects in the image, diagnose what you think should be done, decide what needs to be brighter, darker, etc.

Since I want to darken the entire background, I select what I don't want darkened, then copy and paste that selection. PS automatically makes a new layer with the pasted selection.(call that layer 1)

To darken the background, then I insert a levels or brightness adjustment layer just above the background and below the new layer 1.

Then I work on the figure, selecting the parts I want to darken, copying and pasting them on new layers with their own adjustment layers to darken or brighten them.

So what you have to know is:
  • how to make and use layer masks (and channel masks)
  • how to use the selection tools
  • how to create and use layers
  • how to create and use adjustment layers
  • what are clipping masks and how to use them
This is clearly not something that can be covered in a thread but a week of work would get you some functional knowledge but not a ease of use or understanding what is best to use when.
I have been working hard at this for 4 or 5 years and think of myself as reasonably skilled for an amateur but very far from expert. (Photoshop is the most complex program I have ever worked with and there are tools I still don't know how to use.)

It took me about 10 minutes on your image, working a bit quickly and a bit carelessly. To do this correctly it would take maybe 40 minutes because I'd be much more careful with masking and edges.

IMO, the totally best book to look most of this is Photoshop Masking & Compositing (2nd Edition) (Voices That Matter): Katrin Eismann, Sean Duggan, James Porto: 9780321701008: Amazon.com: Books

This is worth every penny (although I like the older version better which is available used 9780735712799: Photoshop Masking & Compositing - New & Used Books & Textbooks at Alibris Marketplace )
 
As an Amazon Associate we earn from qualifying purchases.
There are lots of ways to do virtually everything in PS.
I don't use dodging and burning on an overlay layer too much because it isn't precise; it is difficult to use when I want to make specific uniform brightness changes to a specifically circumscribed area.

In a picture like this, the most important thing to do is to learn to see the defects in the image, diagnose what you think should be done, decide what needs to be brighter, darker, etc.

Since I want to darken the entire background, I select what I don't want darkened, then copy and paste that selection. PS automatically makes a new layer with the pasted selection.(call that layer 1)

To darken the background, then I insert a levels or brightness adjustment layer just above the background and below the new layer 1.

Then I work on the figure, selecting the parts I want to darken, copying and pasting them on new layers with their own adjustment layers to darken or brighten them.

So what you have to know is:
  • how to make and use layer masks (and channel masks)
  • how to use the selection tools
  • how to create and use layers
  • how to create and use adjustment layers
  • what are clipping masks and how to use them
This is clearly not something that can be covered in a thread but a week of work would get you some functional knowledge but not a ease of use or understanding what is best to use when.
I have been working hard at this for 4 or 5 years and think of myself as reasonably skilled for an amateur but very far from expert. (Photoshop is the most complex program I have ever worked with and there are tools I still don't know how to use.)

It took me about 10 minutes on your image, working a bit quickly and a bit carelessly. To do this correctly it would take maybe 40 minutes because I'd be much more careful with masking and edges.

IMO, the totally best book to look most of this is Photoshop Masking & Compositing (2nd Edition) (Voices That Matter): Katrin Eismann, Sean Duggan, James Porto: 9780321701008: Amazon.com: Books

This is worth every penny (although I like the older version better which is available used 9780735712799: Photoshop Masking & Compositing - New & Used Books & Textbooks at Alibris Marketplace )


Wow that's a lot , it'll keep me busy for a while :) thanks very much ...
 
As an Amazon Associate we earn from qualifying purchases.
If you work your way through that book, you'll come out the other side pretty far along.
Since I don't often work with regular shapes I rarely use the pen tool but everything else is PS gold.
 
I'm sorry to be a pain, I'm really serious, and I want to learn to fish :)

The inevitable issue is that you will have to know the rudiments and then increase your skills.
Eventually, two things will happen. First you will be able to look at a picture and almost instantly see how it could be better and the editing steps that can get it there. Secondly, your skill and fluidity will improve enough so that you can use the tools quickly without having to think and struggle with each one.

I know this because I went through this the very hard way just to get to whatever level of skills that I have.
Compared to someone who is really expert, I am a patzer but compared to where I started, I am terrific.
 

Most reactions

Back
Top