Trying again...

mitsugirly

TPF Noob!
Joined
Jan 18, 2009
Messages
487
Reaction score
1
Location
Galloway/Columbus Ohio
Can others edit my Photos
Photos OK to edit
Ok, I decided to try this again in the daylight hoping for better results than I had last night.
I hate that everyone started a war in the last, please don't do that here...it doesn't help me with trying to figure out how to do this. I respect all of your opinions. What might work for some, might not work for others. I'm willing to try different things until it works for me.

3231436277_1fcc6c97a7_b.jpg


I tried to tone down the colors a bit. However, the glare from the window shining on the hallway wall to the bathroom is bothering me. Also the bright glare in the mirror is bothering me (to the right by the vase on the dresser).
How do I tone down those 2 things?
Other than that...is everything better or not?
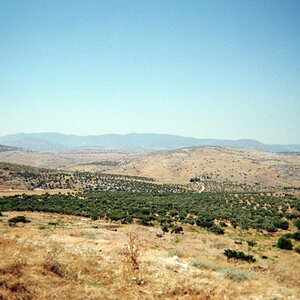
 
I think you've done very well. I like it.:thumbup:
 
Thanks.

I'm thinking maybe if I up the contrast some it will help. IDK, it just looks a little bland to me...like something colorwise is missing. Or maybe I just have a bland room. :???:
 
Part of the tone mapping process is to limit those clipped areas to control the highlights. Can you weight towards the darker exposures in your workflow?

Did you use exposure bracketing or the various shutter speeds like in your last experiment?

Clearly Abraxas has a handle on these, so hopefully he can help again. Interesting to see some of his commercial work.

It might be fun to see your exposures, a bit of work - but even some small thumbs could help us see how your setup looks.

I'm sorry there was a war too, clearly one pretty lady can still launch great armadas of warriors.

-Shea
 
I took 3 pictures and I'm not even sure if I'm spacing them out right or looking at the right thing.

On my LCD...it has the first numbers (I believe it's the shutter speed), the second is the F-stop (I put it at 22 like abraxas said to) then the next thing is a line with -2 1 0 1 +2 on it. That is what I'm basing it off of. I'm taking a picture at -2, then 0, then +2. Is this right?

I also put the ISO on 100 as well. However, I read over the cloudy setting. So I just went and took some more to see how they turn out.
 
Sounds about right, so if it is still too hot either make your middle or starting exposure a bit darker (F/32?) or bias towards the less blown exposure when you tone map.

There are quite a few parameters in the tone mapping softwares, so it is difficult to make intelligent suggestions with out seeing all the exposures and adjustments.

That said you are finding a nice range, and NOT adding too much gain and therefore noise.. no obvious halos or freakishly over saturated colors. I'd say just keep experimenting. :thumbup:

-Shea
 
Thanks for your help.

I guess I'll have plenty of time to experiment since the snow is coming down like crazy and you can't even see the roads in the last hour with no signs of stopping any time soon. :grumpy: How is CALI?? :p
 
72F... 80's last week :er: Forcing ourselves to work...

Hey you can always make a photoshop challenge out of your HDR's... post the 3 exposures in camera raw (ziiped/linked), or even the jpg's and I'm sure you'll get a few variations.

I tried to fake one with your result, but there was not enough range for anything interesting.. meaning it posterized in the interesting exposure ranges where a true multi exposure HDR set would hold out during editing.

You know some guy captured a snowflake in flight recently,... search 'star'

-Shea
 
can you move the fan lol
it is kinda distracting in the picture..
 
that is a great shot, but do this... put that HDR back in photoshop, and select the entire image (ctrl + A). After that select

Image>Adjustments>Hue/Saturation
On the main option selector where it says "Master", change that to Blues, and turn the saturation all the way down. Then, do the same thing with Cyans, and finish it by doing the Magenta. Those colors are not natural colors in that photo, and are created by the lens. Take them out, then your picture will be PERFECT.

Show us the finished version when done.
 
I did exactly those instructions and nothing changed. When I'm done editing in PS, it saves it as a TIFF. Is that normal? That's what I opened back up and it changed nothing in the picture as far as I can tell.
 
I would be curious to see what the properly exposed image looked like. My guess is not a whole lot different from the final results. With HDR you want a wide range of light and dark and expose for the light and dark areas. You can do that using the exposure -2 - +2 metering mode you used or though the manual setting on the camera.
 
I would be curious to see what the properly exposed image looked like. My guess is not a whole lot different from the final results. With HDR you want a wide range of light and dark and expose for the light and dark areas. You can do that using the exposure -2 - +2 metering mode you used or though the manual setting on the camera.

Exactly how I did it. :thumbup:
 
I still think your middle exposure is a tad hot, maybe 2/3rds a stop. 16 bits per pixel is an option for those looking to preserve the maximum pixel depth for printing etc... Conversion to 8 bits is required to save as jpg, and for many of the typical adjustments. You can set to 8, or down convert in PS,.. image/mode...

BTW - My HDR's all started out with way more dynamic range than a typical living space.. a motor cycle with chrome pipes, something with more contrast. I'm not sure how Abraxas gets those shots done.. My results in photomatix look like little more than curves and contrast work. -Shea

mitsu-phomtx_tonemapped.jpg
 

Most reactions

Back
Top