What's new

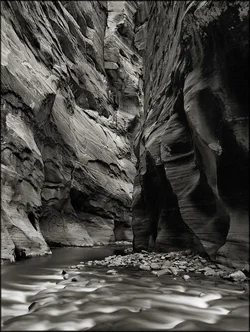
Virgin River Narrows

Ysarex89 83

TPF Supporters
Joined
Nov 27, 2011
Messages
7,717
Reaction score
4,577
Location
St. Louis
Can others edit my Photos
Photos OK to edit
The new school semester has begun and I've got two classes -- gonna be busy so I won't be around too much at least until things settle down. So here's the last of my summer project to try and scan negs that were otherwise impossible to print in the darkroom. This one is a blend of three scans.

Joe

virgin_narrows_zps1887680b.jpg
 
I agree about the color, but that doesn't preclude making a B&W version too.

It's to dark for my taste, and to me the water looks more like wind blown snow or sand than water.
I like where the river is placed in the lower portion of the image, but I wish the camera had been turned a bit more to the left so less of the right hand wall was in the frame.

The Virgin River Gorge has many, many great locations and the fact I-15 runs right through the gorge is a real plus for access.
 
On occasion, I think people have a tendency to "give up" on an image much too soon. I suspect on the original file, there is much more in the shadows to be brought out than I could get on the compressed jpeg.

$9592661214_c560f22f56_o.webp
 
Ha! I think I've stood on the rocks in that very bend in the Narrows.... :runs to go see:


Here - taken by my husband with (I think) Fuji 100...? color print film:


Same place, different angle?? :lol:


Ysarex: I think this looks fantastic as a B&W - hard to go wrong in that area of the world! I like your shutter speed, too. :thumbup: I agree the top one is a little dark, but ceeboy's edit shows the rock face detail is there.

A blend of 3 scans, you said? Nice work!
 
The new school semester has begun and I've got two classes -- gonna be busy so I won't be around too much at least until things settle down. So here's the last of my summer project to try and scan negs that were otherwise impossible to print in the darkroom. This one is a blend of three scans.

Joe

virgin_narrows_zps1887680b.jpg
Really done a good job and appreciative.what's the name of this frame?
 
Appreciate the comments all.

Gloriamint I'm not sure I understand your question. I don't title my photos. This scene is very famous here in the US (note Terri's color snapshot of the same spot); it's a river canyon in Zion National Park in the state of Utah. Here's a map marking the trailhead.

Terri I spent a lot of my free time this summer wrangling with some very difficult negs. Since you've done darkroom work you'll understand. With the neg in the enlarger and multi-contrast paper you determine an exposure for the right wall with a 4 or 5 filter. Then switch to a 2 filter and you've got a 3 stop burn for the left wall and water. Trouble is that only gets you the left wall, as even more burning is needed for the water. I didn't have enough sense back then not to take photos like this but I did save the negs. Now I can scan each region of the neg separately and blend the scans together with much more precision than darkroom burning and dodging afforded.

Ceeboy, as for too dark, I'm sticking with it as is, but I understand. I want to maintain the tone difference between the left and right walls but I agree the right wall is a very big dark area, I'm thinkin' maybe lose some of it with a crop is the solution I'll end up with. Thanks.

Joe
 
Classic! I disagree about lightening the shadows. This works better for me as the original, darker version, or at least something much closer to it than the edit. A lot of the edit looks washed out to me - I realize it could be done better on the raw file, but I just think this needs strong shadow areas to bring out the shapes and textures.
 
I like the original just fine, it's quite dramatic. Relatively translucent shadows that I suspect would probably carry detail all the way in, or nearly so, in a good print.

What I don't like is the conflict between the high contrast/bright water region at the bottom of the frame, and my desire to look down the canyon. There's a major problem with attention being split here, all the lines lead down the canyon, there's a strong sense that this is what's interesting. Then there's this bright water against darker greys, this visually popped area at the bottom of the frame that's ultimately not all that interesting. Not only does the foreground draw the eye inappropriately, it also takes away weight from the bottom of the frame, making the right side feel out of balance.

I don't think burning and dodging is sufficient to restore unity and balance here, but it's possible that slicing a relatively small amount of the bottom of the frame would strengthen it immensely.
 
Terri I spent a lot of my free time this summer wrangling with some very difficult negs. Since you've done darkroom work you'll understand. With the neg in the enlarger and multi-contrast paper you determine an exposure for the right wall with a 4 or 5 filter. Then switch to a 2 filter and you've got a 3 stop burn for the left wall and water. Trouble is that only gets you the left wall, as even more burning is needed for the water. I didn't have enough sense back then not to take photos like this but I did save the negs. Now I can scan each region of the neg separately and blend the scans together with much more precision than darkroom burning and dodging afforded.

Joe, yep, I get it, and I've a few of those kinds of negatives, too! ;) Since my move last year, I've not yet fully set up my darkroom, but prior to the move I've gotten good results with my more troublesome negatives following the split grade printing steps outlined at Les McLean's site. It goes pretty fast this way. I just don't bother working my B&W stuff in PS, since I know I won't print from there. (My Epson does great color prints, but B&W is poor.) Easier to just get a darkroom print and be done with it.

Anyway, I think this is a great image and you might want to take a look at this if you and this negative ever find each other again in the darkroom. :razz: Only Grade 5 and 0 filters, and it works!

 
Terri I spent a lot of my free time this summer wrangling with some very difficult negs. Since you've done darkroom work you'll understand. With the neg in the enlarger and multi-contrast paper you determine an exposure for the right wall with a 4 or 5 filter. Then switch to a 2 filter and you've got a 3 stop burn for the left wall and water. Trouble is that only gets you the left wall, as even more burning is needed for the water. I didn't have enough sense back then not to take photos like this but I did save the negs. Now I can scan each region of the neg separately and blend the scans together with much more precision than darkroom burning and dodging afforded.

Joe, yep, I get it, and I've a few of those kinds of negatives, too! ;) Since my move last year, I've not yet fully set up my darkroom, but prior to the move I've gotten good results with my more troublesome negatives following the split grade printing steps outlined at Les McLean's site. It goes pretty fast this way. I just don't bother working my B&W stuff in PS, since I know I won't print from there. (My Epson does great color prints, but B&W is poor.) Easier to just get a darkroom print and be done with it.

Anyway, I think this is a great image and you might want to take a look at this if you and this negative ever find each other again in the darkroom. :razz: Only Grade 5 and 0 filters, and it works!

Buy Jon Cone papers and inks for the Epson and you'll never go to an outside printer for B&W again.
 

Create an account or login to comment

You must be a member in order to leave a comment

Create account

Create an account on our community. It's easy!

Log in

Already have an account? Log in here.

New Topics

Back
Top Bottom