What's new

Attempt at B/W Portrait C&C

echoyjeff2221

No longer a newbie, moving up!
Joined
Jun 27, 2010
Messages
645
Reaction score
140
Location
WA
Can others edit my Photos
Photos OK to edit
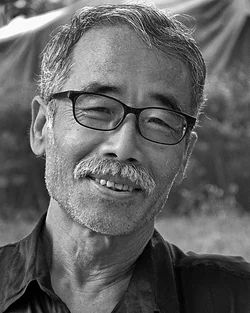
I finally gathered the courage today to ask someone if I could take their portrait. As you might already know, I'm in China ... and so, I wanted to capture some of the local people relaxing and enjoying the nice sunrise. I found this man intriguing -- won't you agree? He was smoking while enjoying the sunrise :)

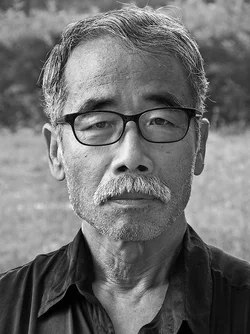
I was extremely nervous at first, but I managed to speak fluently enough in Chinese to make him understand. I also had a nice conversation beforehand to lighten things up :) I was wondering what people thought of this B/W conversion. I really felt that this picture was perfect for a b/w conversion because of its nice range of tones. Also, general C&C!

The only adjustments I did on this were 1. desaturation and 2. contrast adjustments

Thanks!


Portrait BW by echoyjeff222, on Flickr


Portrait2 by echoyjeff222, on Flickr
 
Last edited:
If you had portrait one's background behind portrait 2, portrait 2 would be a winner! They're both nice shots, 'though the monochrome conversion seems a little mid-tone rich to me. You've rendered his glasses nicely with no reflections.
 
I think they are both well done. I would personally like to see a little more brightness and a little more contrast. They are both bordering a little too gray for me.
 
If you had portrait one's background behind portrait 2, portrait 2 would be a winner! They're both nice shots, 'though the monochrome conversion seems a little mid-tone rich to me. You've rendered his glasses nicely with no reflections.

Mid tone rich?

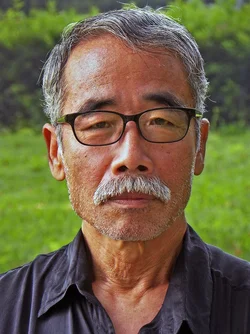
Thanks for the comments! Here's some more contrast ... did it help?


PortraitBWNew by echoyjeff222, on Flickr


Portrait2New by echoyjeff222, on Flickr
 
Nice images to start with but, imo, I would go for a little different look in PPing.
In a portrait, imo, you need the center of the face, particularly the eyes, to be engaging and the rest needs to be there but less important.
You have the detail so its fairly easy to bring up the dark areas on the side of the face, lighten the sungalsses and the eyes separately.
Darken the bright side of head and neck and increase the mid-tone contrast.

I think the viewer needs to be aware of the sun and shadow but not so much that it obscures whatever the viewer needs to see.
The bright areas pull the eye and the side of head and neck is not where the eyes should be going.

Done in PS in about 5 minutes.

I think this gives a more intense, real look.
?

asianfacelll.jpg
 
I freely admit that I go for the heavy drama when the faces suit.
It really smacks the viewer in the face and it just may not be your style or to your liking.
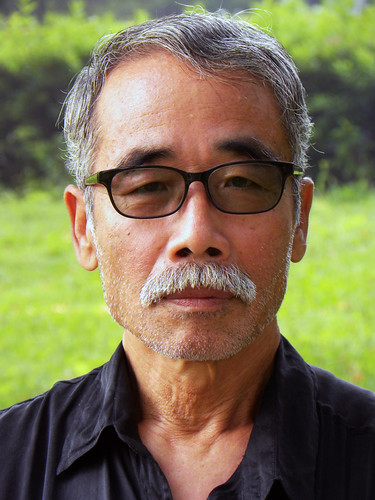
A color version of these would be terrific.
I am influenced by Ban Hup Teh who is a photographer from Malaysia who does wonderful shots with heavy emphasis on the dramatic PPing.

Lew
 
The_Traveler said:
Here is the other.
More dramatic but perhaps not to your liking.

Very nice Traveler care to share your PP tips?
 
Fudge, I'm in China so some things are randomly blocked. UGH. Can you send those via email directly as a file or something? I can't see them :( or maybej just upload straight to the forum?

But I'm sure they're good, lol. What techniques do you use? Just dodge/burn?

@tirediron, oh DUH. I should have known that. Just never heard the tone 'rich' associated with mid tones. DURRRR. :) Thanks. I agree. No pure black/white.
 
Last edited:
There isn't any magic to it.

People want to see the face and the eyes.
so I look for bright areas that pull my eye away from the face and darken those and I look for dark areas that people want to see but can't, and lighten those - always with separate layers and usually bit by bit.
in this case I lightened the dark side until it looked only slightly darker than the bright side so someone could see everything in the face.
then I brightened the lenses separately so I could see the eyes well.
then I brightened the eyes so they showed well -separately - viewers want to see eyes.
then I burnt in the side of his face, his neck and his forehead

all this to get an image that still had sun shading from the sun but that I could see everything well and his face and my eyes lingered there.
then I merged all to a new layer and adjusted the entire image with a levels layer to get it in the middle because my next step would fix all that.
then I sharpened with unsharp mask at 5 pixels and a 15 pixels radius to emphasize the local micro-contrast to give it depth.
all these are on layers so I could adjust opacity to taste.

these are a bit overdone just to make the point and, of course, it is much better to do editing on a full-size image but for a very quick result, I think they are a decent example of pulling a different look out of the original.

attached here so that maybe the OP can see them.

with all the separate layers and the merged layers in full-res color these kinds of things end up in 3 or 400 meg files.
but in BW, obviously much smaller.


$asianface2lll.webp$asianface1LL.webp
 
DAMN. I aspire to be as good as you in photoshop. I kind of follow what you're doing, but some technical jargon flew over my head. How long does it actually take for these edits? I feel like if I tried it, I would spend a lot of the time trying to just get the eyeglasses lightened and not the eyes, ... it just seems very precise and would thus take a long time.

Thanks -- I really like it. Is it supposed to be 149 kb and 252 kb only, though?

EDIT: Come to think of it, I should probably just try those edits on my own. Will get back to you in a few weeks ;) haha.

Also, does anyone have a tutorial on poses? I don't know any "official" poses besides just face on and 45 degree..

in case you wanted the color:


Portrait1 by echoyjeff222, on Flickr
 
Last edited:

Create an account or login to comment

You must be a member in order to leave a comment

Create account

Create an account on our community. It's easy!

Log in

Already have an account? Log in here.

New Topics

Back
Top Bottom