Charles Murray
TPF Noob!
- Joined
- Sep 10, 2017
- Messages
- 8
- Reaction score
- 0
What's up everyone,
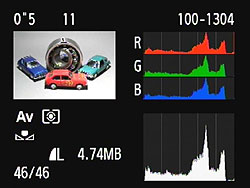
In my quest to better myself as a photographer I have come to an impasse. I've been under the assumption that when setting up my shot captured in RAW I should be taking it a little under exposed so I can bring out all the details in post without the highlights be blown out. But when I do this and goes to raise the exposure in lightroom, the image gets really blown out and loses all contrast and just becomes a dull almost grayish color across the whole image. What exactly am I doing wrong?
In my quest to better myself as a photographer I have come to an impasse. I've been under the assumption that when setting up my shot captured in RAW I should be taking it a little under exposed so I can bring out all the details in post without the highlights be blown out. But when I do this and goes to raise the exposure in lightroom, the image gets really blown out and loses all contrast and just becomes a dull almost grayish color across the whole image. What exactly am I doing wrong?


![[No title]](/data/xfmg/thumbnail/34/34746-f8e4b50f9d9b0de43c95af3d2caf956b.jpg?1619736628)


![[No title]](/data/xfmg/thumbnail/37/37104-99933b18ee16678a8299f12747336d48.jpg?1619737882)