adamhiram
No longer a newbie, moving up!
- Joined
- Feb 6, 2015
- Messages
- 870
- Reaction score
- 588
- Can others edit my Photos
- Photos OK to edit
After being stuck at home for more than 10 months, I finally got around to a project I have been putting off for a long time - digitizing and restoring old photos, specifically those that are in poor condition and came with additional challenges. All of these prints are at least 40 years old, and many were displayed in frames that were exposed to sunlight and other conditions that were not ideal for preserving them. I am sharing the techniques I used along with before-and-after images, both to help others looking to do the same, as well as hopefully learn some new methods I can use to improve the results of these and other images.
There are the steps I followed to get the results below.
--
I am very happy with how this one came out. The paper had no texture, and the original seems to have held up pretty well. I was able to recover the colors pretty easily and didn't have a lot of dirt or damage to clean up.

DSC_1581-compare by adamhiram, on Flickr
I think this one came out pretty good as well. If you zoom in, you can see that this print had some texture to it that I had to correct for, and the colors were a bit faded, albeit still recoverable.

DSC_1637-compare by adamhiram, on Flickr
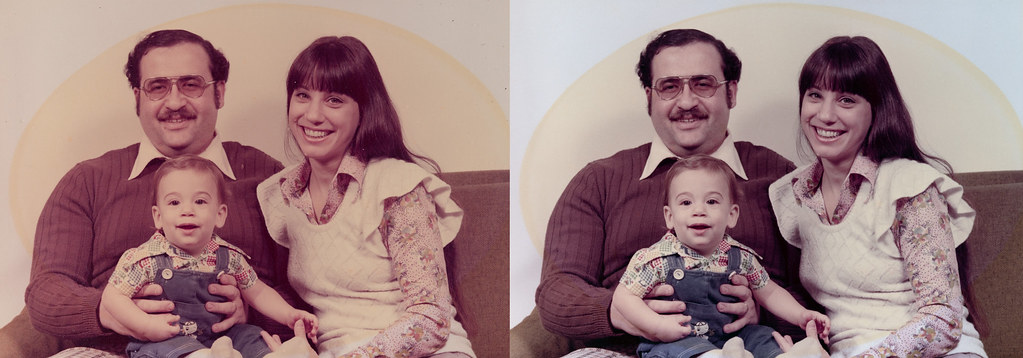
This one included additional challenges. The paper was textured and had quite a bit of damage, the colors were quite faded, and it is pretty clear this was displayed with an oval matting. My method of removing texture worked quite well here, the damage was fairly simple to repair with the spot healing brush, and the colors were pretty recoverable. However I was not really sure how to correct for the oval matting without making it look worse. For now, I think this is as good as it will get.

DSC_1567-compare by adamhiram, on Flickr
I included this one because 0f a slightly different challenge it presented. This has been hanging on a wall in direct sunlight for close to 50 years, so the fact that it held up this well was pretty amazing. The print had a lot of texture that I was able to improve but not fully remove, and I was still able to recover quite a bit of the original color. However a lot of the contrast was gone, making it very difficult to recover a lot of the shadow detail, such as in the black suit.

DSC_1555-compare by adamhiram, on Flickr
Now we're starting to get to some prints that were beyond my ability to fully restore. This print was heavily textured, extremely faded with colors I couldn't recover, quite a bit of physical damage to the paper itself, and was clearly in a frame with a rectangular mat. I was able to bring back the contrast and improve the colors, but I wasn't sure if it was just too far gone to recover better color detail, or if a more advanced technique was needed. Again, spot healing brush did the trick to repair most of the damage, and I could probably utilize Content Aware Fill to fix the edges if I so chose.

DSC_1596-compare by adamhiram, on Flickr
Lastly, I wanted to share this photo that had it all. Heavily textured, extremely faded, unrecoverable colors, oval matting that cuts across the subjects, and a lot of dust and dirt to physically clean off before even capturing digitally. I did my best with this one, but unfortunately didn't have much to work with.
DSC_1585-compare by adamhiram, on Flickr
Thank you for reading this far, and any feedback or suggestions are welcome!
There are the steps I followed to get the results below.
- Capture the image. I built a copy setup to use my digital camera to capture the highest quality of these old prints. This gave better results than a scanner, as it allowed me to capture prints of almost any size, as well as change the angle and direction of light as needed. Most of these were captured at 85mm or 135mm at f/8. For additional information on this setup, check out this thread.
- Capture additional angles. For any prints on textured paper or any significant damage, capturing multiple images to stack while rotating the print makes it easier to reduce or eliminate the texture in postprocessing. This is because the highlights and shadow of each bump will be in a different place in each capture, providing more data to work with. I typically photograph with the print straight, then rotate it 10-15 degrees in each direction, then rotate the print and camera 90 degrees and repeat. Depending on the print, I will take between 6-10 captures.
- Adjust the white balance. After bringing the images into Lightroom, I like to start with a consistent white balance, even if it has to be adjusted later as part of color corrections. This is especially important when stacking multiple shots of the same print. I took a test shot with a white card (styrofoam plate) to get the correct white balance and set all images to use this setting.
- Eliminate or reduce texture in the print. I don't know why, but it seems like every photo from the 60s and 70s was printed on textured paper, which never scans well. Sometimes I wonder if I am making the same mistake when I order prints on luster paper (or coating), but that's another discussion. This method combines two techniques I've used before. In travel or landscape photography, I have used Photo Merge to combine multiple images of the same subject to remove undesired subjects from the scene (such as people). For nighttime starscapes and moon photography, I have used stacking and blend modes to increase sharpness and reduce noise. Both of those techniques seemed appropriate for this application and I think produced decent results. As a side note, I have tried other methods of reducing texture, including high pass filters and even FFT (fast Fourier transform) analysis, and the results were almost always worse, and often resulted in a blurred image to mask the texture.
- Open all captures of the same print in Photoshop as layers. Select all layers and use Edit > Auto Align to get them precisely aligned with each other. Sometimes I will need to rotate and crop the image and re-align them again to ensure they are aligned properly. It is important to confirm this layer by layer, since one misaligned layer can ruin the final image.
- Select all layers again and convert to Smart Object. Then select Layer > Smart Object > Stacking Mode > Median. The result should be a less noticeable texture in the image.
- Clean up the image. From here, I will create a new layer and spend some time with the spot healing brush. I like to do this step before any other postprocessing so if I want to go back and redo anything, I don't have to clean up the image all over again. This step is mostly to get rid of dust and dirt, scratches, and other debris or damage that may be in the original print.
- Duplicate and merge layers. Next, I will duplicate these layers and merge the copies into a new working layer. There's probably a better way to do this with smart objects, but this was a simple way to continue processing in a non-destructive way.
- Color correction. I have experimented with lots of different methods for recovering colors and contrast, and none of them seem to do a better job than Image > Auto Tone, Image > Auto Color, and various combinations of the two. Sometimes one of them produces near-perfect results, while other times you get what you get. I found that doing a layer with each correction and changing the opacity of the top layer can sometimes help too. I just go with whichever looks best.
- Finish processing in Lightroom. Lastly, I bring it back into Lightroom to finish processing. Any tweaks to white balance and tint can be done here, including adjustments in the HSL panel to correct any obvious color casts. I tend to not touch contrast until the end - sometimes a little more is nice, other times it may need to be reduced depending on how auto color/tone processed the image. Often I need to pull back on highlights to reveal a bit more detail, and the dehaze tool can be helpful in enhancing some of the colors, but also seems to require a slight boost to shadows to counter the darkening that results.
--
I am very happy with how this one came out. The paper had no texture, and the original seems to have held up pretty well. I was able to recover the colors pretty easily and didn't have a lot of dirt or damage to clean up.
DSC_1581-compare by adamhiram, on Flickr
I think this one came out pretty good as well. If you zoom in, you can see that this print had some texture to it that I had to correct for, and the colors were a bit faded, albeit still recoverable.
DSC_1637-compare by adamhiram, on Flickr
This one included additional challenges. The paper was textured and had quite a bit of damage, the colors were quite faded, and it is pretty clear this was displayed with an oval matting. My method of removing texture worked quite well here, the damage was fairly simple to repair with the spot healing brush, and the colors were pretty recoverable. However I was not really sure how to correct for the oval matting without making it look worse. For now, I think this is as good as it will get.
DSC_1567-compare by adamhiram, on Flickr
I included this one because 0f a slightly different challenge it presented. This has been hanging on a wall in direct sunlight for close to 50 years, so the fact that it held up this well was pretty amazing. The print had a lot of texture that I was able to improve but not fully remove, and I was still able to recover quite a bit of the original color. However a lot of the contrast was gone, making it very difficult to recover a lot of the shadow detail, such as in the black suit.
DSC_1555-compare by adamhiram, on Flickr
Now we're starting to get to some prints that were beyond my ability to fully restore. This print was heavily textured, extremely faded with colors I couldn't recover, quite a bit of physical damage to the paper itself, and was clearly in a frame with a rectangular mat. I was able to bring back the contrast and improve the colors, but I wasn't sure if it was just too far gone to recover better color detail, or if a more advanced technique was needed. Again, spot healing brush did the trick to repair most of the damage, and I could probably utilize Content Aware Fill to fix the edges if I so chose.
DSC_1596-compare by adamhiram, on Flickr
Lastly, I wanted to share this photo that had it all. Heavily textured, extremely faded, unrecoverable colors, oval matting that cuts across the subjects, and a lot of dust and dirt to physically clean off before even capturing digitally. I did my best with this one, but unfortunately didn't have much to work with.
DSC_1585-compare by adamhiram, on Flickr
Thank you for reading this far, and any feedback or suggestions are welcome!
Last edited:


![[No title]](/data/xfmg/thumbnail/36/36393-86ce601930c671b92b6df002b7fcbd0b.jpg?1734168775)
![[No title]](/data/xfmg/thumbnail/37/37643-1ec2500989f6f4894b6e6323c2d3669e.jpg?1734170766)