Experimental Portraits

CherylL

TPF Supporters
Supporting Member
Joined
Aug 6, 2012
Messages
4,851
Reaction score
5,820
Location
near St Louis
Can others edit my Photos
Photos OK to edit
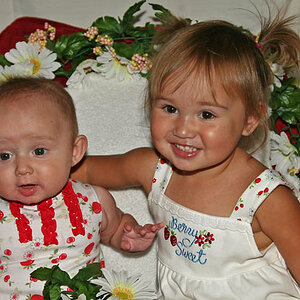
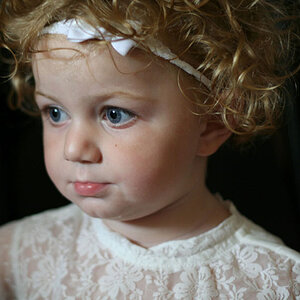
The youngest grand with fairy lights and great grandmother's tablecloth.
Canon R6 50mm f1.2 natural light. Open to C&C

1.
011524_010wSM.jpg


2.
011524_014wSM.jpg


3.
011524_018wSM.jpg


4. This one I could have been lower. Camera seems too high?
011524_023wSM.jpg


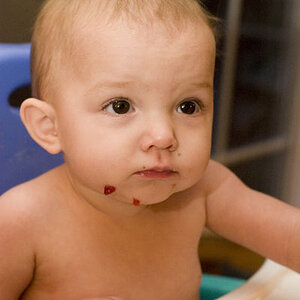
5. This was from November of my friend's grandson. Maybe would be better if his hands holding the glass?
112023T_SmW.jpg
 
All in for #1. I'd try dodging the eyes a bit and increasing contrast just there and possibly the mouth/lips. Keep everything else soft with a subtle touch of brightness. Love those 1.2 lenses. A great look!
ExpPortA.jpg
 
Last edited:
First of all, I'm always pleasantly surprised by your abilities to think outside the box and try new things. You have a knack for thinking up new things to try that I'm envious of.

On the images, the advice I got years ago, I still follow on portraits, get the eyes sharp and everything else falls in place. Shooting wide open places a difficult burden on the photographer due to the razor thin DOF. Even with auto focus and spot, cameras have a mind of their own on the focal point, then add a little movement, or the slight turn of the head shifting the focal plane and sharp eyes are elusive. Look how sharp the eye lashes are in #3 as a profile vs one and two.

Maybe it's a personal preference but I'm not a big fan of ambient portraits because of the inability to get light into the eye socket. The pupil will sparkle with color when light hits it, I've achieved that in ambient shots but you either need the light right or use reflectors to move it.

That said, I found the third shot the most intriguing. I made a few edits to an already good image. Brightened the pupils and eyes to get the color, added highlights on the eyes, burned some edges to define lashes and lips, removed the annoying shadow on the face and nose, added a soft white fill to enhance the dream look, and a frequency sharpen to make the little details like the lashes, eyes, freckles pop. One on the left is the original, one on the right is the edit.

Untitled-1.jpg
 
Last edited:
Beautiful set, Cheryl! I agree with Smoke about your inventiveness. :)

Great stuff here. Really the only one lacking is the 2nd shot, and that's only because she covered her mouth with one of the lights, and it seems to have thrown an odd reflection back on her face. It's nothing that you did or could have foreseen.

#s 3 and 4 are absolutely charming! I don't think the camera is too high in #4 - it's a nice perspective.

Love the last one, too - whimsical and cute.
 
All in for #1. I'd try dodging the eyes a bit and increasing contrast just there and possibly the mouth/lips. Keep everything else soft with a subtle touch of brightness. Love those 1.2 lenses. A great look!View attachment 271113

In ACR I upped the exposure on her face with a mask. I'll try adding a touch more light. I bought the 50mm 1.2 used a year ago and happy with the lens. I have the adapter to use the EF lenses on the R6. The R lenses are very pricey.
Thanks for the feedback!
 
First of all, I'm always pleasantly surprised by your abilities to think outside the box and try new things. You have a knack for thinking up new things to try that I'm envious of.

On the images, the advice I got years ago, I still follow on portraits, get the eyes sharp and everything else falls in place. Shooting wide open places a difficult burden on the photographer due to the razor thin DOF. Even with auto focus and spot, cameras have a mind of their own on the focal point, then add a little movement, or the slight turn of the head shifting the focal plane and sharp eyes are elusive. Look how sharp the eye lashes are in #3 as a profile vs one and two.

Maybe it's a personal preference but I'm not a big fan of ambient portraits because of the inability to get light into the eye socket. The pupil will sparkle with color when light hits it, I've achieved that in ambient shots but you either need the light right or use reflectors to move it.

That said, I found the third shot the most intriguing. I made a few edits to an already good image. Brightened the pupils and eyes to get the color, added highlights on the eyes, burned some edges to define lashes and lips, removed the annoying shadow on the face and nose, added a soft white fill to enhance the dream look, and a frequency sharpen to make the little details like the lashes, eyes, freckles pop. One on the left is the original, one on the right is the edit.

View attachment 271116

The edit looks more high key? I do like the edit. I did add a curves dark & a curves light on the eyes, but dialed it back. I'll add a touch more.
Normally on the R6 I use the eye focus which is very good 99% of the time. This set I used the spot focus. We were taking flower photos before this and I didn't set it back to eye.
Thanks for the feedback!
 
Beautiful set, Cheryl! I agree with Smoke about your inventiveness. :)

Great stuff here. Really the only one lacking is the 2nd shot, and that's only because she covered her mouth with one of the lights, and it seems to have thrown an odd reflection back on her face. It's nothing that you did or could have foreseen.

#s 3 and 4 are absolutely charming! I don't think the camera is too high in #4 - it's a nice perspective.

Love the last one, too - whimsical and cute.
Thanks terri for your feedback! For the lights she was holding a strand and I had one in my left hand. I would set my focus on her eye and then lift my set to cover parts of her face. The lights will throw off the focus.

The 3rd one the window was to my right. The space is only 2 feet or so wide between a table and the window. I was holding the cloth with my left hand to the window and I had to bend contort down to shoot under my left arm. If I did this again I would tape the cloth to the window freeing up my hand. The model was growing weary and I didn't want to stop for tape.
 
edit looks more high key? I do like the edit. I did add a curves dark & a curves light on the eyes, but dialed it back. I'll add a touch more.

Here's a simple trick for eyes to pop the color. At the top of your stack hit (Shift+Alt+Ctrl+E) to add a stamp layer of all layers applied. Change the blend mode to Screen. Add a black mask, then use a soft edge white brush at 100% to apply the effect only to the pupils. Adjust the layer opacity for effect.

Screen mode looks at each channel’s color information and multiplies the inverse of the blend and base colors. The result color is always a lighter color, without affecting the underlying hue, or your histogram. The effect is similar to projecting multiple photographic slides on top of each other.

The high key softening was a a solid white fill layer set to soft light, then adjusting the opacity for effect. I use curves for many applications but blending modes can also be an effective tool.
 
Last edited:
Here's a simple trick for eyes to pop the color. At the top of your stack hit (Shift+Alt+Ctrl+E) to add a stamp layer of all layers applied. Change the blend mode to Screen. Add a black mask, then use a soft edge white brush at 100% to apply the effect only to the pupils. Adjust the layer opacity for effect.

Screen mode looks at each channel’s color information and multiplies the inverse of the blend and base colors. The result color is always a lighter color, without affecting the underlying hue, or your histogram. The effect is similar to projecting multiple photographic slides on top of each other.

The high key softening was a a solid white fill layer set to soft light, then adjusting the opacity for effect. I use curves for many applications but blending modes can also be an effective tool.
Good tips! I've used a color screen layer to add light rays. I'll try it for the pupils.
 
This is a wonderful set! That first one, is she hexing you to produce cookies and milk? I think #4 is fine at that angle. #2 definitely catches dark and moody well.
 
This is a wonderful set! That first one, is she hexing you to produce cookies and milk? I think #4 is fine at that angle. #2 definitely catches dark and moody well.
Thanks Jeff! Possibly hexing me because I tore her away from her show. :)
 
Here's a simple trick for eyes to pop the color. At the top of your stack hit (Shift+Alt+Ctrl+E) to add a stamp layer of all layers applied. Change the blend mode to Screen. Add a black mask, then use a soft edge white brush at 100% to apply the effect only to the pupils. Adjust the layer opacity for effect.

Screen mode looks at each channel’s color information and multiplies the inverse of the blend and base colors. The result color is always a lighter color, without affecting the underlying hue, or your histogram. The effect is similar to projecting multiple photographic slides on top of each other.

The high key softening was a a solid white fill layer set to soft light, then adjusting the opacity for effect. I use curves for many applications but blending modes can also be an effective tool.
I tried your tips and ended up with a re-edit that is somewhere between my first edit and yours.


Ms K by Cheryl, on Flickr
 

Most reactions

New Topics

Back
Top