Exposure cheat sheet needed.

domromer

TPF Noob!
Joined
Aug 11, 2007
Messages
878
Reaction score
0
Location
Eugene, Oregon
Website
www.flickr.com
Can others edit my Photos
Photos NOT OK to edit
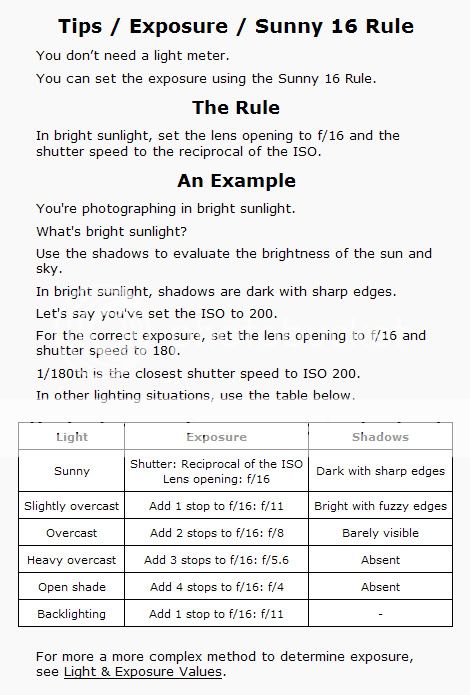
I'm taking my unmetered rolleicord out for the first time tomorrow and need a exposure cheat sheet.

I've borrowed an incident meter and have been comparing the exposure against my D80's meter and I keep getting wildly different results. So I thought a backup might be a good idea.

Anyone know where I could find a cheat sheet online to print out? I googled it but didn't find much.
 
Haha I found a couple online but they are all rather elaborate and complicated, if you'd like I can post them.
 
There should be a basic exposure guide on the film packet.
 
google sunny 16 rule, it is very simple and works.
 
google sunny 16 rule, it is very simple and works.


Sunny 16 rule

From Wikipedia, the free encyclopedia

Jump to: navigation, search
For the EP by Ben Folds, see Sunny 16 (EP)
In photography, the sunny 16 rule (or, less often, the "sunny [FONT=Georgia,serif]f/[/FONT]16 rule") is a method to estimate correct daylight exposures without using a light meter.
The basic sunny 16 rule, applicable on a sunny day, is this:For example, for ISO 100 film, choose shutter speed of 1/100 second (or 1/125 second)
The elaborated form of the sunny 16 rule for more general situations is:
  1. Set the shutter speed to the setting nearest to the ISO film speed
  2. Set the f-number according to the table below:
Aperture Lighting Conditions Shadow Detail [FONT=Georgia,serif]
f/
[/FONT]16 Sunny Distinct [FONT=Georgia,serif]
f/
[/FONT]11 Slight Overcast Soft around edges [FONT=Georgia,serif]
f/
[/FONT]8 Overcast Barely visible [FONT=Georgia,serif]
f/
[/FONT]5.6 Heavy Overcast No shadows
[FONT=Georgia,serif]f/[/FONT]4 Sunset

[1] For example, to shoot ISO 100 film in sunny conditions, set the shutter speed to 1/100 or 1/125 and the f-stop to [FONT=Georgia,serif]f/[/FONT]16. With ISO 200 film, set the speed to 1/200 or 1/250. For ISO 400 film, 1/400 or 1/500. As with other light readings, the shutter speed can be changed, as long as the f-number is compensated. For example, 1/250th of a second at [FONT=Georgia,serif]f/[/FONT]11 would be equivalent to 1/125th at [FONT=Georgia,serif]f/[/FONT]16.
 
google sunny 16 rule, it is very simple and works.


found this:


sunny16.jpg

http://www.photokaboom.com/photography/learn/tips/054a_exposure_sunny_16.htm
 
Hey thanks for all the replies. Last night I found what I needed. What do you know it was in my class notes!! Maybe I should read my own stuff sometimes.

I kept finding sunny f16, but what I really needed was soggy oregon winter day!

Which my notes list as 3 stops under.

I'll scan the print out and post it here later.
 
Which incident meter did you borrow? Could you give us an example of how it is differing from your D80.

Here's a link to the Expo-Mat. It's marked incorrectly in EV, but if you disregard that it is OK.

Best,
Helen

After reading the manual it seems the mistake was that I was pointing the dome more at the sky and not at my subject or back towards lens. Will see if it works better today.

I read the zuckerman book on exposure so I think I'll do better today.

I hope so, I'm shooting chromes in a 58 year old camera!
 
Wow that is complicated. I have no idea what most of that means!

Sure it looks that way, but once you understand what each section means and does, it's really very nice and simple. (he said simple?)

It really takes into account, multiple lighting factors, which is correct, but for someone just starting, the basics come first. Print the page, and follow along.

Read and then ignore: Shutter Speeds and Clear Photos - which explains the slowest you can shoot, hand held. Table 1, adjustments for color temperature K. Exposure compensation meter, which just warns you that these subjects are not "normal" contrast and lighting.

Now you have just three boxes to deal with. See the instructions in the center?

1) Determine the light level, using the table in the lower left hand corner. For my example, I picked an easy one. 13 - Typical Daylight open shadows.

2) What is your film speed? 100, no adjustment, but since that would be too easy and not explain anything, lets use 400 film. You look in the EV to LV adjustment box, center left. 400 is +2 over the base number of 100 film. Typical Daylight = 15 for this film

3) Look at the box on the top. Find the diagonal that reads 15, 15, 15, 15... Pick any Aperture and Shutter speed, that intersects at #15 and you have your exposure.

But maybe you don't want to do that, because you want to have a deep depth of field. So you pick f/16 on the left side, move your finger across the row until you find #15. Look up on top, it says 1/125th. There you are.

Maybe you are shooting something that moves, so that would be too slow. You pick 1/500th up on the top, move your finger down the column until you find 15. Look on the Left, it says f/8. There you are.

That's it. 1-2-3

Find the Lighting LV
Adjust for the film speed EV
Select your settings to match the type of shot.

Shoot!


Hey thanks for the breakdown. When I get back home I'll dive in and figure it all out.
 
Hey thanks for the breakdown. When I get back home I'll dive in and figure it all out.

So today I figured it all out. It's actually a cool system. I need to calibrate myself as to what is heavy overcast and what is light overcast. I kept guessing darker than it actually is. I tested it on my digital and took some shots with it on my rolleicord. We'll see tomorrow if I'm right. I think I'm going to laminate it.
 

Most reactions

Back
Top