First Try At Panoramic Photography

Joined
Jun 23, 2009
Messages
385
Reaction score
0
Location
Trinidad & Tobago, West Indies
Can others edit my Photos
Photos NOT OK to edit
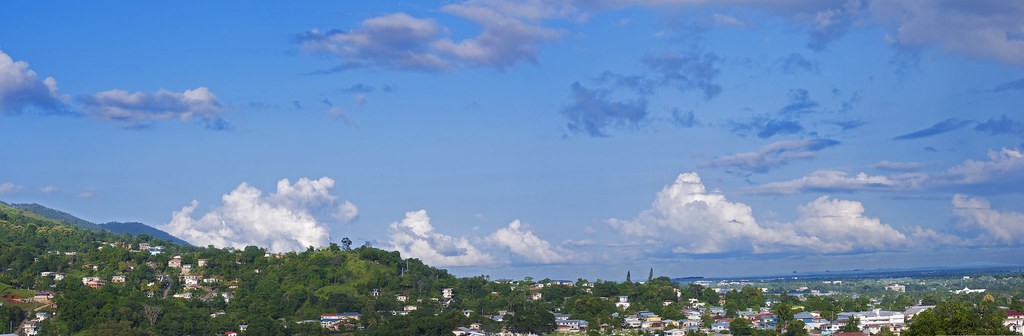
Hey guys, shot this panoramic this evening. Its my first try at it and would like to get some feedback please. It would be greatly appreciated.

3805832154_e6a782dda7_b.jpg
 
Need more of the townsite and less of the sky, imo.

Thanks for the comment. Only reason there is more sky than town is because from my location just where the image stops at the bottom the roof of a nearby house started. Which wasn't great.

And make sure the horizon is level.

Thanks for the comment. Will try to make the horizon straighter next time. Guess will come with practice.

you can always crop so its leveled.

Never tried that before.......will look into it. Thanks
 
Agree with the above comments... for old time's sake, I'll drag this out from the storage closet...

Having fun and learning are indeed what it's all about. I'll repost my handy-dandy, fifty-cent panorama how-to...

John's basic 'How-to' guide to Panoramas...

1. In order to get a good pano, your camera has to be level, and has to rotate around the nodal point. This the point at which the image inverts. For practical purposes, with most lenses, using the sensor plane will work fine. What this means is that you have to shoot from a tripod for best results.

Therefore, put your camera on your tripod and level it. Even though my tripod legs and head both have levels built-in, I carry a small dollar-store spirit level in my camera bag to make sure everything is as close to level as I can get it.

2. Once I'm satisfied that everything is level and square and my tripod is locked (except for the rotating axis) where I want it, it's time to work on the exposure. Another important factor is to NEVER SHOOT PANOS IN AUTO! Set your camera to a manual or semi-manual mode (I use full manual, but either shutter or apeture priority will work as well).

Determine the range of your pano (eg the left and right limits) and then go through and meter the different areas. Find out what the camera is recommending as maximum and minimum exposure, and when you've done this for the full range of the image, then average the settings. Don't change these settings; yes some will likely be slightly under exposed, and some slightly over, but deal with it in post.

3. Now you're ready to start shooting. I always start at the left-hand end of the intended pano and work right, simply so that the images are in the correct order when they're on my computer, but that's up to you. Expose the first image, and choose a landmark about 2/3 of the way to the right-hand side of the frame. Now, being careful to ensure that you don't upset your level, move your camera so that the left-hand edge of the frame lines up on the land mark you just chose. Ideally you want about a 30-35% (or 1/3) overlap between each image. Continue shooting in this manner until you have the whole sequence captured.

4. Download and stitch using your favorite software.
A few tips: With respect to the issue of exposure: If there is an extreme dynamic range within the pano, (say bright sun to deep shade) I will often bracket each image 1/3 stop on each side, so that for every image used in the pano, you actually expose three. This gives you a bit of latitude in terms of trying to produce an image with a pleasing and realistic dynamic range, but be warned, it often looks hokey.

One of the most important tools you can have for taking panos (aside from a good tripod) are filters. There are two types, one is the circular polarizer (CPOL)for enhancing colours and deepening the blue in sky and the other is graduated neutral density(G-ND); these help to prevent blown skies and preserve detail on the ground. When using a CPOL, it's important to remember not to change it's setting through the course of the pano either. Find the optimum setting and use it at that setting for the whole image. Likewise with your G-ND; don't change their position or intensity.

Sorry, those example links are no longer valid.

Hope that's helpful

~John
 
Last edited:
Agree with the above comments... for old time's sake, I'll drag this out from the storage closet...

Having fun and learning are indeed what it's all about. I'll repost my handy-dandy, fifty-cent panorama how-to...

John's basic 'How-to' guide to Panoramas...

1. In order to get a good pano, your camera has to be level, and has to rotate around the nodal point. This the point at which the image inverts. For practical purposes, with most lenses, using the sensor plane will work fine. What this means is that you have to shoot from a tripod for best results.

Therefore, put your camera on your tripod and level it. Even though my tripod legs and head both have levels built-in, I carry a small dollar-store spirit level in my camera bag to make sure everything is as close to level as I can get it.

2. Once I'm satisfied that everything is level and square and my tripod is locked (except for the rotating axis) where I want it, it's time to work on the exposure. Another important factor is to NEVER SHOOT PANOS IN AUTO! Set your camera to a manual or semi-manual mode (I use full manual, but either shutter or apeture priority will work as well).

Determine the range of your pano (eg the left and right limits) and then go through and meter the different areas. Find out what the camera is recommending as maximum and minimum exposure, and when you've done this for the full range of the image, then average the settings. Don't change these settings; yes some will likely be slightly under exposed, and some slightly over, but deal with it in post.

3. Now you're ready to start shooting. I always start at the left-hand end of the intended pano and work right, simply so that the images are in the correct order when they're on my computer, but that's up to you. Expose the first image, and choose a landmark about 2/3 of the way to the right-hand side of the frame. Now, being careful to ensure that you don't upset your level, move your camera so that the left-hand edge of the frame lines up on the land mark you just chose. Ideally you want about a 30-35% (or 1/3) overlap between each image. Continue shooting in this manner until you have the whole sequence captured.

4. Download and stitch using your favorite software.
A few tips: With respect to the issue of exposure: If there is an extreme dynamic range within the pano, (say bright sun to deep shade) I will often bracket each image 1/3 stop on each side, so that for every image used in the pano, you actually expose three. This gives you a bit of latitude in terms of trying to produce an image with a pleasing and realistic dynamic range, but be warned, it often looks hokey.

One of the most important tools you can have for taking panos (aside from a good tripod) are filters. There are two types, one is the circular polarizer (CPOL)for enhancing colours and deepening the blue in sky and the other is graduated neutral density(G-ND); these help to prevent blown skies and preserve detail on the ground. When using a CPOL, it's important to remember not to change it's setting through the course of the pano either. Find the optimum setting and use it at that setting for the whole image. Likewise with your G-ND; don't change their position or intensity.

Here are a couple of my panos (left as links due to their size) taken in Chennia, Crete earlier this year:
This one Is an overview of the city, using six images:
http://www.rthtg.net/john/crete/Pano_City (Large).jpg

This one is a view of the harbour in the old part of town, which was stitched from approximately 14 images, and in hi-res, weighs in about around 40Mb as .jpg!
http://www.rthtg.net/john/crete/Pano... (Large).jpg

Hope that's helpful

~John

Thanks alot. Thats a nice detailed procedure. Will try to follow for my next pano.
 
i really like it ... even though town has been cropped but the sky looks good enough to not care for other things.

panoramic shots will be my next thing. :D
 

Most reactions

New Topics

Back
Top