how did i do???

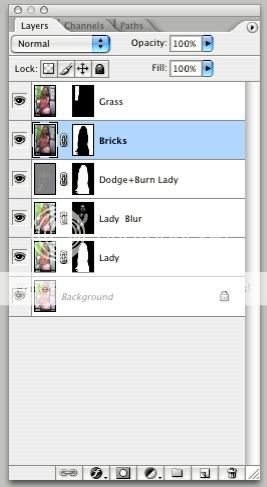
I had a go at it, Here is my attempt..

girlmt.jpg


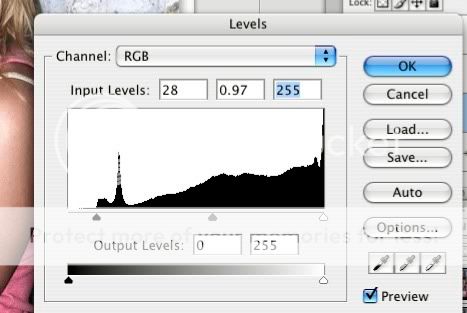
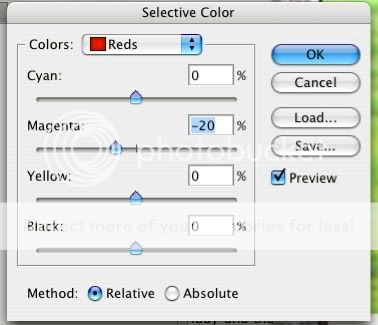
And an attempt with a Plug-in

Girlpt.jpg
 
Just as a complete aside from how the retouching has worked, you should look into the lighting more, it can be fixed for $10 :)

The flash has made a shadow on the background which gives the model a bad outline. Also it has flattened the features of the entire photo. It looks too 2dimensional.

Now it's a bright sunny day and am I right in assuming the model was standing in the shade? That's good, but one thing you can do to improve the lighting is use a reflector. Either a large white sheet, or silver sheet which can be had from Ebay for pennies and reflect the natural light back onto the subject. If you can't afford the pennies you can literally make it for nothing using a sheet of cardboard and some aluminium foil.

This has a few affects. Firstly if you reflect the light from the side it adds depth to the face. Secondly a flash gives a light source that is a few sqcm, but if you use a 1x1m reflector the lighting becomes very soft and actually helps cover up skin blemishes which makes retouching even easier :)

Do you recommend always using the flash and a reflector...to add depth?

The pic was literally taken the day I got my Nikon d80(my first dslr)...it was taken in a tower @ a local state park, so it was pretty much dark all but the window....steps to her left. Should I have positioned a reflector there?
 
I was wondering if you used the step-by-step that I linked in the graphics programs section? :wink:

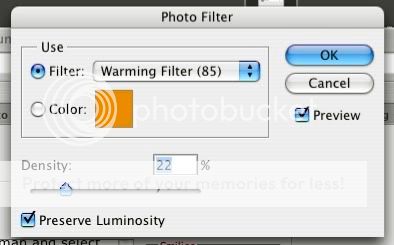
As far as yours I do think its a little overdone on the face but I'm not sure how much better I did. I applied a photo filter to add some sepia color and I think that threw it off.

But in any case, rmh159 had a really good tip. I do that as part of my smoothing process. I do just about all my smoothing really zoomed in so that I don't screw up any lines and make it look funky.

Keep up the good work! :thumbup:


Edit: By the way the flash left a lot of bright spots on her face and arm. If you use an external I would try and bounce it off a ceiling (if there is one of course), diffuse it somehow, or just now use one at all. :)

Yes I did use the link you posted. Thanks! Practice, practice :wink: Im very new at all of this, but I really have the determination to learn.

Would placing a diffuser over my flash have helped? I dont have alot of equipment...well really any, other than my camera, right now. Im still trying to grasp when to use a reflector/diffuser....Ill get it one day :wink:
 
Just a suggestion about another point, if I may...
I think the picture is a bit too light...
Maybe it would benefit from a little burning in around the edges too
What do you think?...give it a go?

Around the background....darken it a bit?
 
okay, so overall, aside from the lighting issues and the plastic face I have given her :lol: is it a horrible picture? Is there hope?
 
Southerngal said:
okay, so overall, aside from the lighting issues and the plastic face I have given her :lol: is it a horrible picture? Is there hope?

You did great! The first time I tried to follow those steps I gave up halfway through. I think the smoothing is really up to you on how much you want to do it. Everyone will have a different opinion. I like it to be barely noticeable and thats just me. Some people like the "magazine" type look.

Southerngal said:
Yes I did use the link you posted. Thanks! Practice, practice :wink: Im very new at all of this, but I really have the determination to learn.

Would placing a diffuser over my flash have helped? I dont have alot of equipment...well really any, other than my camera, right now. Im still trying to grasp when to use a reflector/diffuser....Ill get it one day :wink:

I'm really new when it comes to lighting and I struggle with it a lot. But what I normally do since I don't have any sort of lighting set up (just ordered a 430EX shoe-mount flash yesterday) I try to avoid at all costs using my on-camera flash. Sometimes I will use it for fill light if I am standing far enough away where it won't give me harsh shadows.

As far as diffusing the light some way. I think it would help its hard to say without seeing the location before you shot. But with an external or shoe mounted flash I would bounce it off a ceiling or wall and then maybe you a reflector to help even it out.

Since I don't have one though (yet :wink:) I would probably change my ISO and aperture value to keep my shutter speed higher if I'm hand holding it. If I had my tripod I would use.

I hope this wasn't a terribly long confusing. I'm sure someone else here will provide some additional advice. :thumbup:
 
Very good for your first try, It can be very easy to overkill it. I often find a setting I'm pleased with, walk away for a min and come back for a fresh look.

Heres my take of it, I'm pretty bored tonight so I thought I'd start a tutorial.

christy-3.jpg


Layers2.jpg


Ok so I was really bored so I thought i'd write a tutorial for everyone


______________________________________

Before I begin, I found this gamma test strip online, You should be able to see a differance in all the grayscale boxes preferably even a, b and,c and y+z with a calibrated moniter, You may need to adjust your brightness/contrast to get it close. (Preferably in adobe gamma or hardware calibration)
grayscale.gif


To soften the skin:

Start with the original Image, its named background layer. If its not locked already click the padlock button, that way it will stay safe. Next duplicate the layer by right clicking on the layer and click Duplicate. I named this "lady" , it will make it much easier if you name all your layers.

Next use the polygonal selection tool to click around the woman and select her body and hair. If you need to add or subtract from the selection once your done by holding shift or Opt (alt for pc) and click to start a new selection this will cut out a chunk or replace it.
01.jpg


Now you want to hit this button on the bottom of the layers box
02.jpg
This will take your selection and make an Layer Mask, this will let us edit the lady and the background will not be affected. Look at the layer box above and look at the black/white box beside the lady layer, the white is editable and the black is masked off. Further up the bricks layer has the same one but inverted so the lady is masked off. Now your selection is saved and can be reselected by Cmd+ clicking the layer mask (sorry pc guys not sure of the shortcut...maybey ctrl+click??)

Now for the harder part, I used curves with the RGB channel and then the blue and red channels separately to remove the red color cast on her skin, rather then going into another subject I will just give you some values using the levels tool, and the selective color tool instead of curves. You may vary well be able to get better results by tweaking these are just ballpark.

I set the levels ( cmd+L or image>adjustments>levels) to 28-.97-255 as shown below. This should give it some contrast so the lighting isn't so flat.
03.jpg


Next I opened up the selective color ( image>adjustments>selective color ) select red from the drop down menu, and pull back the red slider to -20% , this will reduce some of the redness., you could tweak the yellow forward to try and bring some color back but I prefer the next step if you have cs /cs2

04.jpg


Open the Photo filters menu (image>adjustments>Photo Filters) and select the warming filter and set it to 22%

05.jpg


The skin should have a nice warm glow, if its not you might need to tweak the above settings a bit.

If you want to remove the hotspots on her face it needs done now before we make our blur layer. Duplicate the Lady layer. Working on this layer I used the patch tool (on the flyout where the healing brush is) to make a selection around a hotspot, drag to a clean area and release. repeat for other spots. Notice its a bit flat now? lower the opacity of this layer to around 65% (might depend of how good the clone job was), just untill it looks right. Now select "lady copy" layer and Cmd-E to merge down (or layers>merge down) click preserve in the pop up dialog and it should combine those two layers and keep the mask (important!) check the layers box above to see what it looks like, it needs that black and white box, i'll refer to this as the layer mask from now on)

Next for the blurring....

Duplicate the lady layer and rename it Lady-Blur. Now click on the lady-blur layer mask, and right click on mask and hit delete mask.

Now go to Filters>Blur>Gaussian blur> and set it to 2.5 , this will change depending on the image size. It looks very blurry but we will selectively add it in later.

Now Hit the mask button under the layers box, and it should turn solid white, we want to click on the layer mask and hit Cmd+I to invert the white to a solid black (or image>adjustments>invert) Now the blurring should disappear. Since everything on the mask is black, its all hidden. A middle gray would make the blur half as strong as when the mask was white. By starting out at black we can paint in with a transparent white (making shades of gray) to build up the blur.

Make sure the layer mask is still highlighted and hit B for a brush and select white. To experiment brush on with 100% opacity and watch the blur appear. Hit undo and lower the opacity anywhere from 8% to 15% and build up the blur. Use a larger soft brush at first and trim around the edges with a smaller one. To erase select black and paint over a mistake.( Tip: to edit on the image portion of the layer you need to click on the thumbnail of that layer, same with the mask, to edit the mask you need to select/highlight the mask thumbnail)

Ok so heres a resized version of my "Lady-Blur" mask, the lighter the shade the more blur that is applied.

06.jpg


Part II tomorrow.... using a non-destructible dodge+burn mask layer to light/darken area's of the skin, essentially painting with light!

I'll be back tomorrow around 5:00, Please feel free to ask any questions or add in anything I might have forgotten. This was my first tutorial, hopefully wasn't too hard to follow.

This isn't the only way or maybe even the best way to do it, but it works for me. Also looking at my image again I think the grass might be a bit to bright and distracting, it could stand even a little more desaturation.

Edit* I can add some more pictures for any steps that might be confusing or poorly written :)
 
Part II

The Dodge-Burn layer is the same as using the dodge and burn tool, their names referring to the film days when editing in the darkroom. Dodge will lighten the layer while burn will....you guessed it, darken the layer. By editing on its own separate layer has many advantages over using the brushes in the toolbar. You can hide them at any time, as well as make adjustments on the fly, and lower the opacity to soften the effects across the whole layer.

Start by creating a new layer (layer>new>layer...) you will need to use the menu or the shortcut, creating a new layer from the layers palette won't give you the dialog pop-up. Once the dialog comes up rename to dodge-burn, and select Overlay from the mode drop down menu. Check the box next to fill with overlay neutral color (50% Gray)

Now that the layer is set to overlay mode everything 50% gray will be transparent, everything white will get lighter and black will make it darker. Using white as an example, by setting an opacity of 10% will dodge or or lighten the photo, using 50% opacity will create a stronger effect.

Get out a white soft edge brush and reduce the opacity to 10% or so and brush on areas that you would like to get lighter (shaddows, eyes etc..) You can use a black brush with a low opactity to tone tone the skin/body, I didn't use much here but have used it a bunch on male portraits where the muscles had rather flat lighting. I did tone down the lips a bit as they where a bit too "fluorescent" looking

I also used a mask to make sure I didn't bleed onto the background. Instead of reselecting the lady again, just hold down Alt. and drag the mask onto the dodge/burn layer.

As for the other layers, I duplicated the background layer (drag to the top) and then copied the lady mask as shown above, only this time, with the mask selected, Inverse the colors. This will mask the lady off and allow you to work only on the background. Use levels/curves to adjust the background. I also de-saturated the bricks somewhat because there where a vibrant shade of smurf blue after the adjustment.

The next layer named grass, uses the same techniques as above, but if you look at the layers palette screenshot above in the first post you can see that the mask is made so only the grass is effected. Curves and hue/adjustment where used here to adjust the grass, after looking at my image again I would further desaturate the grass to take the attention away from the grass, not to mention in my area it would be a shade of brown :)

I hope you guys and gals have enjoyed the tutorial, any feedback would be appreciated, there was 60 views and no comments? maybey my tutorial was a flop? lol :)
 
Thank you so much for putting together the tutorial. I'll give it a try when I get home tonight.
 

Most reactions

New Topics

Back
Top