How to read in camera light meter to expose properly - help please

sophiespal

TPF Noob!
Joined
Jul 16, 2013
Messages
8
Reaction score
1
Location
Canada
Can others edit my Photos
Photos OK to edit
Hi there,
I have had a Nikon D90 and prior to that a D70. Use my 50 mm portrait lens for most everything (pics of my children and flowers).

I still have no idea how to read by in camera light meter to ensure my exposure is correct.

I don't even know where to find it on my camera. Could someone please walk me through how to do this?

Thanks,
Sheri
 
You basically use ISO, F-Stops, & Shutter speeds to balance or center the meter shown typically in the button of your view finders. Example, the meter is leaning to the right, this can be corrected by adjusting the F-Stop. If the meter leans left, this can be corrected by adjusting the Shutter spend. Then you have ISO, adjusting the ISO can add/subtract to the F-Stop or Shutter speed.
 
When walking into 'strange' lighting situations, I typically place my camera in "A" and take a shot or two without the flash and one or two more with the flash. Then I review the pictures on the LCD and look at the settings the camera chose to use. Using those as a starting point, I then move over to manual and make adjustments to get the DOF I want, stop motion with shutter speed, etc. It comes down to understanding the exposure triangle and the benefits and loses of each adjustment. There are other times that it's easier to put the camera on Av mode to more or less 'fix' the DOF and let the camera automatically adjust to lighting changes. Other times, it's Tv mode where I want to stop (or intentionally blur) subject motion and let the camera make the rest of the choices. Sometimes, I just get lazy, too, and put it on "A" and fire away. But those are typically for my personal use/gratification so I'm not so critical for exposure, etc.

Note, Nikon has slightly different names for aperture-preferred and shutter-preferred settings.
 
You basically use ISO, F-Stops, & Shutter speeds to balance or center the meter shown typically in the button of your view finders. Example, the meter is leaning to the right, this can be corrected by adjusting the F-Stop. If the meter leans left, this can be corrected by adjusting the Shutter spend. Then you have ISO, adjusting the ISO can add/subtract to the F-Stop or Shutter speed.

No matter which side the metter is leaning it can be corrected with either one of the three or even a combination of them.

Depending on the scene you want to photograph you may need to adjust accordingly.

Do a test.

Shoot a completely white wall with the meter showing correct exposure.

Now shoot a completely black wall and do the same.

The photos will look the same 18% grey. That is because 18% grey is what a camera will read as correct exposure. Usually you have to compensate between 1 1/2 to 2 stops either way depending on what you are shooting.

That is why you will see photographers moving the camera from the darker place of the intended photo to the brighter one. Then you split the difference and set your exposure accordingly.
 
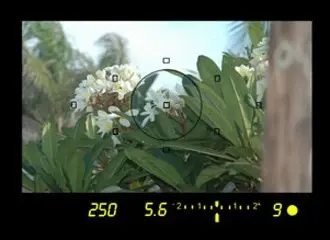
Your camera's meter looks something like this in the viewfinder (appearance may vary slightly depending on your make of camera, but they're all more or less the same):

$canon_viewfinder.jpg

Notice the little meter with a "-2" at one end and a "+2" at the other.

When the little marker is in the middle you have correct exposure.
 
When the little marker is in the middle you have correct exposure.

Depending on what you are shooting.

Shoot a pair of black shoes with the meter centered and you will not get correctly exposed colour.

Shoot a white cup with the meter centered and it won't be correct.

You need to understand your intended scene to decide where the meter should be

That wasn't the question. The question was:

...I still have no idea how to read by in camera light meter to ensure my exposure is correct.

I don't even know where to find it on my camera. Could someone please walk me through how to do this?

Thanks,
Sheri

You're correct about it depending on what scene you want to shoot. It also depends on what metering mode you are using. But assuming the metering mode is set to the D90's default, Matrix, then centering the meter will give a pretty good exposure overall. Once the OP know's where the meter is and how to use it then she can move on to creative exposures.

Learning to walk before learning to run is often the best way to go.
 
As pointed out above...the key is to look at the 'scale' and see where the 'needle' falls.

I believe that with many Nikon cameras, the meter is not visible unless you are in manual mode (or in an auto mode with exposure compensation set to something other than zero).
So if you don't see the scale in the viewfinder, it's because the camera is automatically adjusting the settings to make the needle get to zero.

So when you switch into manual mode, you can adjust three things to affect the needle. Shutter speed, aperture and ISO.

So the first thing to know, is how to change those three settings (in manual mode). Once you have that figured out, practice it...a lot. Point the camera at your subject or scene, and then adjust the setting to get the needle to zero. Keep in mind that if it's more than two 'stops' away from zero....it will just get to the end of the scale and flash. So you have to keep adjusting the settings until the needle does start moving...then you can see how close you are to zero.

Taking a step back, you should know which direction of shutter speed, aperture and ISO will give you more light (exposure) or less light (exposure). So that way, you will know which direction to adjust your settings.

Once you have practiced that, you will likely be asking yourself..."Which settings should I adjust?". The answer to that is 'The ones that give you the photo that you want'. To put it another way...Each of the three settings has it's own artistic characteristic (or consequence). Shutter speed controls how motion is captured, aperture affects depth of field and ISO affects digital noise levels. So the first thing you need to do, is to set an artistic goal. Once you have set that goal, you can adjust the setting that will help you achieve that goal...then you use the other two settings to get the meter to zero. Again...practice, practice, practice.

So once you can do that, you should be comfortably shooting in manual mode. But as pointed out above by munecito, getting to zero on the meter doesn't necessarily mean getting 'proper' exposure. Cameras have what is called 'reflected light meters'....and for them to work, they have to be calibrated to be correct for what we call 'middle gray'. So if you are getting your meter to zero on something that is middle grey (or similar tone), then your exposure would be accurate. But if your subject (the area that you are metering) is not the same tone as middle grey, then you would not have proper exposure when at zero. So to get proper exposure, you would have to adjust the meter to be off of zero. The way it works, is that for subjects that are darker than middle grey, you need to adjust to a negative position on the scale. For subjects that are brighter than middle grey, you need to adjust to a position that is on the positive side of the scale. Just how far away from zero, is something that you'll have to figure out. The brighter (or darker) the subject is, the further away from zero you would need to be. Either way, you'll mostly likely be somewhere on the scale (plus or minus two).

One method for getting proper exposure is to use a grey card. How to use a Grey Card ~ Mike Hodson Photography
 
Study pages 84, and 87 - 94 of your D90 user's manual. As mentioned by Forkie, and as seen on page 87 - note the light meter has 3 modes of operation.
When not using AUTO mode, the photographer has to choose the metering mode appropriate for the photo being made.

There are times when the photographer will need to under or over expose because of the way the light meter works.
The light meter is designed to produce exposure that has an over all reflectance of 12% to 18%. If a scene is predominately white, or black, the light meter will not accurately meter the scene and the photographer has to adjust the exposure.
One way that can be done is to 'bracket' a series of exposures which can be evaluated post process. See user manual pages 92, 95, 191, 193, and 195.

Page 9, Item 21 shows where in the viewfinder you will find the light meter scale.

If the D90 user's manual is not readily available, you can download it here - https://support.nikonusa.com/app/answers/detail/a_id/16087
 
Last edited:
That wasn't the question. The question was:

...I still have no idea how to read by in camera light meter to ensure my exposure is correct.

I don't even know where to find it on my camera. Could someone please walk me through how to do this?

Thanks,
Sheri

You're correct about it depending on what scene you want to shoot. It also depends on what metering mode you are using. But assuming the metering mode is set to the D90's default, Matrix, then centering the meter will give a pretty good exposure overall. Once the OP know's where the meter is and how to use it then she can move on to creative exposures.

Learning to walk before learning to run is often the best way to go.

It was the question.

The OP wanted to ensure correct exposure.
 
The light meter can only ensure 'correct' exposure when combined with something else...like a grey card or just the knowledge & experience of the photographer.

Another thing to consider is that viewing the histogram after the shot has been taken, is probably a more accurate way to judge correct (or acceptable) exposure.
 
Inside the viewfinder is a horizontal scale with hash marks, and there should be a 0 in the middle, with + and - on either side. The zero is medium gray, which is what the camera thinks is always the correct exposure. However, it is not, such as when the subject is brighter or darker than medium gray. The camera is averaging the entire scene and determining what exposure will render it medium gray.

If you use an automated mode, such as P or A, the meter will never be off zero unless you tell the camera to decrease or increase exposure via the exposure compensation dial. In a program mode, the camera will always select an exposure that will render the scene medium gray unless you tell it otherwise, thus it won't move off zero, which it thinks is correct.

The "+" means the camera thinks the exposure will be brighter than medium gray, and the "-" means it thinks it will be darker than medium gray. In manual mode, if you point the camera at a dark object and move the dials until the meter reads zero, the camera will expose to make that object medium gray. The camera is always, always, telling you to make the exposure medium gray. If you decrease the exposure to make the object render dark as it should be, the meter will move to the minus side, indicating the camera thinks you're making the exposure too dark. However, this is when you must know more about exposure than the camera.

You should understand metering. But if you don't like the camera's meter, I recommend a hand-held light meter. An incident meter measures the light falling onto the scene, whereas the camera's meter measures the light reflecting off of subjects into the scene. It's reflected vs. incident. The short explanation is with the incident meter, the light itself becomes the average tone and thus brights and darks are rendered appropriately in the exposure. The camera's meter will be fooled by brights and darks.
 

Most reactions

New Topics

Back
Top