I got my new slave units! How's my lighting now?? CC please :)

k.tremblay1

TPF Noob!
Joined
Feb 24, 2012
Messages
16
Reaction score
1
Location
Cape Cod, MA
Website
www.ktremblayphotography.webs.com
Can others edit my Photos
Photos OK to edit
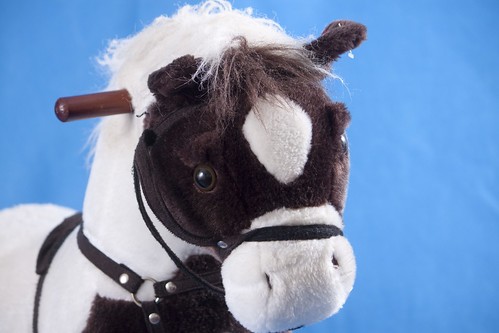
Hello all! I had a post going the other day about lights that I bought, which were 85 watts equivalent to 300 and they didn't light ANYTHING. Someone (Mleek i think the name is?) suggested I buy 2 slave units from adorama so I did and just received them! I set them up real quick and shot these test pics. I didn't set the white balance or anything, I was just testing the lighting.

Settings were iso 100, ss 1/200, f/5.6. The lights were bouncing off umbrellas and I had 1 diagonal to the horse's right side and 1 directly to the left side. I am not too sure if this is where I should have them set up... Any advice? How does the lighting look overall? Would you have done anything differently? Thank you!!!

1.

IMG_5181 by k.tremblay1, on Flickr

2.

IMG_5180 by k.tremblay1, on Flickr

3.

IMG_5179 by k.tremblay1, on Flickr

4.

IMG_5178 by k.tremblay1, on Flickr

5.

IMG_5177 by k.tremblay1, on Flickr
 
It doesn't look bad to start with, I see some small blown areas on the head,but other than that, the exposure is good. This type of lighting however, is what is often referred to as 'flat', that is: It doesn't have a lot of shadow or contrast. Spend a few minutes searching 'portrait lighting' and similar terms. The most basic step usually is to make sure that one light (the 'key') is stronger (relative to the subject) than the other (the 'fill').
 
Ok thank you! How do I make one light stronger than the other if you can't control how much light it outputs? Do I put one light closer and the other further away? Or have the fill light shoot thru the umbrella instead? i will start researching now, thanks!

It doesn't look bad to start with, I see some small blown areas on the head,but other than that, the exposure is good. This type of lighting however, is what is often referred to as 'flat', that is: It doesn't have a lot of shadow or contrast. Spend a few minutes searching 'portrait lighting' and similar terms. The most basic step usually is to make sure that one light (the 'key') is stronger (relative to the subject) than the other (the 'fill').
 
All of the above. The easiest way will be moving the lights farther from or closer to the subject, (Search "inverse square law") BUT that adds a wrinkle by changing the effective size of the source. A shoot-through umbrella will probably kill about 1 stop, and if that's not enough, drape a sheet of white tissue paper between the light and umbrella.
 
Ok thank you! How do I make one light stronger than the other if you can't control how much light it outputs? Do I put one light closer and the other further away? Or have the fill light shoot thru the umbrella instead? i will start researching now, thanks!

I assume that you are using manual flash on these. In that case, you should be able to manually adjust the output of the flash on the flash unit itself. For example, if the flash camera right is at 1/1 power (full power), then try setting the flash camera left to something lower than 1/1, for example, you might try 1/4, 1/8, 1/16, etc. until you get better results.
 
Ok thank you! How do I make one light stronger than the other if you can't control how much light it outputs? Do I put one light closer and the other further away? Or have the fill light shoot thru the umbrella instead? i will start researching now, thanks!

2; 2.8;4;5.6;8;11;16

Those are f/stops. They have a mathematical relationship to one another. If you place one light say 30 to 40 degrees to the left of right of the camera at 4 feet, and then place a second IDENTICAL light at the height of the camera and close to the camera,pointed straight ahead at the subject, but move it back to 5.6 feet, you will have established a 3 to 1 lighting ratio that does not look so "flat".

This is an easy way to practice and learn...use those exact distances, and two IDENTICAL OUTPUT lights, and you'll very soon see how to create decent lighting that has some shadows, and which makes things look three-dimensional. At typical indoor distances, moving the fill light farther back works quite well, and since it is farther away than the "MAIN" light, it helps to keep the main light from "competing" against the closer,brighter, main light.

This is a very confusing post to me, Derrell. I think you meant to say "to the left OR right of the camera at 4 feet", but that aside, do you mean 4 feet from the subject? Does that mean the closest part of the subject to you? The closest part of the subject to the flash? The center part of the subject from you or from the flash? And when you set the second flash at 5.6 feet from the subject but pointing directly at the subject, where do you take the measurements for the 5.6 feet?

And how does this all relate to f/stop?

I do not follow this post but maybe that's because I don't have sufficient lighting experience.

Can you expand on this? Thanks.
 
They were pretty easy to use, weren't they? With SO much more light!

Basically moving one light back is going to cause the light to be less intense on the subject so it would be a different brightness than the other light allowing you to create a more dimensional look.
StudioLighting.net is a great resource
 
2; 2.8;4;5.6;8;11;16

Those are f/stops. They have a mathematical relationship to one another. If you place one light say 30 to 40 degrees to the left of right of the camera at 4 feet, and then place a second IDENTICAL light at the height of the camera and close to the camera,pointed straight ahead at the subject, but move it back to 5.6 feet, you will have established a 3 to 1 lighting ratio that does not look so "flat".

This is an easy way to practice and learn...use those exact distances, and two IDENTICAL OUTPUT lights, and you'll very soon see how to create decent lighting that has some shadows, and which makes things look three-dimensional. At typical indoor distances, moving the fill light farther back works quite well, and since it is farther away than the "MAIN" light, it helps to keep the main light from "competing" against the closer,brighter, main light.

This is a very confusing post to me, Derrell. I think you meant to say "to the left OR right of the camera at 4 feet", but that aside, do you mean 4 feet from the subject? Does that mean the closest part of the subject to you? The closest part of the subject to the flash? The center part of the subject from you or from the flash? And when you set the second flash at 5.6 feet from the subject but pointing directly at the subject, where do you take the measurements for the 5.6 feet?

And how does this all relate to f/stop?

I do not follow this post but maybe that's because I don't have sufficient lighting experience.

Can you expand on this? Thanks.

Yes, I meant to write left or right of the camera. I just got new progressive vision eyeglasses...ack!!! PITA!!!

Anyway, to get a nice 3:1 lighting ratio without a light meter, there are two easy ways. Set up one light at full power, and then a second, identical unit at the same distance, but at HALF power. The distance with off-camera flash or hot lights is measured from the light, to the subject.

The second way to get ,a ,3:1 ratio would be to space two identically powerful lights units so that they are "one stop apart"...so, 4 feet for the main and 5.6 for the fill. Or 5.6 feet for the main light, and eight feet for the fill light.

The exact,precise measuring point for main and fill light needs to be the same point. if the relationship in light power is maintained, it does not matter where the measurements are made at...closest part, farthest part, middle--the three to one lighting ratio will be preserved.
 
Derrel said:
Yes, I meant to write left or right of the camera. I just got new progressive vision eyeglasses...ack!!! PITA!!!

Anyway, to get a nice 3:1 lighting ratio without a light meter, there are two easy ways. Set up one light at full power, and then a second, identical unit at the same distance, but at HALF power. The distance with off-camera flash or hot lights is measured from the light, to the subject.

The second way to get ,a ,3:1 ratio would be to space two identically powerful lights units so that they are "one stop apart"...so, 4 feet for the main and 5.6 for the fill. Or 5.6 feet for the main light, and eight feet for the fill light.

The exact,precise measuring point for main and fill light needs to be the same point. if the relationship in light power is maintained, it does not matter where the measurements are made at...closest part, farthest part, middle--the three to one lighting ratio will be preserved.

Straight old school. Good tip. !
 
What are the names of the slave units you got from Adorama??
 

Most reactions

Back
Top