Panorama post-production question for Photoshop expert

NikT4i

TPF Noob!
Joined
Sep 3, 2012
Messages
6
Reaction score
0
Location
Israel
Can others edit my Photos
Photos OK to edit
Hi all,

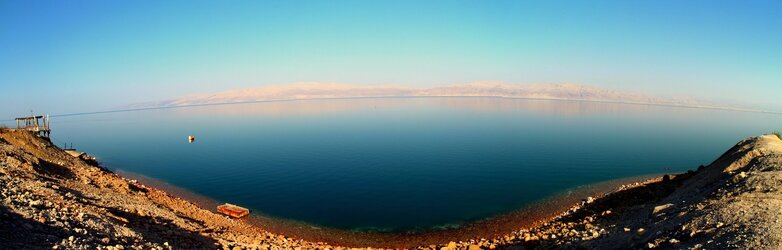
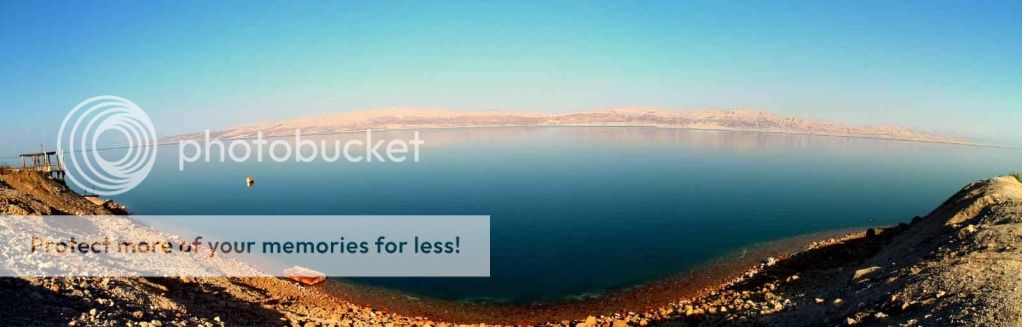
so I took attached panorama of the "Dead Sea" with my Canon T4i,

it's a combination of 21 photos, witch I combined using Microsoft ICE,

and then I did some colors correction in Picasa 3.

As you can tell I am not a post production expert, but I want to print this photo, and before that I just wanted to ask:

How I can boost the appearance and the color of the background mountains? I want them to be more reddish and less foggy.. I got the Photoshop CS5 but I really a rookie,

So step by step guidance will be enormous,

Thank you so much, Nik. :thumbup::D
 

Attachments

  • $Panorama 1 (21 pics- Hand held -037.jpg
    $Panorama 1 (21 pics- Hand held -037.jpg
    172 KB · Views: 166
first I would fix the join a third of the way along the coast on the right... it is a little bit out... I will leave the PS tips to the experts
 
I would fix the stitching errors and the curved horizon first.
 
In Camera Raw use the Adjustment Brush tool. Set all the sliders to 0 except the Clarity slider. Set the Clarity slider to +50 or so. Adjust the size and feathering of the Adjustment Brush tool. Paint over the mountains and the reflection of the mountains in the water with the tool. In the tool option select Add and maybe do it 4 or 5 times. On the last pass also set the Sharpness slider to about +35.
Then click Open Image to open the pano in Photoshop.

In Photoshop copy the Background layer by using the keyboard shortcut CTRL-J, or dragging the Background layer down to the New Layer icon at the bottom of the Layers pallet .
Click on the foreground color (usually white) box near the bottom of the Tool bar. That brings up the Color Picker dialog box. Hover your cursor over your image and you will see an eye dropper. You can use that to click on a color in the image and the foreground box will change to that color.
Select the Brush tool. In the Brush Tool Options panel select a soft edged brush at a fairly small size. To work on the 1600x512 image posted here I used 10 px for the brush size.
Paint the selected color onto the mountains. Don't panic that it is obliterating the mountains. once you have put the color where you want it, at the top of the layers pallet is a box that says Normal in it.
Click on the down arrow to open the Blending mode selection block.
Near the bottom click on Color which is a different layer Blending mode. To the right of the Blending mode box it says Opacity. Change the Opacity to 15% or so.
In the layers pallet click on the Background layer and duplicate it again. Add color to the mountains again and reduce the Opacity to 15% or so.

PanoramaEdit121pics-Handheld-037.jpg
 
You can also use a selection tool and select everything above the horizon, then go to image tab: adjustments: curves.....play around with curves to bring colors out.
 
D3Shooter said:
You can also use a selection tool and select everything above the horizon, then go to image tab: adjustments: curves.....play around with curves to bring colors out.

You can message me if you want, I'm pretty good with CS5 ;)
 
$Panorama 1 (21 pics- Hand held -037 2.jpg

Another way is to use the quick mask and with a very soft brush, paint the sky until past the horizon including the reflection of the mountains. Exit quickmask and put this in another layer. use curves or levels to increase contrast to remove haze and darken it a bit. Apply layer mask and brush away the dark extended areas. Adjust the opacity to lighten to your taste.
 
Wow thank you all for this amazing tips.. I am working on it now and it is really starting to look much better... Not easy though in the begging.. But this is how all beginnings are..

Thanks again, amazingly helpful forum,

Nik.
 
I would fix the stitching errors and the curved horizon first.

Agree with the stitching errors but would leave the horizon exactly as it is. The curve is great.

How is that that I just can't see the stitching errors even in the original enlarged file? can some one point out there is that exactly?
 
I would fix the stitching errors and the curved horizon first.

Agree with the stitching errors but would leave the horizon exactly as it is. The curve is great.

How is that that I just can't see the stitching errors even in the original enlarged file? can some one point out there is that exactly?

Yea.. I found some now (on the background mountain).. don really know how to fix it.. maybe I'm gonna try to blur it a bit in Photoshop...
 

Most reactions

New Topics

Back
Top