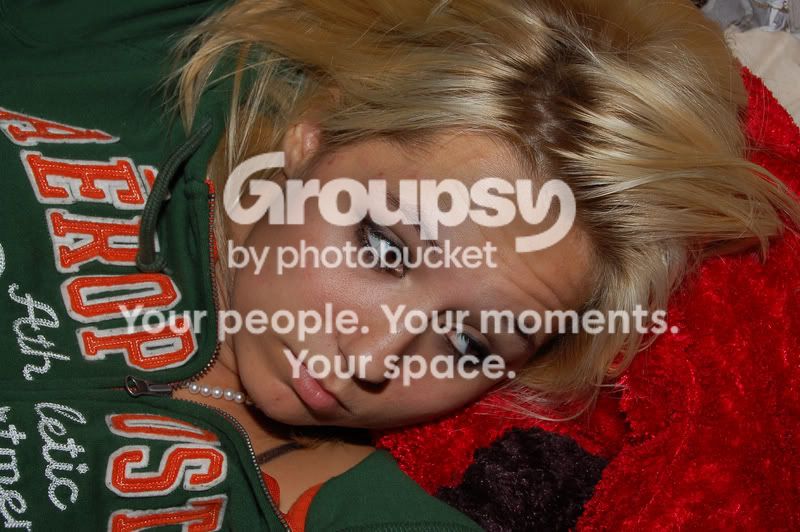
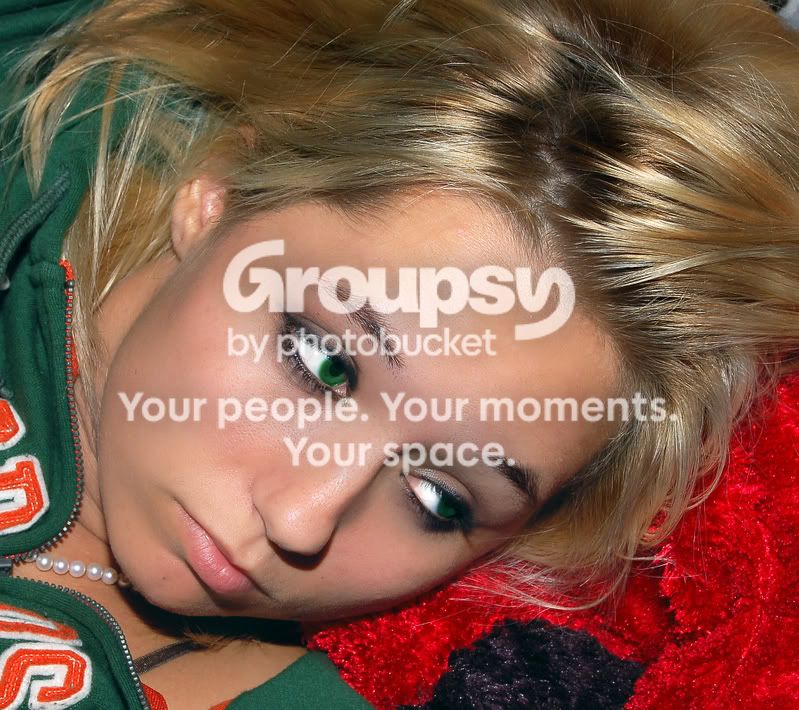
I like what you've done with this image. Most of us are tempted to take editing so far that the subject looses too much of the realism and spontaineity. I think you've found the balance here. You've kept enough of the original to reserve its realism. Your model is incredibly beautiful.
Your signature states that your images are ok to edit. And I hope you don't mind that I experimented with it.....
The first rendition is the result of using only photoshop (no plug-ins)
The second rendition is the result of the Neat Image plug-in.
Which do you like better
You are really not supposed to see the pores in a portrait. Despite being natural, the creases in the forhead look out-of-place and tend to draw the attention of the viewer slightly away from the eyes.
Midnite Jam's first rendition seems the most natural of the bunch but even that requires more work to for example slightly lighten up the dark side of her face around the eye particularly and getting the red out of her eye as well.
NoelNTexas, Of the three edits, I like yours more because the candid-natural-like quality wasn't edited out. I got a sense that I was looking at a real person rather than a cooky-cutter concoction from a celebrity magazine when I viewed your edit.
skieur, I deliberately increased the light ratio that you refer to (the dark eye). I wanted to eliminate the flat light appearance in order to produce more of a light-modeling effect that hinted of classic "Rembrandt" portrait lighting. You can google 'Rembrandt lighting' to get an idea of the concept. Also google 'broad lighting', short lighting, butterfly lighting, and paramount llighting. You'll like what you find.
I added a vignette to emphasize the face. I added catch lights in the eyes to create a light source and establish dimention to the iris. I added a hint of rose tint to her cheek to help eliminate the appearance of flat lighting.
And if the irises are red, then I need to calibrate my monitor again. I'll check out that red on my other 3 monitors.
NoelNTexas, If you're interrested, I'll write a tutorial for you. You're lucky to have a natural beauty to model for you.
midnitejam I love your edit, what steps did you take? looks like a glausin blur on the skin as well as some color blending. Is that correct? I would love to know exactly how you did this.
midnitejam I love your edit, what steps did you take? looks like a glausin blur on the skin as well as some color blending. Is that correct? I would love to know exactly how you did this.
D-50 and setiawan4gus and anyone else who was interrested, I hope you enjoy these instructions
Cheers-MJ
Dupe layer (just for general purposes) Healing Brush (Eliminate all blemishes) Filter. Noise. Median Radius: 10 Layers opacity: 50
Add layer mask. Paint inside the white mask with black brush To eliminate the smoothing effect from Eyes, brows, lashes, edges of nose, hair Nostrils, and mouth
Eyes Adjustment Layer. Channel Mixer. Check Monochrome Select the mask and brush the color back into the irises Ctrl +click the adjustment layer (makes a selection) Select. Inverse (puts selection on irises only) Click on the original layer copy to make it active Ctrl+J (copies eyes to their own layer) Change Blend Mode: Screen Double Click thumbnail of the channel mixer layer Lower Constant slider until image is fairly dark (If eyes blue, dupe the lightened Iris Layer until almost white) Deselect the channel mixer layer
Catch Lights Create new layer With small brush, paint white dot in each eye were pupil and iris meat Adjust opacity until catch lights look realistic
Create highlights in iris Create new layer Paint section of iris opposite the catch light with white Adjust the layers opacity until the area opposite the catch light resembles a highlight
Rembrandt Lighting Ilusion Filter. Render. Lighting. Effects. Style: 2 oclock Spotlight Change the spotlight to 10 oclock position Using shape and size of light and the Negative Sliders and Narrow Sliders adjust The shape and intensity of the light that falls upon the face so that the near cheak recieves 50% more light than the far side of the face The difference of light-to-darkness ratio is about 1 to 1.5 Flatten all the layers. Create new layer. Change Blending Mode: Overlay. Select air brush and paint light (white paint) into left cheek and eye until there is a triangular highlight on the left cheek below the eye and enclude some of the eye in the triangular highlight Flatten Layers
Create Vignette Filter. Distort. Lens Correction (to create a vignette) Vignette Slider: -100 (or until satisfied) Vignette Midpoint: from +50 to -0 (to suite taste)
My sincerest apologies to NoelNTexas for using his thread to this project. Thanks to everyone for their interrest.




![[No title]](/data/xfmg/thumbnail/30/30989-2ed4e52fa80fcd0ba553c515ffc589cd.jpg?1734159049)
![[No title]](/data/xfmg/thumbnail/30/30881-c36788e79b12973b7bf57c94b46961e9.jpg?1734158883)
![[No title]](/data/xfmg/thumbnail/35/35958-c5e3387cf4682d8c9cd7b7818c294709.jpg?1734167791)
![[No title]](/data/xfmg/thumbnail/30/30986-0fbf9af8f70b46ce37aeb237ba68b573.jpg?1734159039)
![[No title]](/data/xfmg/thumbnail/30/30877-ef8d8a8cf110d5566382bb4e8a76fd3f.jpg?1734158872)