Setup for Product Photography - help

jeppevinum

TPF Noob!
Joined
Jul 5, 2014
Messages
6
Reaction score
0
Location
Danmark
Hey! I need some help to setup some light for product photography.
I have this picture to indicate the style i looking for. Maybe some of you know how to edit it too.

http://www.acnestudios.com/shop/men/shirts/mario-stretch-washed-denim.html <------ Click on the link to see the picture

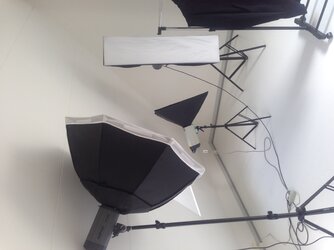
My room look like this. And I have the light you see on the pictures.

$Photo 768.jpeg$Photo 769.jpeg$Photo 770.jpeg
 
Last edited:
I am sorry the pictures have rotate. I appreciate all the help i can get.
Maybe if you have some tips for camera settings, I can use that too.

/Jeppe
 
That shot is butterfly lighting.
 
What does butterfly lighting mean? I think its way you place the lights... but how
 
look at the catch lights and shadows.

main light directly in front and overhead of model. reflector below to fill in shadows under chin.

then probably two bg lights to over expose the bg and allow light to creep around the rim.

black level is reduced in post to give it a muted/matte washed out effect.
 
did you steal all that lighting equipment?
 
Hahahah i have borrowed it from some different friends to find out, how much i actually need for myself.
 
Not really sure I'd call that 'butterfly'; it seems to be lacking most of the lower light source, but regardless, this is very easy to replicate. You can do this with either three or four lights; four would make it easier. Start with a white seamless background and mark a point say 8' in front of it; that will be the model's 'mark'. Set up two lights to cross-light the background so that they're angled at about 45 degrees, and use the same modifier on each (medium or large softbox or similar). Next place the model on the mark and if you have two more lights, then set them up (again using the same modifier) so that they are each about the same distance off of the lens axis and at a height which will allow the heads to be aimed slightly down; if you only have one light, then have it right on lens axis, and at a height which will allow it to be aimed slightly down. With the background lights off, calculate your exposure for the model, let's say f8. Once you've go that done, turn on your background lights and set them so that they're 2/3 - 1 stop above the key (model lights), say f11.

That's it... done. As long as the model stands on the same mark and you don't move the lights, you'll get a perfect exposure every time.
 
Whoops, just found out how to enlarge those images; you're right it is a butterfly pattern, sort of, at least going by the catchlights.
 

Most reactions

New Topics

Back
Top