White Balance....white, gray, and black WB cards.

bronzeo

TPF Noob!
Joined
Dec 5, 2004
Messages
143
Reaction score
17
Location
Joplin, MO
Website
www.imagemakerart.com
When using a neutral card for setting WB, is there a particular reason for choosing one of the three. I just ordered all 3..... I watched several video on YouTube about them, but no one ever explained why they chose the variation that they were using.. at least between the white and gray (they didn't show using the black one.)
 
As long as you know the reflectance of the card it shouldn't matter. ANy will give you the info you need.
BUT gray seems always more useful than either black or white, simply because it is more guaranteed to not be blown out or blocked up than the other two are.

I can't really think of any valid reason really why you would want to use a white or black card, assuming you are shooting RAW. Again they will work most of the time, but they are riskier than gray (chance of blowing or blocking one or more channels accidentally and losing your reference point) in exchange for no obvious benefits

Really?

Do you post process? What do you use to set the curve endpoints?
 
Really?
Do you post process? What do you use to set the curve endpoints?
Cards are for white balance. You don't need more than one reference for white balance, because white balance is defined at a single point in colorspace; more than one reference would be redundant.

If you're talking about curves, then you're talking about something different: contrast/tonal range. And since there is no "correct" value for contrast or tonal range, unlike white balance, there's no reason why physical reference points are needed for it. Simply make sure on the in-camera histogram that the image is not clipped on either side (and ideally that most data is in the upper half), and worry about getting whatever your exact preferred tonal range is in post processing. For black point/white point/tonal range, cards aren't going to add anything to the equation except wasted time.
 
So you do know a reason to use black and white cards?
 
So you do know a reason to use black and white cards?
??

Nothing I just described involved white or black cards. The histogram works without ANY cards, and the gray card is only used for an absolute WB shot or reference if desired. You can replace the gray with either black or white, to serve the same purpose, but I don't know why you ever would, since it won't work any better, and will add the risk of clipping it and making it useless if you aren't careful, which is harder to do with gray.

Just like you could replace a bicycle with a unicycle for commuting to work if you wanted, and both can technically work better than nothing, but in purely practical terms (set aside hipsters and circus trainees), the unicycle offers nothing above and beyond the bicycle's utility, and does add a bunch of other headaches and risks.
 
When using a neutral card for setting WB, is there a particular reason for choosing one of the three. I just ordered all 3..... I watched several video on YouTube about them, but no one ever explained why they chose the variation that they were using.. at least between the white and gray (they didn't show using the black one.)

Bronzeo, you're cameras built in reflective light meter meters a scene to render a neutral tone; specifically 18% grey. That's what grey cards are set to. That way you can both set exposure via a grey card and set WB as the card should have equal values for red, blue and green (assuming you're using a quality card). Using White and Black cards allows you to verify your white and black points, either via the histogram or in post. Having a white, gray, and black point in an image can be a quick and helpful way to ensure that your whites and blacks will both fall where you need them to in the scenes lighting; either by checking to see where the spikes in the histogram fall or by checking their values in Ps to ensure you're not blowing out your whites or clipping your blacks (black with detail and white with detail will generally fall around 5 and 245 respectively). A tool like the ColorChecker grayscale : Amazon.com: X-Rite M50103 ColorChecker Gray Scale: Camera & Photo , or any of the other grayscale cards, should give you distinct spikes in the histogram for white and gray. For example, a four tone card like the QP card: QP Card 4-Step Gray Scale Card GQP102 B&H Photo Video would give you a spike on the right for white, a spike in the middle for gray, and a spike to the left of center for dark gray. If your histogram looks good you know your lighting will be right.
 
As an Amazon Associate we earn from qualifying purchases.
Using White and Black cards allows you to verify your white and black points, either via the histogram or in post. Having a white, gray, and black point in an image can be a quick and helpful way to ensure that your whites and blacks will both fall where you need them to in the scenes lighting; either by checking to see where the spikes in the histogram fall or by checking their values in Ps to ensure you're not blowing out your whites or clipping your blacks
Can you explain why this is more helpful or useful for exposure than simply looking at the histogram without added spikes?

The histogram by itself accomplishes the same goal, and MORE, in fact, since it also covers situations like having sources of light (e.g. the sun or lamp posts) in the scene, which are of course going to have higher brightness values than any card ever could, and since it takes into account remote lighting that is affecting the scene but is beyond the reach of your arm to light a card.

Adding some spikes isn't really doing anything but... well... making the histogram spikier. If your white card spike is just where you want it, but the histogram still clips (either because of a lamp post in the shot, or because of bright lighting in the distance that doesn't reach to where you're standing), then your image is still going to look bad... Whereas if you go by the trailing edges of the histogram itself, you'll get the right exposure.
 
Bronzeo, have you purchased a color checker card yet? I ask because I know you're doing art reproduction, and there is more than just exposure and WB at play when trying to accurately reproduce colors. Spectral deficiencies in different light sources, lens characteristics, and camera sensor response curves will mean certain colors won't be reproduced accurately even with correct exposure and white balance, so for what you're doing the second step of setting up a custom camera profile for the lighting would be beneficial.
 
When using a neutral card for setting WB, is there a particular reason for choosing one of the three...

I don't know, I set WB off of a white or grey card for the light I'm shooting in, never heard of using a black card to insure correct color balance.
 
Using White and Black cards allows you to verify your white and black points, either via the histogram or in post. Having a white, gray, and black point in an image can be a quick and helpful way to ensure that your whites and blacks will both fall where you need them to in the scenes lighting; either by checking to see where the spikes in the histogram fall or by checking their values in Ps to ensure you're not blowing out your whites or clipping your blacks
Can you explain why this is more helpful or useful for exposure than simply looking at the histogram without added spikes?

The histogram by itself accomplishes the same goal, and MORE, in fact, since it also covers situations like having sources of light (e.g. the sun or lamp posts) in the scene, which are of course going to have higher brightness values than any card ever could, and since it takes into account remote lighting that is affecting the scene but is beyond the reach of your arm to light a card.

Adding some spikes isn't really doing anything but... well... making the histogram spikier. If your white card spike is just where you want it, but the histogram still clips (either because of a lamp post in the shot, or because of bright lighting in the distance that doesn't reach to where you're standing), then your image is still going to look bad... Whereas if you go by the trailing edges of the histogram itself, you'll get the right exposure.

It's about more than a "spike". If you want whites to retain detail they have to fall sufficiently within the right of the histogram. If you want to know your lights and your camera are dialed in gray should be right in the center. Photographing products in a studio environment requires a bit more accuracy than the winging it that typically works when just walking around taking pictures. Sure, you can screw around in post all you want, but when you're shooting product in a studio environment the key is to get everything right in the camera. This way you take the guess work, and the post work, out of the equation. Overexposing whites and then pulling them back loses detail. Overexposing colors and then pulling them back loses saturation and richness. ETTR is a good practice for when you don't have control of the lighting, not when you do.
 
Overexposing whites and then pulling them back loses detail.
This is simply not true. Pulling back exposure (as long as you don't clip it!) does nothing to harm the detail, and depending on your editing, can actually substantially improve your detail, because data from the entire scene is stored in greater precision when you ETTR and have more light (i.e. original data: photons)

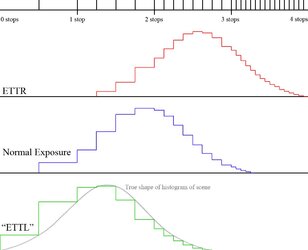
Hypothetical infographic for what it would be like for a 4 stop dynamic range camera, shooting a scene with approximately 3 stops of dynamic range:

(Edit: Sorry for using RGB, not meant to be confusing. These are not supposed to represent color channels)

$ETTR.jpg

Same exact hypothetical scene, exposed to right, center, left, without clipping. The data stored by the RAW is greatest and most precise with ETTR. Depending on what edits you're doing, pulling it back down in post will either preserve as much information as in centered exposure (if all you do is pull it down for instance), OR add more (if, for instance, you up the contrast in post). In no situation ever will it remove detail. (unless it required a long enough exposure that you got motion blur, of course) The further to the left you go from ETTR, the coarser the data that is stored gets, and the less editing latitude you have.

I'm not saying people should always ETTR. It does take time and chimping and requires more light, which might be deal breakers, depending. What I am saying, though, is that ANYTHING in between centered and ETTR exposure will always be as good or better in detail and smoothness than centered exposure would be. Thus, you almost always have a big enough range of options that you can trivially eyeball it from the histogram and not lose anything at all, because anything within that range is either as good or better.

You are correct that black and white cards might save you time in post processing, I guess. But they simply add that exact same time in the studio instead... considering that you can batch process RAWs and thus only have to make the correction once, either way. So why spend the same amount of time AND also pay for and carry around a bunch of cards and junk?
 
Last edited:
Overexposing whites and then pulling them back loses detail.
This is simply not true. Pulling back exposure (as long as you don't clip it!) does nothing to harm the detail, and depending on your editing, can actually substantially improve your detail, because data from the entire scene is stored in greater precision when you ETTR and have more light (i.e. original data: photons)

Hypothetical infographic for what it would be like for a 4 stop dynamic range camera, shooting a scene with approximately 3 stops of dynamic range:

View attachment 70051

Same exact hypothetical scene, exposed to right, center, left, without clipping. The data stored by the RAW is greatest and most precise with ETTR. Depending on what edits you're doing, pulling it back down in post will either preserve as much information as in centered exposure (if all you do is pull it down for instance), OR add more (if, for instance, you up the contrast in post). In no situation ever will it remove detail. (unless it required a long enough exposure that you got motion blur, of course) The further to the left you go from ETTR, the coarser the data that is stored gets, and the less editing latitude you have.

I'm not saying people should always ETTR. It does take time and chimping and requires more light, which might be deal breakers, depending. What I am saying, though, is that ANYTHING in between centered and ETTR exposure will always be as good or better in detail and smoothness than centered exposure would be. Thus, you almost always have a big enough range of options that you can trivially eyeball it from the histogram and not lose anything at all, because anything within that range is either as good or better.

You are correct that black and white cards might save you time in post processing, I guess. But they simply add that exact same time in the studio instead... considering that you can batch process RAWs and thus only have to make the correction once, either way. So why spend the same amount of time AND also pay for and carry around a bunch of cards and junk?
Charts and graphs just show that data is there. The actual quality isn't always the same. I've seen this discussion go round and round, but I've seen actual controlled examples as well, they showed a reduction in saturation and an increase in granularity of the color in the real world. Granted, if you're not pixel peeping, or if you're planning on editing the image to just make it as visually pleasing as possible it doesn't matter. You can pull the image back and just add some saturation, move the black point a bit and voila!, rich saturated color. But will it be clean and accurate? ;)

Also, tones change with exposure changes. This means without controls getting things exactly right becomes guesswork. When you are trying to accurately reproduce something for catalog/sale purposes (especially artwork), color and tonal accuracy is paramount. For portraits and landscapes it's far less important.
 
Also, cards will fail in a scene like this:
http://know.burrp.com/wp-content/up...night-mysterious-scene-in-old-prague-city.jpg

The unclipped true histogram from that street scene might look something like this:
View attachment 70052

Your cards are only lit by ambient, because you're not standing under that light (and you may not be able to. Maybe it's on the other side of a river). So your white card will read much darker than the lighter part of the scene, by several stops. Thus, if you dutifully set your exposure so that the black, gray, and white cards are where you normally would put them, the focal point of this shot will end up horribly horribly overexposed.

Using the histo itself without regard to cards does not result in any such problems, however.
 

Most reactions

Back
Top