What's new

Why you should shoot in raw

coastalconn

Been spending a lot of time on here!
Joined
Mar 24, 2012
Messages
3,594
Reaction score
3,636
Location
Old Saybrook, CT
Can others edit my Photos
Photos NOT OK to edit
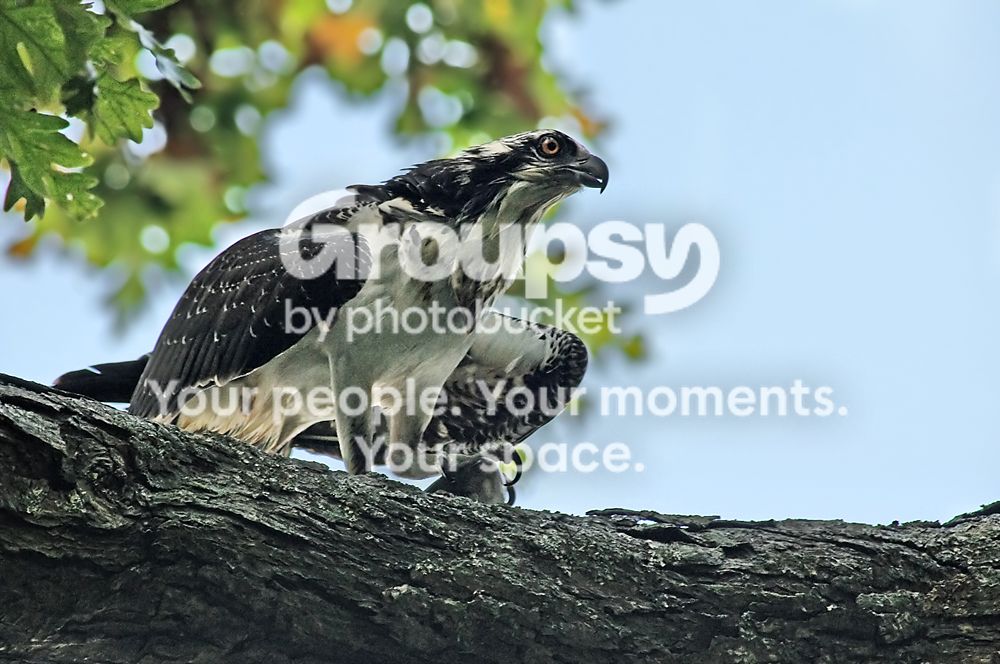
I put this here because I know there is an endless debate about raw vs jpeg. Ideally, You want to get everything right in camera. Sometimes things happen quickly or you just forget a setting. You probably all know I love my Ospreys :) When I was walking out of my spot yesterday at dusk, the only one I saw all day did a crash landing almost directly above me. I had my camera set to -.7 EC as I was shooting some swans in the setting sun. I had no time to react and no light left anyways. I fired off a few shots before it saw me and flew away. All I had was a ghastly silhouette. If I only shot in jpeg I would be left with this ugly mess, and it is probably the last Osprey I see in the next 6 months.


Luckily I only shoot in raw. It is not the best shot in my library, but a fond reminder of this bird until next year. I couldn't clean up anymore noise...
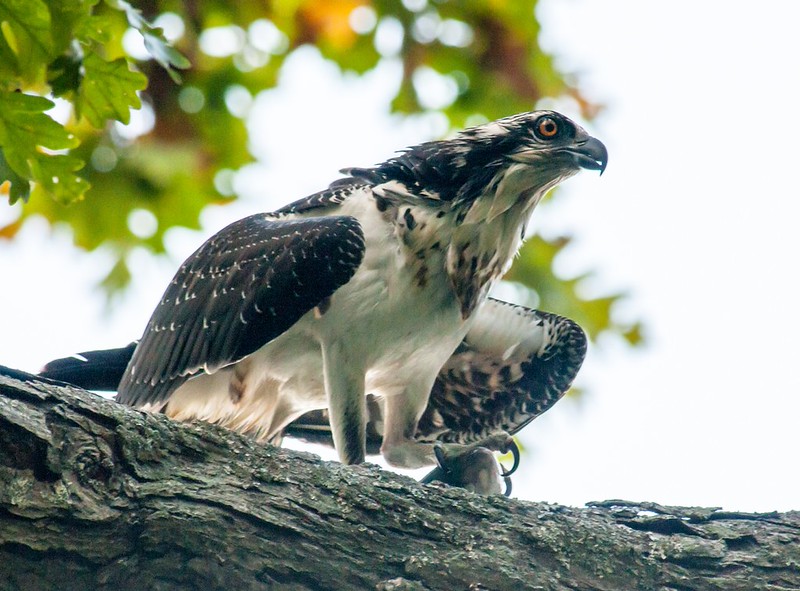

Osprey 10_14 by krisinct, on Flickr

So as you go through your photographic journey, you may want to consider using raw, it might save you some day...
 
Wonderful example! Wow did you turn that one around!
 
took some work, lol, it took +2.50 on exposure, highlights down, shadows up... The noise still bothers me. NR is at 36, default sharpening down to 20... plus heavy clarity, vibrance and saturation... Only the second time I had to do a save that was like this...
 
Not sure what you use but Lightroom 4 has some great noise reduction tools.
 
Love it!!! I know that lots of professional sports photographers shoot jpegs due to file size, buffer, and most the game they won't have to fiddle with the settings drastically. I recently started shooting in raw (coming out of my noob-level if you will) and I absolutely love it! In PS, sharpening shows very very little noise compared to my previous method which was duplicating the layer background, setting it as an overlay, and using the highpass filter in the 'other' option. I also love how almost every tool I'll need to make either minor or drastic changes to an image is there. Afterwards I can save it as whatever file type I'd like (I usually save it out as a tif and then save another as a jpeg with my watermark on it to share online). I really love it's noise tolerance though, I've been kicking myself for constantly forgetting to shoot raw in the past and shrugging it off thinking it'd make little to no difference. Technology today really pushes the limits for photography, I remember being little and shooting film with my mom, then waiting a few hours for them to develop at Costco and afterwards looking for them on the shelfs. Another time I was watching my aunt shoot instamatic during special occasions and being so fascinated when the images would slowly appear before my eyes. Those were the days :)
 
Definitely gonna start shooting in RAW.
 
I continue to shoot JPG..as mostly my day-to-day snaps are just a means
of socialising via photosharing online. But I have now started to use DNG+JPG
and archive the DNGs.
 
I couldnt imagine going back to JPEG, to be honest. The ability to fix white balance, to sharpen, etc. And the knowledge that, should I learn all these post processing tools in the future, I can reedit my old pictures and potentially get even more out of them.
 
Coastal sent me the RAW and I had a play around:

Ospreyrawtpf3copyb.jpg


I used a different approach for this to what I would normally do - not sure if its better or worse, but its a different approach and some ideas might help:

1) In the RAW processing stage I set all the values to 0. I left the white balance mostly to its default as shot values, but the rest of the settings I set to 0. I then opened it up in Elements (ok ok one day I'll get CS somethingerother ;)).

2) In elements I then used the levels tool to balance the levels (mostly on auto).

3) Boosted brightness, adjusted shadows and highlights and tinkered around with this. I also used layermasks so that the sky would retain its blue hue instead of being ending up going a more pure white as a result of the brightness adjustments needed on the bird and foreground elements.

4) I also adjusted the saturation, giving it a little boost, but not too much. I then also reduced the cyan colour channel by a little just to take the edge off the blueish hue that was present over the photo.

4) In the noise reduction filter menu I used the Dust and Scratches removal too (radius 3, threshold 5 or somewhere around those values). In boosting the brightness in editing instead of RAW processing it seemed to generate more speckles over the photo instead of more red colour noise that I got in RAW when I experimented with that.

5) I then ran Neat Image noise reduction over the photo in two rough waves. First wave hit the whole photo, but I was mostly balancing things for the detailed foreground areas, so trying not to reduce noise too much that it destroyed the texture/details too much. I also used it to restore some of the sharpness lost through the noise reduction.
After that a second run was applied only to the background areas (stronger noise reduction possible here).

6) I resized down in two stages, applying tweaks to brightness/contrast and the noise reduction. This latter stage is more about preparing the photo for presentation (in this case on the internet) so a bit of refinement is possible. At this stage I also boosted the brightness over the face of the bird as well, which is slightly shadowed otherwise (this really should have been done earlier).
A final pass of the dust and scratches was also used on the background areas only along with a few more noise and sharpness adjustments and a general unsharpen mask for the photo.


Most of what I got was then just tweaking the above mentioned tools and shifting values around to get a pleasing result. I suspect if I were more serious about the shot one could go in and do a fair bit more selective noise and sharpening adjustments at the fullsized version along with a few more local contrast shifts.
I've also seen some interesting filters one can make with the layermask feature (sadly not easily repeatable in elements due to missing/hidden controls) which helps to better isolate noise and sharp contrast edges from each other.
 
Here is mine again, to hard scrolling back and forth...

Osprey 10_14 by krisinct, on Flickr

I think you controlled the noise much better. It also is nice retaining some color in the sky. I have not figured out layers yet or masking.. Maybe someday:)
This isn't really a keeper for me but a fun exercise. I think I would have blurred the leaves in the top left corner as they distract me also.

If anyone else wants to play with the raw file.. have fun... Osprey raw tpf.NEF

Over, thanks for taking a shot at it. I like seeing different ideas!
 
(1 of 17) Photoshop CS3 Workflow for Photographers - YouTube

one video should have a link to the next in the menu on the right - 17 different tutorials. It's a neat setup because it doesn't just give you single examples, but gives you a whole workflow broken into sections. It's also where I picked up the idea of working in photoshop instead of working in RAW for making changes.
 
My CS5 tells me it doesnt recognize/cant open my RAW files from my D3100. Are there any additional settings on my camera or plugins etc I need for Photoshop?
 

Create an account or login to comment

You must be a member in order to leave a comment

Create account

Create an account on our community. It's easy!

Log in

Already have an account? Log in here.

New Topics

Back
Top Bottom