C&C Welcome on Roxy Dog Portrait

waday

Do one thing every day that scares you
Joined
Jul 21, 2014
Messages
7,485
Reaction score
3,599
Can others edit my Photos
Photos NOT OK to edit
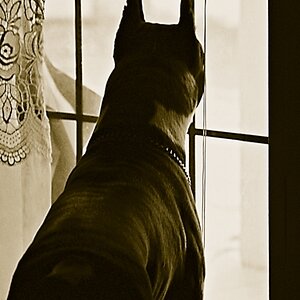
I had some free time tonight, so I decided to take a 'portrait' of my dog, Roxy. I don't know what it is about it, but it seems 'boring' to me.

While I've had my DSLR for a long time, and I've been taking okay pictures, I want to actively get better at this hobby.

I'm fairly new to adding light to photos, so please give me any feedback you can. This definitely has some PP--the original needed to be fixed. :confused:

$Roxy-LRChair.jpg
 
Looks well exposed and sharp enough. Maybe it seems boring because the dog isn't doing anything interesting or dog-like. Lighting and processing won't change that, unless you shopped it within an inch of it's life into some crazy, dramatic scene.
 
I think its the chair. It blends well with the lighter color of the dogs fur. Find a background with more contrast, maybe.

Or maybe like Pejacre said; give a dog a bone & let him do doggie stuff

Sent from my Samsung Galaxy S4. probably at work.
 
Thanks for the feedback! Good points. I never thought about the chair color matching her fur and blending in.

She was pretty tired, but she did get a few treats after it. I'll see if I can grab a few shots on our walk in the morning.
 
Another shot with her ready to catch the treat…

$Roxy-LRChair_Treat.jpg
 
Technically all the pieces are here. It lacks dynamism or intrigue--the colors aren't very vivid, the lighting isn't dramatic, etc.

http://www.123inspiration.com/wp-co...Furry-Dog-Portraits-by-Daniel-Sadlowski-9.jpg

Something like that is what I mean--much more dynamic and compelling.

Jake

Thanks for the link. I'll have to take some pointers from his photos.

Looks like he used a softbox or striplight camera left, rim light camera right, and then a spotlight on the background. Not that you need all those lights, just something more... punchy.

Jake
 
Looks like he used a softbox or striplight camera left, rim light camera right, and then a spotlight on the background. Not that you need all those lights, just something more... punchy.

Jake

Thanks for the breakdown! I really appreciate it. I'm fairly new to adding light (all I have right now is a hot-shoe flash), so I need all the help I can get! haha :hail:

Off camera flash is your friend! It can really take your photography to a new level--there's plenty of affordable options out there. Yongnuo is one of the most popular--they sell triggers, flashes, etc, all on the cheap, and have really good reviews.
 
Off camera flash is your friend! It can really take your photography to a new level--there's plenty of affordable options out there. Yongnuo is one of the most popular--they sell triggers, flashes, etc, all on the cheap, and have really good reviews.

I want it badly... trying to stick to a budget isn't fun. :grumpy:

It's called GAS... Gear Acquisition Syndrome. It never goes away, and only gets worse.

Haha. I love that! I'm afraid of that.. or, more importantly, my wife is afraid of that.

Thanks for the tip on Yongnuo. I'll check them out!
 
LR has 3 sliders at the bottom of the Basic panel known as the Presence section- Clarity, Vibrance, and Saturation. Camera Raw's Basic panel has the same 3 sliders
Clarity adds/subtracts mid-tone contrast. Vibrance adds saturation to colors that are not already vibrant or subtracts saturation. Saturation boosts/mutes all colors.
I rarely use the Saturation slider, but use Clarity and Vibrance for most images I edit.

Using Camera Raw here, I added Clarity, but subtracted Vibrance. I also added 0.25 EV of exposure along with a bit of sharpening (Amount +25) using the Sharpening panel. (Camera Raw and LR Develop module are essentially the same software.)
I then used Photoshop CC 2014 to select just the wall. I saved that selection.
With the selection active I made a Vibrance Adjustment layer and moved the Saturation slider all the way to the left to remove all the color from the wall.
Next I made an Exposure adjustment layer, retrieved the saved selection, and added exposure to the wall.
I cropped and added a narrow black border.

RoxyEdit-LRChair.jpg
 
Last edited:
LR has 3 sliders at the bottom of the Basic panel known as the Presence section- Clarity, Vibrance, and Saturation.
Clarity adds/subtracts mid-tone contrast. Vibrance adds saturation to colors that are not already vibrant or subtracts saturation. Saturation boosts/mutes all colors.
I rarely use the Saturation slider, but use Clarity and Vibrance for most images I edit.

Using Camera Raw here, I added Clarity, but subtracted Vibrance. I also added 0.25 EV of exposure along with a bit of sharpening (Amount +25) using the Sharpening panel. (Camera Raw and LR Develop module are essentially the same software.)
I then used Photoshop CC 2014 to select just the wall. I saved that selection.
With the selection active I made a Vibrance Adjustment layer and moved the Saturation slider all the way to the left to remove all the color from the wall.
Next I made an Exposure adjustment layer, retrieved the saved selection, and added exposure to the wall.
I cropped and added a narrow black border.

RoxyEdit-LRChair.jpg

Thanks for the edit! I like it!

I like the increased clarity/sharpening/exposure and decreased vibrance! Also, I didn't think about moving it into Photoshop to remove the wall color. Definitely a must with the apartment beige walls!
 

Most reactions

Back
Top