Handcoloring?

sillyphaunt

TPF Noob!
Joined
Dec 10, 2004
Messages
493
Reaction score
3
Location
Oregon
Website
www.bugshots.net
I have a roll of B/W film that I shot, and I'd like to try my hand at handcoloring a few.

My question is, do I need to print them on fiberbased paper to do it? What paper looks best to do it?

And would it be better if I sent them off to be printed and then hand colored them?

What do you/have you used.. oils? dyes, pencils? Any tips would be great. :)

And a totally weird question.. is it possible to scan a photo, manipulated it in photoshop, have it printed by a lab, then hand color it? Is the paper different?
 
Hi Kylie - You should have been in my handcoloring workshop last fall. You'd be a great student. ;) First off: if you want to get serious about this stuff, you owe it to yourself to purchase a high quality photo printer, preferably something that uses archival inks. Inkjet papers have come a loooong way, and some have such beautiful texture, it's hard to believe they can be run through a printer!

For traditional hand coloring of a FB print, I print with Agfa MC Classic 118. I love this paper. (Your bromoil is printed on the same paper, check the texture.) It takes photo oils, pencils, any oil-based medium beautifully. Prime it with a little PM solution for better flow of straight oils. You can also use wax pencils and chalks (pastels). This paper handles it all.

And a totally weird question.. is it possible to scan a photo, manipulated it in photoshop, have it printed by a lab, then hand color it? Is the paper different?
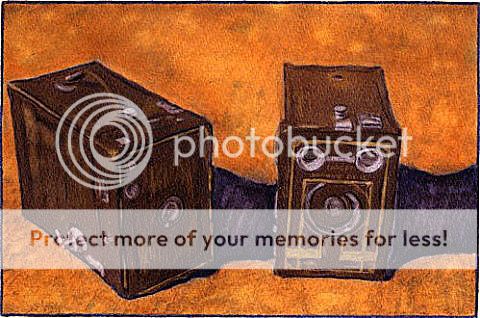
Sure! :) I do it all the time. This image, for instance – you’ll recognize it as an SX-70 manipulation. I set the box cameras out on my back patio and took a couple shots with Time Zero. I manipulated till I got one I liked. My patio was the background, so you can imagine how dull the original looks. So I scanned it, making it into a digital image that I could desaturate, rendering it into a B&W image. That’s what I printed out, and hand colored.
theboxcameras.jpg

Sadly, the paper I used for my original is now discontinued. It’s a Bergger paper, sized to allow for oils.

Your challenge for inkjet handcoloring these days is to find another inkjet paper that has a suitable sizing, or coating. Oil & paper don’t mix, and your photo oils quickly absorb into uncoated paper and ruin your print. You can really get carried away (like me, but I would caution against anyone being like me) and size your own paper, at home. I’ve done it using plain old Knox gelatin. :mrgreen:
 
Terri, I can always count on you.. You really should write a book or something.. "Alternative Photo processing for Dummies".. I'd buy it! :lol:
 
"Alternative Photo processing for Dummies".. I'd buy it!
Thanks, but I'm still at the stage where a more suitable title would be "Alternative Photo Processing BY a Dummy". :lol:

I do like traditional hand coloring a lot, however. I forgot to mention, whether you make your own prints or have someone print them for you, ask them to print 10% lighter than normal. You don't want them flat, of course, but not too much contrast, either.

You asked about dyes; I've played with them when available, but not inspired enough to want to buy them. I prefer Marshall's photo oils, pencils and pastels for the most part. I love my wax pencils, too, but they're not as easily blended, so I use them in smaller areas. The oils themselves are archival, so they do nothing to harm the stability of a silver gelatin print. :) Hope this helps!
 
sillyphaunt said:
Terri, I can always count on you.. You really should write a book or something.. "Alternative Photo processing for Dummies".. I'd buy it! :lol:
I'd go with that. Her creativity and skill is amazing isn't it? Blows me away sometimes. And she's always willing to pass information and ideas on.

I've got to say though. You people are far too arty for your own good. :cokespit: :crazy:
 
I'd go with that. Her creativity and skill is amazing isn't it? Blows me away sometimes. And she's always willing to pass information and ideas on.
This is how we all learn. I like to pass on stuff I know that works; I've wasted lots of time fumbling in the dark! ;) And thanks for the kind words, really. :D


I've got to say though. You people are far too arty for your own good. :cokespit: :crazy:

Arty is as arty does, Mr. Ferny. :sillysmi: So, you know.....nyahhh! :greenpbl:
 
Ok first off - my apologies for waking up an old thread. I registered a while ago and have been lurking eversince, but have now plucked up the courage to ask a possibly stupid question.

I am new to this whole developing and printing thing. Having managed to produce a few decent prints I happened across an article on this handprinting.

I only use b&w but fancy the idea of hand colouring. Can this only be done on fibre paper (something I havent tried yet as purchasing any "old fashioned" photography equipment is nigh impossible here in SA).

Any help would be appreciated even if it is just to tell me that I am a complete idiot. :lol:
 
Welcome to the forum! :)

Hand coloring can be done on almost any kind of paper. You will make certain adjustments to how you apply your colors, and what media you use, depending on the paper you choose.

FB paper, with a matte or semi-matte surface, is usually going to give you the nicest look with photo oils, either from tube or pencil. There are some decent resin coated papers out there, but again, the surface should be matte or semi-matte.

It's possible to apply color to a glossy surface, but you must apply some kind of workable spray fixative in order to give the paper some "tooth" so it can accept your media, and if you have a choice, it's best to avoid glossy papers.

My favorite hand coloring medium is the photo oils from Marshalls, with the oil pencils for detail. I also like pastel pencils, wax pencils, crayons, and watercolor, but I don't use them as much. And I use FB paper virtually 100% of the time!

Anything else you'd like to know - ask away! :D
 
Thanks Terri,

Will have to make a day to visit the one photographic supply shop that I can find and see if I can some different papers to work on.
 
Biker2 said:
Thanks Terri,

Will have to make a day to visit the one photographic supply shop that I can find and see if I can some different papers to work on.
Absolutely. Any questions that come up, just ask and we'll see if we can get you started. :)
 
Terri, can you explain how you size the prints with knox gelatin? Do you dilute the gelatin? I am having a hard time with this. I have marshall oils, but I can't seem to find a paper that will take the oils well. They either blotch up or wipe off completely. Thank you.
 
Terri, can you explain how you size the prints with knox gelatin? Do you dilute the gelatin? I am having a hard time with this. I have marshall oils, but I can't seem to find a paper that will take the oils well. They either blotch up or wipe off completely. Thank you.
Hi mainiac4775 - welcome to TPF! I feel your pain - I've had to throw away many a good inkjet print when the oils did that to me in the past. Most of them are manufactured with very little sizing, as there is little expectation that photo oils will be attempted in this digital age! :razz:

Fortunately, there are some choices. The Knox gelatin has many pluses: it's readily available at your grocery store, the prepared solution makes enough to cover several prints, and it's seriously cheap! :) The main drawback is just that it does involve some prep. Using one packet from a box of unflavored Knox gelatin, combine in 5 ounces of warm (not super hot) warm water. (I've always used straight tap water, but you can use distilled water if you have high mineral content in your area.) Combine it right in a glass measuring cup for simplicity, just cover with plastic wrap. The mixture will be cloudy. Let it stand at least 5 hours or overnight - room temperature. Using a double boiler with not too much water on the bottom, pour the mixture into the top to gently heat the next day - heating only enough to let the mixture clear - don't bring it to a boil or you'll end up with gelatin! ;) Once it's cleared, remove from the double boiler. Let it cool down somewhat, but don't chill it completely.

I apply to inkjet prints that I've printed and let sit out for at least a day to give the inks a chance to set. Tip: I've read where some artists take an extra step to spray their inkjet prints before applying gelatin grounds, with products like Krylon UV protectant, or any other artist UV spray (matte finish) to help set the inks. If you decide to do this, just allow complete drying time before applying the gelatin ground. These types of sprays are available online or at any art supply store and last a long time.

To apply the gelatin mixture, I always use an inexpensive hake brush. The bristles are very soft and hold the stuff perfectly. Apply a thin coat horizontally, wait a few minutes, then another thin coat vertically. When dried, it should not be overly shiny but you'll see a dull sheen.

It's a good idea to do several prints at a time so you'll have them ready when you want to sit down and hand color. Marshall's oils will glide on beautifully. Don't rub down as firmly as you would when using regular darkroom silver gelatin paper, and use a gentle touch with oil pencils, too. btw, you will not need to apply the PM solution.

I like the Knox procedure because it's a true gelatin ground, and all natural. However, for a faster way, I've also used a spray-on ground called Print Guard. Here, you just print and prep your print with a UV matte spray to set the inks ahead of time (if desired), then apply the Print Guard spray in the same manner: sweeping the spray horizontally then vertically, waiting a few minutes between coats. You must use all these sprays outdoors, and be mindful of any wind! The advantage here, of course, is that you can be ready to go quickly. However, you must use proper caution and avoid the vapors. It stinks, so let it be completely dry before bringing your prints back inside.

Also, since I usually make enlargements in my home darkroom, I've not tested inkjet papers in a couple of years. I can't really help you here. It pays to take the time to purchase manufacturer's sampler packs, because the internal sizing can vary greatly between manufacturers, and can give you very different results. Once you find a paper/ground combo that works, you're golden until they discontinue your fave paper! It's time consuming but worth the effort to have 2-3 papers you like.

Lastly, Marshall's used to make their own canvas inkjet paper, but I don't know about current availability. It was strange stuff, limp like a piece of canvas, but it came ready to print and color on right out of the box, appropriately sized and grounded. It wasn't great for all images because of it's rough, canvas-like texture, but it's certainly a paper worth having on hand if still being made.

Good luck - and have fun! Would love to see your posted work here. :)
 
Terri, thanks for giving me something else to put on my list of things to try my hand at.
 
Terri, thanks for giving me something else to put on my list of things to try my hand at.
Don't mention it. :mrgreen: My own list grows at an alarming rate!

I'd love to see more hand colored work posted in here. It's seriously addictive.
 
Anyone know of a supplier of Marshall's Photo Oils (or any other brand) in UK or France?

Seems impossible to order from the US, because of restrictions on shipping hazardous substances.

Thanks,
Richard
 

Most reactions

New Topics

Back
Top