DSLR noob
TPF Noob!
- Joined
- Feb 7, 2007
- Messages
- 1,527
- Reaction score
- 10
- Location
- Atlanta, GA
- Can others edit my Photos
- Photos OK to edit
This is a form of editing referred to as "Rotoscoping." It has been used in advertisement and film since the early 1900s. You can see this effect used in movies such as "Waking Life" and "A Scanner Darkly". I read an article on doing this in 2006 and started practicing with techniques until I developed my own style. This is the style I will illustrate in this tutorial.
This is a very interesting technique that I just found pretty useful for advertising my friend's DJ channel using a very low resolution picture he had on Facebook taken with a phone. I WOULD recommend it if you want to do some creative work with a bad quality image. Also, I did this and all other works like it with a mouse, so a tablet is not necessary for drawing when a clicking point-to-point system of using the pencil, pen, and polygon lasso techniques, and this tutorial is written for people using a mouse or a touch-pad in mind. Okay so let's get started.
First thing you want to do is pick a photograph to work with. I chose to work with this rather small grainy overexposed image of my friend in his DJing outfit. The benefit to this method I am showing you is that it gives you the creative freedom to correct these exposure and focus issues if you know enough about what needs to be done with them. I also doubled the original size of the picture knowing the new lines I would be drawing would act similar to a vector. Using a path rather than pixels will yield the smoothest results. I later returned the image to its original size so that it appeared to get sharper after the editing.
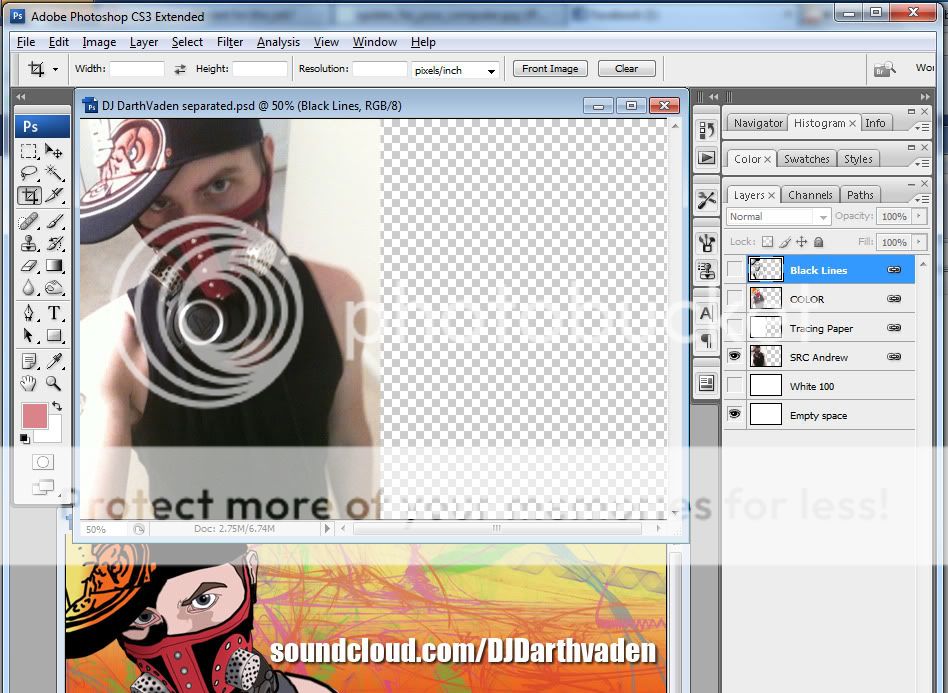
The next thing I did was create a layer for what I usually think of as digital tracing paper. On a Windows machine use "Control + Shift + N" to create a new layer (I named mine "tracing paper"). "Control + A" to select all of it, and "Shift + F5" to fill it with a color. Choose white from the drop down menu. Make this layer's opacity 40%. I prefer to do my black line tracing over this because it just seems more like traditional tracing. This step can be omitted if it doesn't seem to help you.
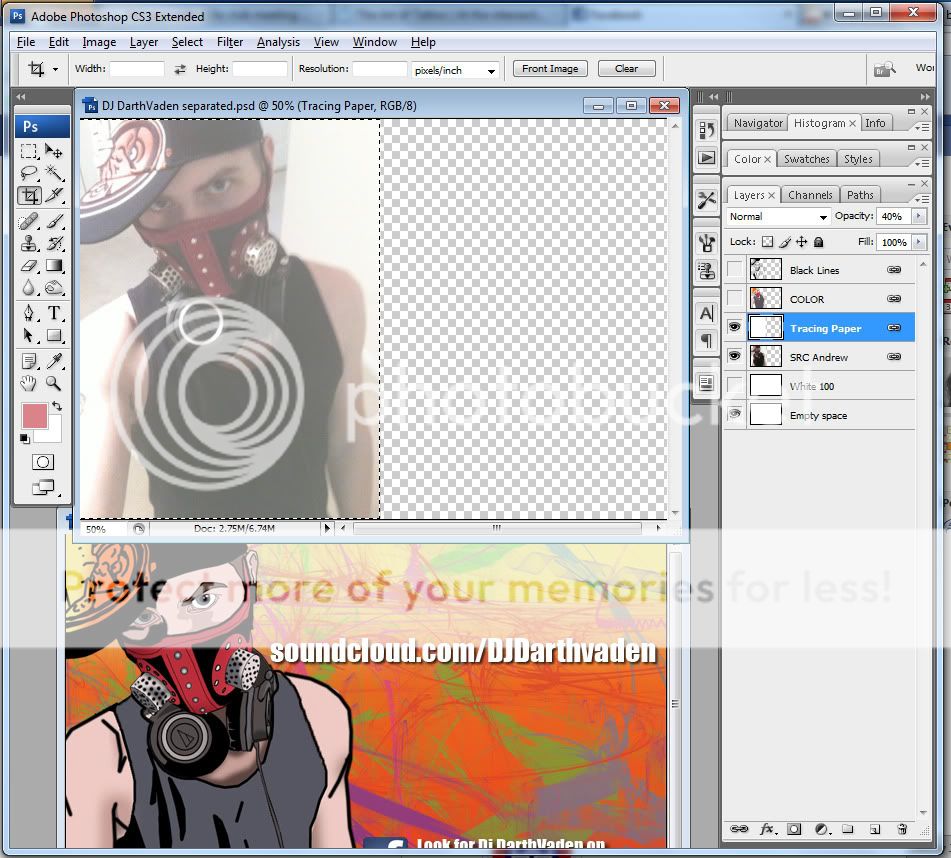
On yet another layer, use a very small brush (< 4 pixels) with more than 80%-hardness 100%-opacity color-black along with holding shift and clicking points to draw lines or MANY tiny lines to draw arcs (for those of you just starting with Photoshop, use the "[" and "]" keys to increase or decrease the diameter of the brush as you draw. This is MUCH faster). If you are familiar with the pen tool, you can use this instead. The path can later be stroked or filled or really manipulated in any way you need if you go this route, this will also allow for more enlarging of the photograph if needed. You can also choose to fill in large shadows with black if you want to for the artistic effect. For example on his face, mask, and parts of the headphones I used solid black.
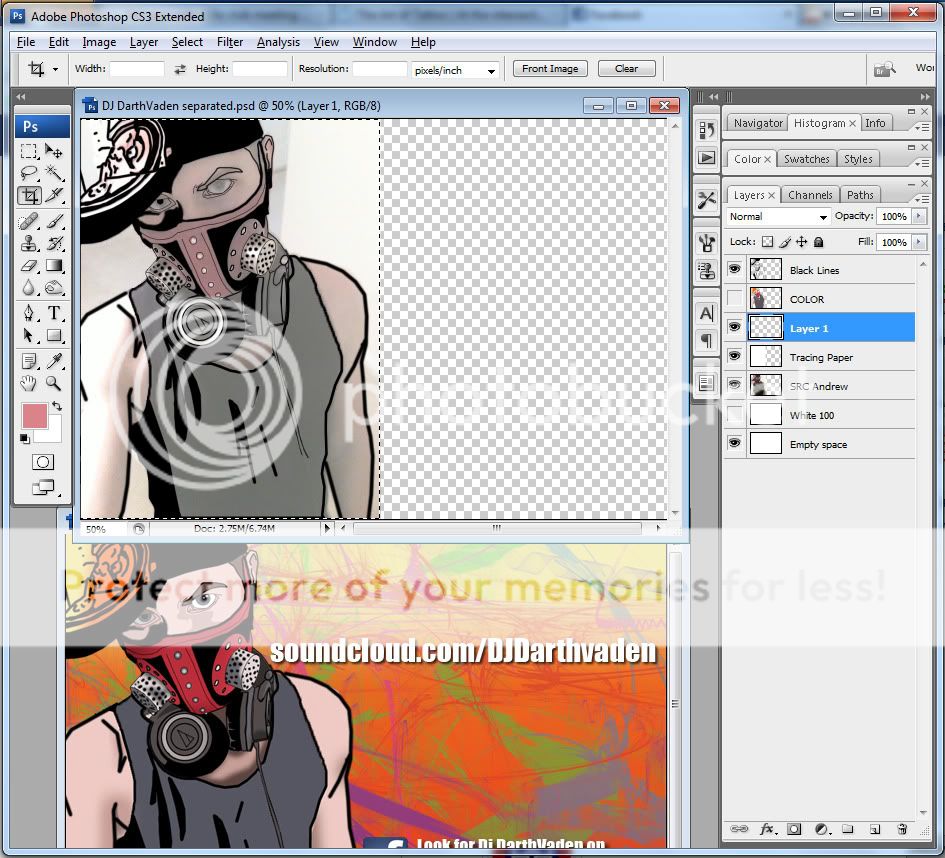
If you need to see what before and after the tracing should look like close up, here is a picture of what it looks like when I use a layer mask to hide some of the black lines and I am zoomed in.
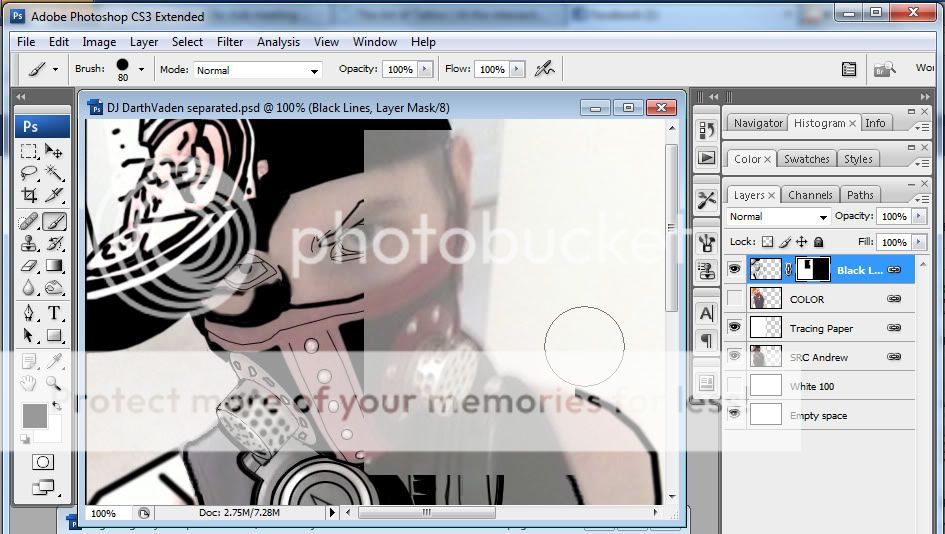
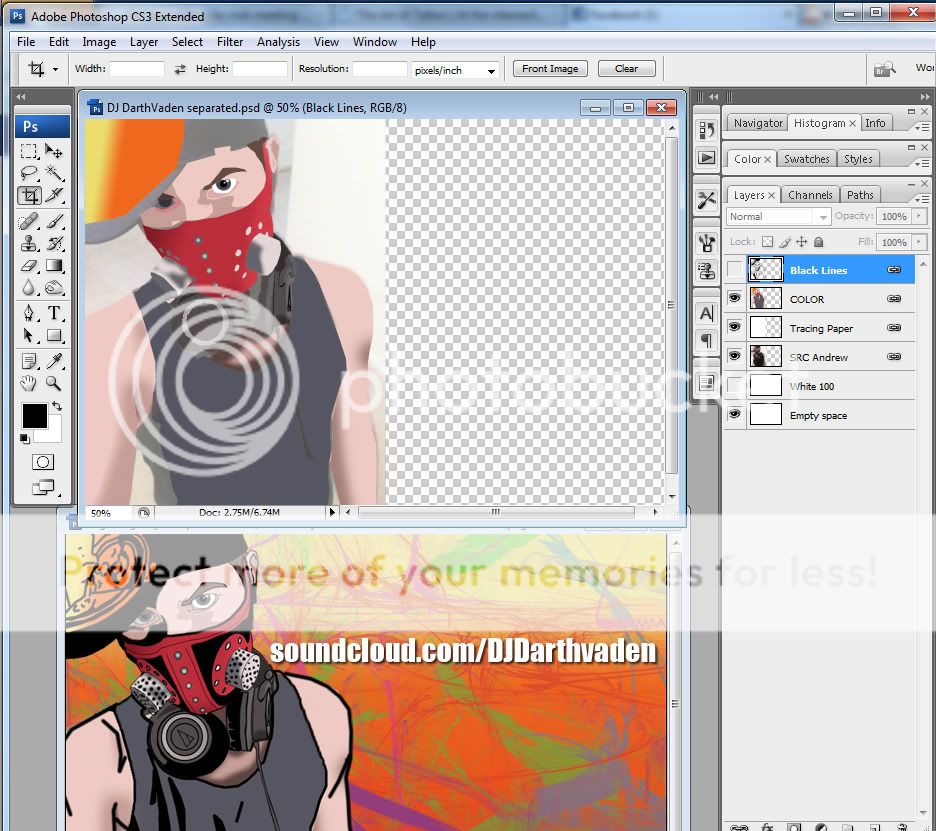
Once the black lines are all completed, I created another layer for the colors that I put underneath the black line layer. After doing this, you can then start coloring in areas with a brush (knowing that since the layer is for color is UNDER the layer for black lines, it will be easier to color within the lines). I actually use a different method for coloring that I will also give you if you do not like using a mouse to paint with the paint brush. On the colors layer, use the polygon lasso to select large areas that you want to fill with color ("shift + F5" change "white" to "color" on the drop down menu and pick a suitable color), once again feeling free to not stay perfectly within the lines too much as the black lines will cover the edges of color. If you are doing this, try to think of yourself as an animator using cut up construction paper to make early South Park episodes, and the lasso is selecting the shapes you cut out. Keep toggling the colors layer, and possibly the tracing paper layer, from visible to invisible to check for shadows and highlights that you will want to paint in using the paint brush or more polygon lasso selections. The picture below shows the colors layer WITHOUT the black lines layer.
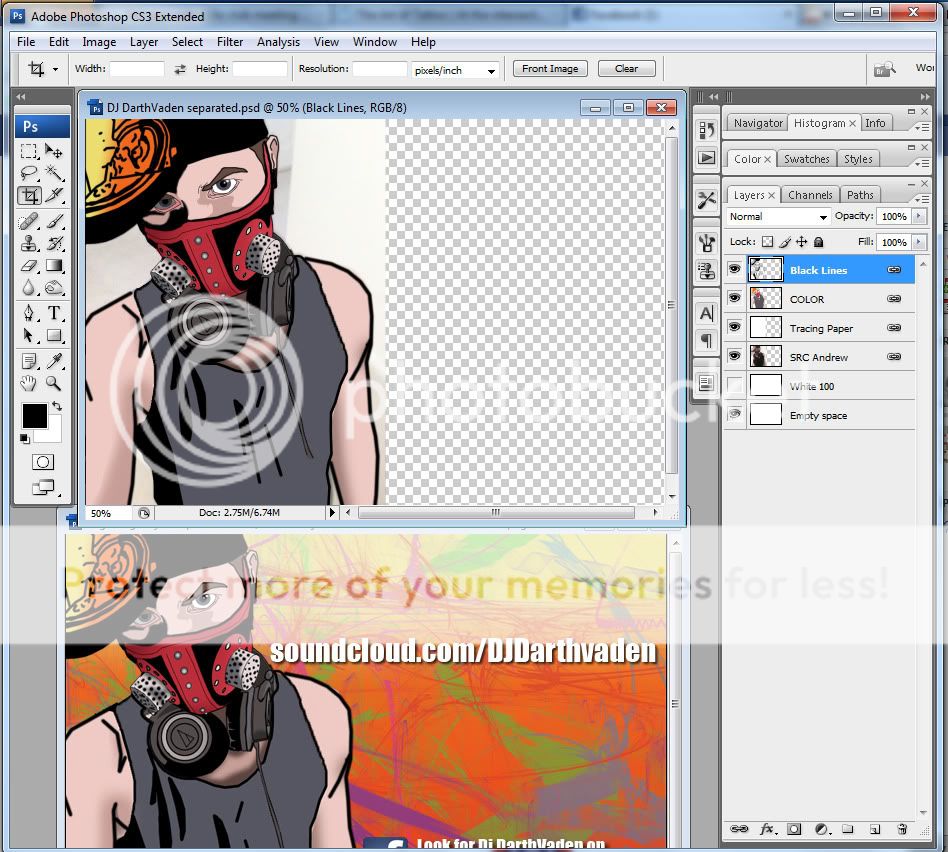
The picture below is the same as above only with the black lines layer back to visible.
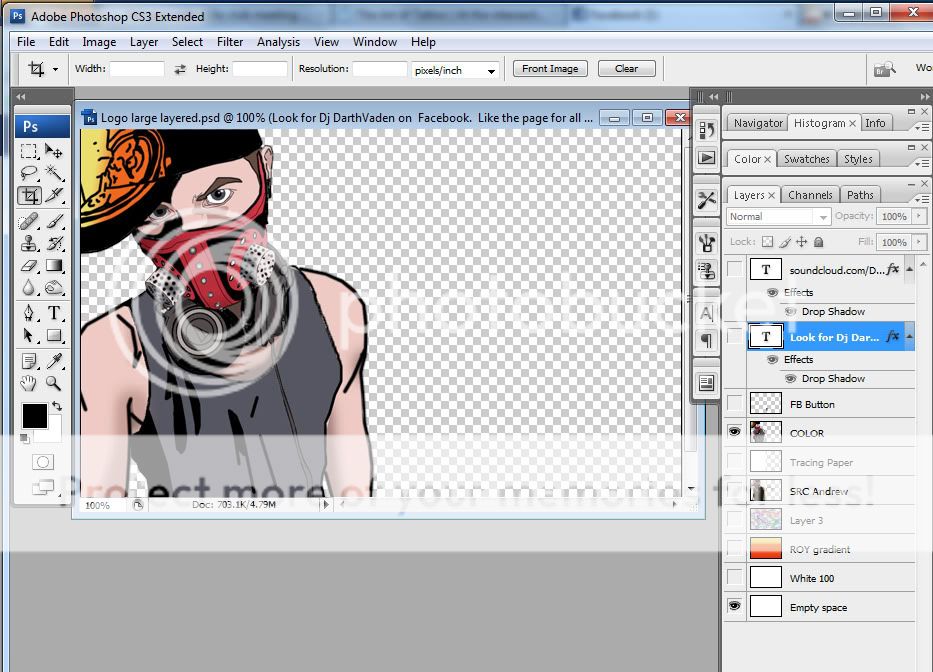
Now at this point, if you have selected and painted your subject, you can move on to drawing in a background either one of your own creative vision, or using the methods above to trace the photograph you are using. I deleted my photo's original background since it was a picture taken inside my friend's apartment bathroom with bland white walls. It is hardly exciting, and to capture how his music made me feel I had to do something different. I will show you the methods I used to create the background. Deleted background shown below.
I then turned off the visibility of all the layers I had worked with so far, and created a new layer. I made a Red-Orange-Yellow gradient as shown below.

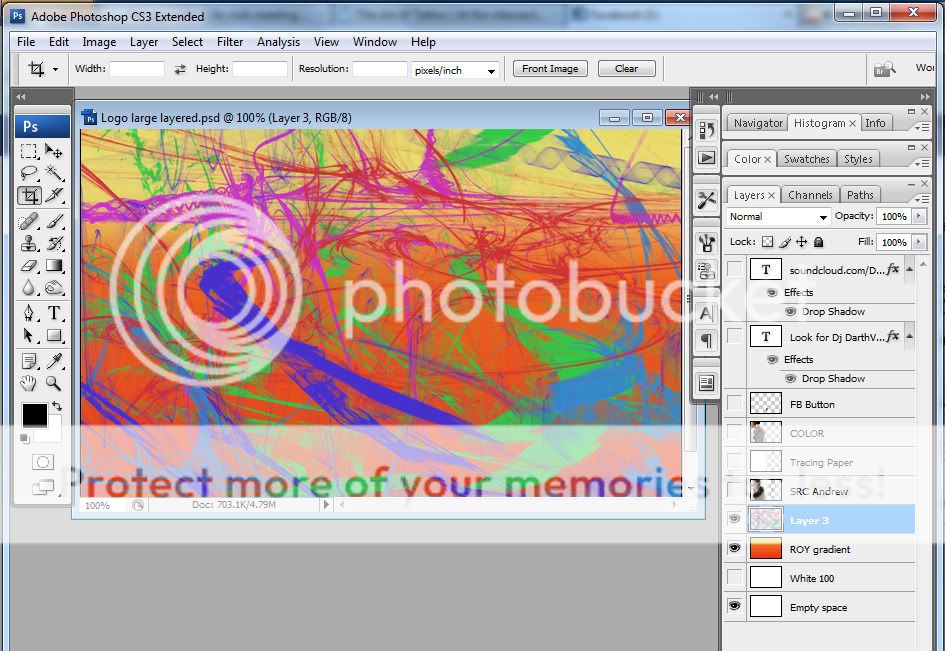
I downloaded and installed a set of fractal brushes from the internet. You can Google search for free Photoshop brushes to find a set, they're all over the place. The whole point of fractals is that they're random but visually pleasing, so try to find some that will work for what you need. Here are the results of picking many different bright colors and clicking with the fractal brushes.
Next I changed the opacity of the brushes to make them less visually competitive with the subject and more of a background thing to add visual interest without too much distraction.

Lastly, since this was an advertisement I put up links and a few drop shadows. You might be using this method to make an advertisement, profile picture, or banner,. If you are, I highly recommend you use an easy to read font, with a bright contrasting color. It is important to get your message across if you have one you would like to put into words on the piece, or if you are using this method to make a comic book like- scene.
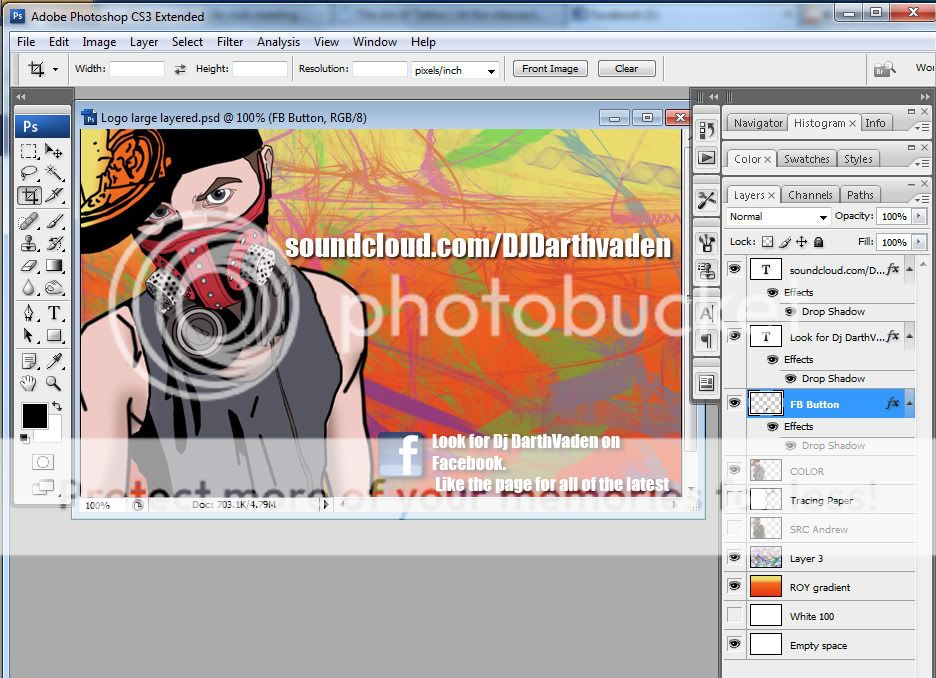
To see what I am talking about, here is my original version of the ad with a hard to read text (also before I fixed and issue with how the eye on the left is colored).
 DJ-Darth Vaden by rowe2ry, on Flickr
Final image:
 DJDV4 by rowe2ry, on Flickr
Photoshop Key board shortcuts used:
Ctrl + C --> copy
Ctrl + V --> paste
Ctrl + D-->deselect
Ctrl + Shift + N --> create new layer
Ctrl + J --> duplicate layer
[ and ] --> increase-decrease brush size
L --> lasso
B --> brush
Shift + F5 --> fill with color
Holding shift to add or alt to subtract from a selection when using a selection tool.
holding control while clicking layer thumbnail to select all pixels in the layer
holding alt while using brush/pencil tool to switch to the eye dropper
This is a very interesting technique that I just found pretty useful for advertising my friend's DJ channel using a very low resolution picture he had on Facebook taken with a phone. I WOULD recommend it if you want to do some creative work with a bad quality image. Also, I did this and all other works like it with a mouse, so a tablet is not necessary for drawing when a clicking point-to-point system of using the pencil, pen, and polygon lasso techniques, and this tutorial is written for people using a mouse or a touch-pad in mind. Okay so let's get started.
First thing you want to do is pick a photograph to work with. I chose to work with this rather small grainy overexposed image of my friend in his DJing outfit. The benefit to this method I am showing you is that it gives you the creative freedom to correct these exposure and focus issues if you know enough about what needs to be done with them. I also doubled the original size of the picture knowing the new lines I would be drawing would act similar to a vector. Using a path rather than pixels will yield the smoothest results. I later returned the image to its original size so that it appeared to get sharper after the editing.

The next thing I did was create a layer for what I usually think of as digital tracing paper. On a Windows machine use "Control + Shift + N" to create a new layer (I named mine "tracing paper"). "Control + A" to select all of it, and "Shift + F5" to fill it with a color. Choose white from the drop down menu. Make this layer's opacity 40%. I prefer to do my black line tracing over this because it just seems more like traditional tracing. This step can be omitted if it doesn't seem to help you.

On yet another layer, use a very small brush (< 4 pixels) with more than 80%-hardness 100%-opacity color-black along with holding shift and clicking points to draw lines or MANY tiny lines to draw arcs (for those of you just starting with Photoshop, use the "[" and "]" keys to increase or decrease the diameter of the brush as you draw. This is MUCH faster). If you are familiar with the pen tool, you can use this instead. The path can later be stroked or filled or really manipulated in any way you need if you go this route, this will also allow for more enlarging of the photograph if needed. You can also choose to fill in large shadows with black if you want to for the artistic effect. For example on his face, mask, and parts of the headphones I used solid black.

If you need to see what before and after the tracing should look like close up, here is a picture of what it looks like when I use a layer mask to hide some of the black lines and I am zoomed in.

Once the black lines are all completed, I created another layer for the colors that I put underneath the black line layer. After doing this, you can then start coloring in areas with a brush (knowing that since the layer is for color is UNDER the layer for black lines, it will be easier to color within the lines). I actually use a different method for coloring that I will also give you if you do not like using a mouse to paint with the paint brush. On the colors layer, use the polygon lasso to select large areas that you want to fill with color ("shift + F5" change "white" to "color" on the drop down menu and pick a suitable color), once again feeling free to not stay perfectly within the lines too much as the black lines will cover the edges of color. If you are doing this, try to think of yourself as an animator using cut up construction paper to make early South Park episodes, and the lasso is selecting the shapes you cut out. Keep toggling the colors layer, and possibly the tracing paper layer, from visible to invisible to check for shadows and highlights that you will want to paint in using the paint brush or more polygon lasso selections. The picture below shows the colors layer WITHOUT the black lines layer.

The picture below is the same as above only with the black lines layer back to visible.

Now at this point, if you have selected and painted your subject, you can move on to drawing in a background either one of your own creative vision, or using the methods above to trace the photograph you are using. I deleted my photo's original background since it was a picture taken inside my friend's apartment bathroom with bland white walls. It is hardly exciting, and to capture how his music made me feel I had to do something different. I will show you the methods I used to create the background. Deleted background shown below.

I then turned off the visibility of all the layers I had worked with so far, and created a new layer. I made a Red-Orange-Yellow gradient as shown below.

I downloaded and installed a set of fractal brushes from the internet. You can Google search for free Photoshop brushes to find a set, they're all over the place. The whole point of fractals is that they're random but visually pleasing, so try to find some that will work for what you need. Here are the results of picking many different bright colors and clicking with the fractal brushes.

Next I changed the opacity of the brushes to make them less visually competitive with the subject and more of a background thing to add visual interest without too much distraction.

Lastly, since this was an advertisement I put up links and a few drop shadows. You might be using this method to make an advertisement, profile picture, or banner,. If you are, I highly recommend you use an easy to read font, with a bright contrasting color. It is important to get your message across if you have one you would like to put into words on the piece, or if you are using this method to make a comic book like- scene.

To see what I am talking about, here is my original version of the ad with a hard to read text (also before I fixed and issue with how the eye on the left is colored).
 DJ-Darth Vaden by rowe2ry, on Flickr
Final image:
 DJDV4 by rowe2ry, on Flickr
Photoshop Key board shortcuts used:
Ctrl + C --> copy
Ctrl + V --> paste
Ctrl + D-->deselect
Ctrl + Shift + N --> create new layer
Ctrl + J --> duplicate layer
[ and ] --> increase-decrease brush size
L --> lasso
B --> brush
Shift + F5 --> fill with color
Holding shift to add or alt to subtract from a selection when using a selection tool.
holding control while clicking layer thumbnail to select all pixels in the layer
holding alt while using brush/pencil tool to switch to the eye dropper
Last edited:


![[No title]](/data/xfmg/thumbnail/1/1592-cfae4a7ea791f96c6e2d03484be2e454.jpg?1734142210)


![[No title]](/data/xfmg/thumbnail/39/39420-c7c6e6f01cdeeceeb81ee717b24dd629.jpg?1734173503)


![[No title]](/data/xfmg/thumbnail/38/38738-7933157d1b8968c986eeeab2d1828524.jpg?1734172602)


