By terri at Mon, 2006-04-03 19:01
INTRODUCTION
The art of hand coloring black and white prints has been around almost as long as photography itself. Its humble beginnings date back to those early days of the first daguerreotypes, when people began to realize that this new-fangled “photography” delivered exactly what it promised – the lens was capturing them just the way they looked. Often times, this was not what they wanted! Gone were those idealized portraits they were used to seeing from their portrait painters – the ones that put softness to their hair, a twinkle in their baby blue eyes and a romantic flush to their cheeks. While first dismayed at this apparent new intrusion onto their business of portraiture, it didn’t take long for the shrewdest of portrait artists to figure out how they could still make money - by working alongside portrait photographers, and offering a new service: applying their colorful oils to these prints. The art of hand coloring photographs was born!
Why hand color the traditional way?
I have been hand coloring black and white photographs for several years now. Learning this technique has, without question, led me down an artistic path in my photography that I would never have thought possible. My passion for what is (loosely) referred to as “fine art” black and white photography suddenly took on a new meaning. Having this art form as a way to enhance, or even change the feel of an image, is extremely liberating.
Some artists call this process hand painting, some call it hand tinting – but those terms can also mean slightly different processes, depending upon your medium, or even whose work you’re viewing – so, for the purposes of this article, we will refer to this process as hand coloring.
Obviously, a sense of appreciation for the traditionally processed, silver gelatin print comes into play. While there is a growing popularity for “selective coloring” of digital images, the traditional method forces you into the role of real hands-on artistry. In his informative guide, The Photographer’s Toning Book <SUP>1</SUP>, Dr. Tim Rudman writes: [there is] “…considerable satisfaction that is to be had from the craft aspect of printmaking. The thrill of watching the image slowly emerge never completely disappears. The sense of creation that is to be had by physically handling a sheet of photographic paper through all the stages of exposing, developing….is very real. It is a tactile process involving a ‘real’ and evolving product, quite unlike the rather abstract computer image that has no physical substance throughout its embryonic development until the ‘print’ command is given.”
The technique has certainly come a long way from its rudimentary beginnings. What this article mainly focuses on is the traditional art of hand coloring. I call this “traditional” hand coloring because, for the majority of this article, the images you will view will be of traditionally hand processed, darkroom-generated silver gelatin prints. These prints are highly archival, meaning they are produced using wet darkroom methods and, with proper storage conditions, can last several hundred years. In addition, the preferred medium with hand coloring is with photo oils, either in tubes or in pencils. These photo oils are, themselves, very archival, so they will do nothing to interfere with the archival stability of the silver gelatin print.
I am emphasizing this medium because, in my opinion, this is the classic and best way to hand color. Not just for the most archival properties, although that can be an important consideration, but also because these photo oils are transparent, pure, rich in color, and impart the most superior look in a hand colored piece, and this process is very creatively rewarding. I will be discussing other media a bit later on, and touch on digital applications, as well, but for the moment we are going to concentrate on the traditional method.
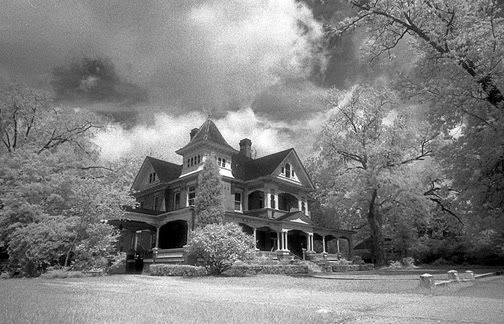
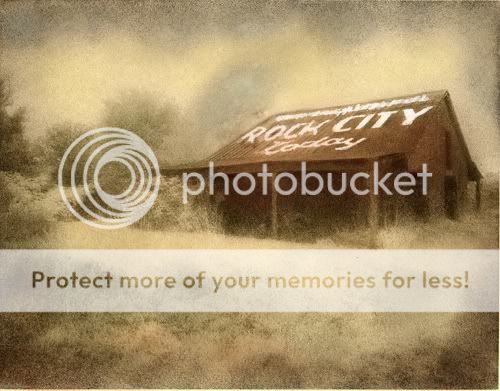
Adding color can dramatically change the mood to a B&W photograph. The image above was shot with Kodak HIE and has an ominous feel to it, as befitting an infrared image shot after a storm.
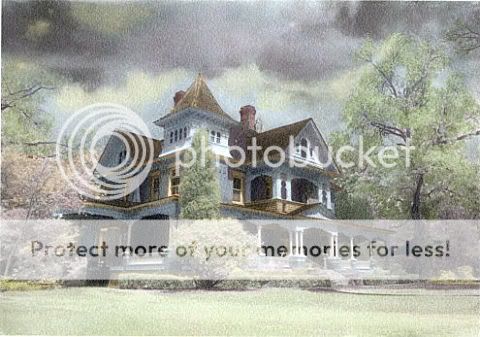
By cropping the original image to bring the house into the forefront, then applying an array of color to soften the image, the mood is completely changed. The image becomes one that simply showcases the fine old architecture of this antebellum home.
BASIC SUPPLIES
Here is a list of the basic supplies needed to get started with hand coloring. All art supply houses will carry these items, as well as online stores.
* Photographic oils (oil tubes, oil pencils) Although there are a few brands available, by far the most widely used photo oils on the market are Marshall’s Photo Oils© and their oil pencil sets. The pencils can be invaluable in coloring smaller areas of detail and, since they are manufactured by Marshall’s, the colors are meant to complement the photo oils.

Marshall’s Master Photo Oils set, photo oil pencil sets
* Cotton balls Any brand will suffice. All that is pertinent here is that 100% cotton is used – synthetic fibers are strongly discouraged. Not only will synthetic cotton not hold the oils as well as 100% cotton, the synthetic fibers can damage the delicate emulsion of the photographic paper when applied.
* Q-tips © Of both rounded and pointed tips, as an aid to applying small amounts of oil.
* Foam core board Available at art supply stores. This is an optional suggestion, but works well as a good work surface over a kitchen or drafting table. They are lightweight but strong, and will keep your table at home clean.
* Toothpicks, wooden skewers For use as hand made cotton skewers to apply or blend oils in small areas.
* Color wheel An important tool for helping you mix colors, and they contain a lot of other information, as well. You will want a color wheel handy when considering color choices for your print.
* Kneaded erasers are indispensable in their ability to clean out areas of your print where you don’t want color – the eyes of a portrait subject is a good example. You will learn to spread a “wash” of color over a large area of your print – and you use the kneaded eraser to clean out areas where color is not desired. You can continue to fold these erasers in on themselves – kneading them, if you will – for a long period of use.
* Good lighting, comfortable seating I worked with a woman who enjoyed standing at her kitchen counter while she hand colored. She produced lovely images and apparently didn’t mind standing for extended periods of time, so this worked for her. It’s not something that I recommend, however! I work at a drafting table with only the slightest tilt, in a high-backed cushioned chair with foot supports. This is what works for me, and what I would recommend to keep yourself close to your work, and comfortable enough to stay with it for a few hours. My drafting table is by a window where I can use available daylight – but I most always supplement this with a good daylight bulb in a lamp attached to the front of my drafting table.

Along with your photo oils, have these supplies assembled when preparing to hand color.
PAPER CHOICES
Paper considerations are crucial. There are several great brands available and you owe it to yourself to try several of them, to see what works best for you. My personal favorite has long been the now discontinued Agfa (MC) Classic 118, which is what I have recommended for my students. However, any semi-matte or matte fiber based paper will do - as long as it has some “tooth” to the emulsion and boasts a rich white base.
It is also possible to hand color on resin coated papers, although generally not recommended. Fiber based papers absorb the oils much better than RC. Standard RC papers are about 50% plastic and 50% paper, and have a very thin silver emulsion. Without question, the quality and archival stability of RC papers has significantly improved over the last few years. However, at the collectable – and sellable – level, fiber-based papers will always be considered far more valuable.
The surface of the paper is also important. You can color on a semi-matte or matte surface, depending on the paper. You cannot, however, use photo oils on a glossy surface, regardless of whether the paper is FB or RC. The glossy coating represents a ground barrier, and actually prevents the oils from being absorbed into the paper. There are some artists who simply spray over a glossy paper with a workable pre-fixative, and this will certainly add some tooth to the surface and give the oils something to cling to – but for me, it hardly seems worth the effort. For best results you want the oils to actually become part of the fiber of the paper, not just lying on top!
Also important is how to PRINT an image you want to hand color. If you print yourself, simply print approximately 10% lighter than you would for a print of normal contrast and tonal range. Keep a moderate contrast -not flat, but not too high. Make sure there is detail in both shadows and highlights of your print. You will quickly discover that the photo oils are transparent, and a blown area will remain blown, while a deep black will not reflect the color. If someone does printing for you, discuss these considerations in advance, and ask for a density spread to choose from.
If you have a print that needs spotting, always spot BEFORE hand coloring. If you are planning to tone your print, tone your print BEFORE spotting
BASIC COLOR THEORY
PRIMARY COLORS
Red Yellow Blue
The primary colors are called primary because you cannot mix any combination of colors to create them. They are considered the “pure” colors.
SECONDARY COLORS
However, you can create other colors by mixing two primary colors, which in turn, become secondary colors.
For instance:
Yellow and blue = green.
Blue and red = violet
Red and yellow = orange
TERTIARY COLORS
Combining a primary color with a secondary color will yield a tertiary color. There are six tertiary colors.
For instance: Red (primary) and orange (secondary) = red orange.
NOTE: All of the above mixing is done using equal proportions of either primary or secondary colors.
DEFINITIONS AND TERMS:
As previously mentioned, color wheels can be extremely helpful tools when learning to mix colors. When studying your color wheel, you will notice there is a split between what is called “warm” and “cool” colors. Cool colors always contain blue, which is the cool primary color. Warm colors are made up of reds, yellows and oranges.
Warm colors are the “advancing” colors, and cool colors “recede”. To help you cement this concept, think of a B&W image of a laughing child dressed in play clothes. You might want to color those clothes in warm, vibrant tones, to “advance” the subject. Now think of a B&W landscape, an image that contains distant mountains. You would want to color those mountains in cooler, “receding” shades of purple or blue – which happens to be the way your eye would perceive them in nature. Shadow areas can always be colored in various hues of violet or blue, as shadows naturally form in “recessed” areas and call for a receding color.
Keep in mind the color representations on a color wheel are highly idealized – meaning, “Your results may vary”! Don’t be discouraged if you are attempting to mix a color that you see on your color wheel, and it does not appear to be an exact replica. Mixing takes practice and patience. In addition, the larger photo oil sets contain many pre-mixed colors, so much of the work is done for you!
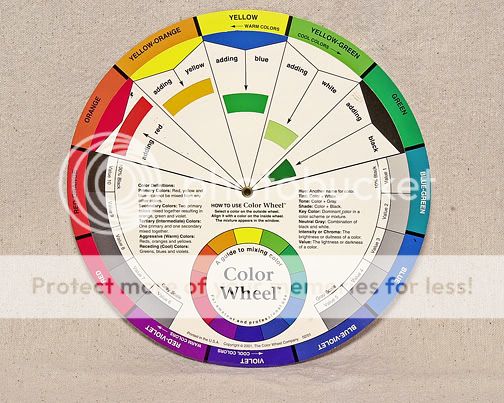
Color wheels are available in several sizes, and easily found at art supply stores.
Hue: Another word for color.
Intensity: The brightness or dullness of a color.
Shade: A color that has been mixed with black.
Tint: A color that has been mixed with white.
Tone: A color that has been mixed with gray.
Value: Meaning the lightness or the darkness of a color.
Color Harmonies An understanding of color harmony allows more freedom of choice in your palette, while still achieving professional looking results. By selecting a color harmony and identifying those colors on your color wheel, you can then lighten or darken these colors by the addition of white or black, or dull them with the addition of gray, and still be within a given color harmony. This does not limit you to using only these colors when hand coloring an image, of course, but provides direction and guidance for a pleasing end result.
On the color wheel, colors that are directly opposite from each other are called complementary colors. Red and green are complementary colors. When used close together in hand coloring, they serve to intensify each other. When coloring a landscape, for example, if you want to make a red flower stand out with more intensity, you may add some green around it. Using this type of contrast is a great way to add visual interest to your work.
A split complementary is a trilogy of colors. Taking one color as the main color, find that color’s complementary color directly across the color wheel. Then look at the two colors on either side of the complementary color. These three colors make a split complementary color harmony. Blue, red-orange and yellow-orange make up a split complementary.
A triadic color harmony is also a trilogy of colors. You again start with one color as the main color and, using your color wheel, find that color’s split complementary as above, and then locate the colors on either side of the split complementary. Violet, orange and green make a triadic color harmony.

“Cemetery faucet” is an example of a triadic color harmony. Can you see how the three colors relate to one another on the color wheel?
Photograph courtesy of Brad Sprinkle
PREPARING YOUR PRINT
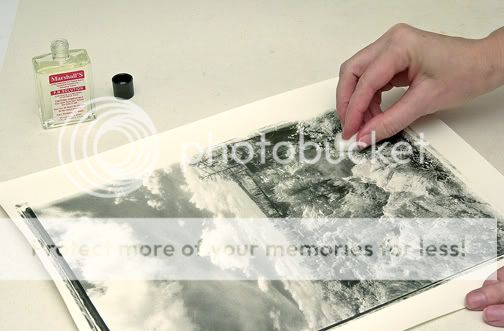
When you open a box of Marshall’s © photo oils, you will see you have been provided with a few “extras”, the number of which will vary depending upon the size of the set. However, all sets will come with a small bottle of a prepared medium called, not surprisingly: PM Solution©. This is an archival medium used to moisten the top emulsion of your print. The old portraitists used blends of turpentine with their oils; this medium is fundamentally the same but is more stable. It helps with the flow of the oils, and makes blending and rubbing down colors easier. You’ll want to dampen a cotton swab – not soak it to where it’s dripping – and apply the PM solution in an even, circular motion until the entire print is lightly coated.
While you let your print dry, make yourself some skewers. Using a toothpick and a tiny amount of cotton, slightly moisten the tip of the toothpick (I dip mine in a small pool of water) and twirl the cotton around it, to form a tiny, rounded cotton-tipped end, covering the point. It takes a little practice, but is easy, and they are very handy to have nearby. I use these a lot when I’ve mixed a special color blend that I don’t have a matching pencil color for, and I need to color in a small area. They are also what I used to rub down a pencil line. I will make several, of various sizes, whether I end up using them or not – they’re ready to go. In addition, if you want to skip the purchase of a pencil set, you can use these skewers as an economical replacement, using only minute amounts of the oils with them.
It takes a little practice, but wrapping a skewer is easy and they are useful to have around

A completed skewer. Using a tiny bit of cotton allows for less waste when coloring.
So, your print is prepped, you have good lighting, your oils are laid out with your palette, skewers, q-tips and swabs. You’re about ready to begin!
How to apply photo oils and pencils to your print:
It’s extremely intimidating to look a perfectly good B&W print and think that you’re going to improve it by hand coloring! The best way to get past those doubts is to dive right in. Go ahead - make your mistakes, hate what you’ve done and start all over – just keep plugging away until you suddenly see that you got it right, and it’s exactly as you envisioned. Everyone has their first few efforts, and some prints will simply be easier to color than others.
Choosing your first hand colored pieces I would advise you to start by selecting one very basic portrait, and one basic landscape – both images as uncluttered as you can get them. A studio portrait, similar to a school portrait setup, is ideal, as there is no background to concern yourself with and the subject’s face is your only concern. It should be well lighted and contain both eyes of your subject. Avoid attempting to color a high key portrait until you have mastered the basics. If you don’t have a studio portrait at your disposal, you can easily use an outdoor portrait. Take care to have soft light, preferably open shade, to avoid heavy shadows under the eyes or on the sides of the face.
Any landscape will do, but I would advise you to choose one that a) contains no people, as this is not what you want to concern yourself with at first and b) is as simple and uncluttered as you can make it. Think of obtaining a shot of a bridge over a stream, or a pasture in front of a mountain range.
Basic hand coloring terms
Wash: This is a term used to describe applying color to large areas of your print. It is often the first technique you will use when facing a B&W image. After laying out your colors on your palette, scoop up a small amount of the desired pigment onto a cotton ball and, in a circular motion similar to that used when applying the PM solution, wash the color over the area. This is an effective way to cover large areas of your print. When coloring a portrait, you will begin by washing a flesh tone over all areas showing skin. When coloring a landscape, you will wash a selected sky color over the sky, or a green over a large area of land.

Apply base color to a print in a broad sweeping motion called a “ wash”
Don’t worry about going “outside the lines”. In fact, overlaying the boundaries is generally recommended to avoid any kind of “halo” effect by not covering an area completely.
Once an area has been washed, you will notice it seems uneven. Switch to a clean cotton ball and begin to rub down the applied color, evening the tones to a uniform color. You will begin to see how the tonal values of your B&W print suddenly come into play to assist you. The tonal values will naturally keep a darker hue over darker areas of your print, while the lighter areas are much more transparent. The effect should be rich and natural. Stop a few times and rest your eyes by looking away from the print, across your room or out the window. Then look down to assess your tones. If your color seems too dark for you, continue to rub down, using an even, circular motion. If you feel you’ve rubbed down too much, you can apply some more pigment. Remember, it takes repetition to develop a good feel for what will work. This takes practice, so expect your first few prints to take much longer than at any other time!
Clean: Once you are satisfied with your overall wash of a given area, it is time to clean up outside the lines. The most effective way to do this is to continue rubbing down until only a hint of the color shows, and then apply your kneaded eraser. It magically removes all traces of pigment, leaving only your B&W emulsion. There is seldom any need to reapply PM solution, so don’t worry about it. If you decide to completely remove a selected color, you can use the Marshall’s Marlene©, which is a cleaner designed for that purpose. Simply apply the Marlene onto a cotton swab and wipe off all pigment, switching to clean cotton swabs as you go. Once you have cleaned off all unwanted color, you may let the print dry down then reapply a small amount of the PM solution before you begin again.

After rubbing down unwanted color with clean cotton, use the kneaded eraser
Detail work: Like the name implies, this is the part of the process where you make your print begin to come alive by bring out small details. This is where your skewers and pencils will come in handy. Use your pencils and skewers with a light touch. It is desirable to have a fine point on your pencils, but remember not to press too hard on the surface of your print. Use a light touch and start with a line when using pencils. For a slightly larger area, lay your pencil to one side and use a sweeping motion to lay on the color. Then (and this is most important) rub down your pencil color. Use a clean skewer or q-tip to rub and blend. If you see a telltale pencil mark, you have pressed too hard.
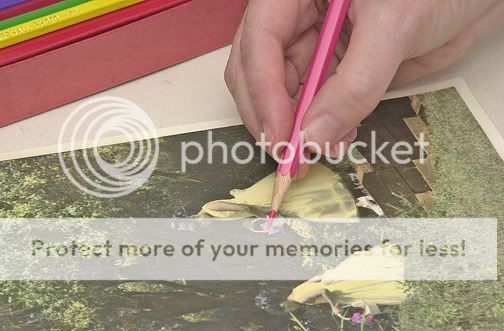
Photo oil pencils are excellent ways to color in small areas. Use skewers to rub down pencil lines
Detailing the areas of your print is the most enjoyable part of the hand coloring process for me. This is when I can select eye color for a portrait, flower color for a landscape, or blend in browns and reds for a rusty bridge. It is where you can put your individual stamp upon a piece.
Hand coloring B&W Portraits
Begin by determining your subject’s flesh tone. Flesh tones are seldom achieved with just one color. Men, women, children, babies are all approached a little differently. It’s important to achieve a natural look regardless of complexion type, so be prepared to spend some time blending.
Depending upon the size of the photo oil set you purchase, you will have between one to three flesh tone oils. You can get more by using Basic Flesh and mixing, or you can experiment with the additional flesh colors that may be included in your set.
Flesh tones –
Light to medium: Use Flesh with a little Cheek (approximately 4:1 ratio)
Medium to dark: Use Flesh #2 - OR, Verona Brown mixed with Flesh
Mix your flesh tones and apply in a wash of color using a cotton swab, covering the entire area to be colored. It is okay to cover the eyes and any hair over the skin. Rub down with another cotton swab to desired tones.
Flesh shadows: Verona brown or Flesh #2.
Cheeks, corners of eyes, gums – use Cheek
Eyes – use skewer with appropriate oil color, or color pencil – after coloring the eye, rub any highlights or catch lights in the eye down to white. Clean out whites of eyes with kneaded eraser.
Lips – women and children: Lipstick (for lips the Lipstick pencil is recommended)
Men: lipstick, rubbed down more
Rub from the outside in when rubbing down gums or tongue, and rotate the colors of Cheek and Lip to avoid too much of the same rosy tint. Clean out the teeth last, using kneaded eraser.
Hair – When coloring hair, you will be using three colors: your main color for the overall wash, a shadow color for the low lights, and a highlight color for the highlights. The pencils are excellent for using in low- and highlight details. The chart below is a starting point only.
Hair Color Main Color Shadow Color Highlight Color
Blonde Raw sienna Verona Brown or Sepia Cad Yellow (rubbed down)
Brown Verona Brown Neutral tint Raw Sienna
Black Neutral tint Cobalt violet Sky Blue or Chinese Blue
Red Flesh Verona Brown or Sepia Cad. Orange
Silver Extender Cobalt violet Sky Blue or Chinese Blue, rubbed down
Clothing – Your subject’s clothing can often dictate your color choices. A good choice for denim in blue jeans, for example, is Ultra Blue Extra Strong, with Cobalt Violet in the shadows and Sky Blue in the highlights along creases.
As a general rule, a pleasing portrait will have warmer colors for clothing, with cooler colors in the background. This helps to separate the subject from the background. There will be instances when this is not possible, of course, so experiment to see what works.
If you are doing a hand colored portrait for a friend or client, they might have very specific ideas on the clothing colors and only wish for you to follow them - regardless of your knowledgeable suggestions! Be prepared for this if you take on clients.
HAND COLORING B&W LANDSCAPES
The “wash” technique is utilized frequently in landscapes. For example, covering trees, pastures, and hills with a base wash of tree green is good for a starting color, with low lights and highlights added for depth and texture. After applying a wash of color, pencils are recommended for detailing highlights and shadows in landscapes. Use blue or purple in the shadows. Highlights should be warm colors such as Oxide Green, Raw Sienna and Cad. Yellow. Below are some general guidelines.
Blue sky – Sky Blue, sometimes Chinese Blue. Sky Blue is a light, thin color, good for clear bright days. Chinese Blue is a richer color and is good for a deeper sky. For a stormy, ominous sky, Payne’s Gray is a wonderful color, with some Cobalt Violet in the deeper clouds. Apply your blue as a wash, covering the sky in your print.
Clouds – After your initial wash of the sky color, clean out the clouds by rubbing down until only the barest hint of blue from your initial wash remains. Use Cad. Yellow in highlights, and Cobalt Violet in shadows.
Distant mountains – Neutral Tint with Cobalt Violet. For middle distance, switch to a bluish-gray hue for additional separation.
Trees – Use a wash of Tree Green for the leaves. For pines, mix with a little Viridian. Use Verona Brown or Sepia in trunks and branches, with Raw Sienna in areas the sun may be hitting.
Bushes – similar to trees, use Tree Green on shrubs, and evergreens mix with Viridian.
Grass – wash of Tree Green. Add Oxide Green in highlights, Verona Brown in any area showing ground. For straw or hay use Raw Sienna.
Water – water reflects the color of the sky, low-hanging trees or vegetation growing nearby. As a hand coloring artist you will find you must consider the color of everything – including the color of water! Oceans can range from blue to green, with a color range of blue-gray, blue green, depending on whether the day is clear or cloudy. Study your print and determine how deep the water is – you may start with a deeper hue that you’ll want to lighten as the water approaches lakeshore or beach. An important consideration is whitecaps in oceans, or rapids in rivers – these contain natural whites and should be rubbed down to the white in the print. When coloring the reflections, use the same colors as whatever the object is being reflected, whether it is a red barn or green leaves – just add some neutral tint to darken the shade.
Rocks can be many colors, so it helps if you were familiar with the terrain. Out West rocks have a decidedly reddish hue and in the Southeast range from grays to browns. Use warmer colors for rocks in the foreground, cooler colors in the background.
Dirt can be many shades of brown. Experiment with Verona Brown (a warm brown) and Sepia (a cooler brown). Georgia clay can be achieved with Verona Brown mixed with Cheek.
Asphalt roads can be colored with Paynes Gray (rubbed down) or Neutral Tint.
ADVANCED TECHNIQUES AND OTHER MEDIA
The main thing I’d like to emphasize is the importance of having non-oil-based hand-coloring medium as part of your arsenal. Particularly when coloring on inkjet prints, where there is a wide array of printers, inks, and paper combinations, non-oil-based mediums are a must.
I. Other media. Although I work mainly with photo oils and oil pencils on silver gelatin prints, I have had great results hand coloring with other media, on different papers. Below, I have listed some “tried and true” examples. As hand coloring artists, you should never feel limited by your selections. I encourage you to try them all, see what you enjoy using and get creative. The possibilities are limited only by your imagination!
A. Pastels. This can be a somewhat misleading term to the novice. When I think of “pastels” I usually think in terms of a color whose value has been lightened considerably to a delicate hue. But for the hand coloring artist, we are generally referring to colored chalks, and some brands offer bright and vivid colors. They are similar to photo oils only in that they can be rubbed down the same way, using soft cotton swabs, and they are transparent. No PM Solution is required to prepare your print, though you must use a photographic paper with some “tooth”. They lift off easily with a kneaded eraser. They are widely available art supply stores and come in solid bars or in pencils. I prefer pencils because they offer better control, and can use a sharper point for detail work, or lay the pencil flat for a broad wash of color. The use of a finishing spray is recommended, though sprays can slightly alter some colors, so some testing in advance is a good idea to see if this will adversely affect your final image.
B. Berol Prismacolor© pencils. These are high quality wax pencils that come in a wide variety of colors. The colors are intense and can be gone over repeatedly for buildup of color. You may pre-coat a fiber-based print with PM solution for greater ease in blending. These pencils are not oil-based and can be used on most any paper that has tooth. They are not as transparent as photo oils or pastels, nor do they blend as easily, so start in small areas to get used to handling them before tackling larger sections of a print. They can leave behind a waxy sheen, much heavier in appearance than photo oils, which may or may not enhance your image, so study your print in advance when considering using these pencils.
C. Watercolors. Watercolors can be used on a variety of photographic papers. They can be thinned for the barest hint of color and are exceedingly easy to remove – with water! A dampened cotton swab will suffice. They can be applied directly to the photograph with an artist’s brush or cotton swabs, and are widely available. They can be purchased in cake form, tubes, pencils, and crayons. The crayons are waxy, brightly colored, water-soluble crayons that are easily applied to most photographic papers. Like all watercolors, they are easily removed with water and a finishing spray is recommended to help preserve your work. Watercolors are widely available at art supply stores.
D. Oil sticks and bars. These oil paints can be used directly on matte and RC papers, and held like a pencil to cover large areas with a wash of color. Some brands offer thinner sticks for better control. They can be blended with cotton swabs, and you can elect to apply PM solution to your print before using for better blending. They do not blend as easily as photo oils but the colors are more intense. You may also use artist’s brushes to apply these oils. Simply dip the brush in turpenoid (available at art supply stores) and run the tip of the brush across the bar to collect pigment. Use sparingly until you get comfortable handling them, and you may come to fully appreciate their beautiful hues. They are less transparent than photo oils, but can be thinned. Depending on brand, there is a wide variety of colors available. Good brands are Winsor & Newton © and Shiva© .
From left to right: Prismacolor watercolor pencils, Conte pastel (chalk) pencils, Winsor & Newton Oil Bar sticks, Prismacolor wax pencils, Caran d’Ache watercolor crayons
II. Digital applications. As more photographers use digital cameras exclusively, or add them to their standard photographic equipment, it is easy to believe this would have a negative impact on the traditional art of hand coloring. Not so! Using the new archival, pigment based printer inks, while employing a variety of high quality inkjet papers, you can print out a high quality inkjet image with sound archival properties. Using Photoshop© or other photo imaging software, you can convert your color digital images to black and white. After printing, you then have creative freedom to apply color as your own vision dictates.
A. Inkjet papers. The main rule of thumb to keep in mind is this: oil and paper don’t mix! Some matte inkjet papers are uncoated, and will absorb photo oils quickly into a shapeless blob that cannot be rubbed down or removed. Even oil pencils can be hard to blend and, without a ground barrier between the oils and the paper, eventually the paper will deteriorate and rot. It is important to know in advance if the inkjet paper you have selected has such a ground, or coating. Also, the use of high quality inkjet paper that carries a mention of archival properties is recommended. Paper manufacturers are changing their products rapidly, and papers that were widely available 2-3 years ago have now been modified or discontinued. A great way to test several papers with your particular ink/printer combination is to order a “sampler pack” from the manufacturer.
B. Non oil-based media. Familiarizing yourself with other coloring media is important to the hand coloring artist. As mentioned above, pastels, water-soluble colored pencils (without the water) and wax pencils such as Prismacolor© can all be effectively used on an inkjet print. Once you have determined an effective paper and ink combination, it is time to select your media. Keep in mind you are not limited to a single choice, but can mix media just like with a photographic print – the main difference being you must omit oil-based media from your list of choices. After printing, leave the print alone for several hours to allow all the ink to dry and “set” into the paper. Avoid using PM solution on an inkjet print – the inks may smear and ruin the print. Instead, a wax or watercolor pencil dipped into a bit of extender can help with blending, as can tortillons, blending pencils and q-tips. For pastels, just select a paper with good tooth. I do a wash of lighter color first, and then begin adding darker colors for shading. For bright spots of intense color, wax pencils are a good choice. Use kneaded erasers and turpenoid sparingly for mistakes, until you see what your inkjet paper will allow. Experiment, be patient and have fun!
C. Making your own ground. This is a fun and easy way to be able to use your photo oils on any inkjet paper, regardless of the manufacturer’s grounding, or onto plain artist’s paper. I have read a few variations on the proportions for mixing this; I use what is outlined in Theresa Airey’s book, Creative Photo Printmaking <SUP>2</SUP> , as this makes the smallest amount possible, and a little goes a long way. A ground, as stated before, is simply a barrier between the oils and the paper fibers. Putting oils directly onto the fibers will eventually rot the paper (even if the paper initially accepts the oils without smearing). You can get around this by taking one packet of unflavored gelatin (I use Knox©, which is available at the grocery store) and combining it with approximately 5 ounces of warm tap water, and let the mixture sit for a few hours. It will cloud up during that time, so you must then gently heat it until it clears. Don’t boil the mixture, and stir while you warm it up. Before you apply it to a digital print, coat some onto the same paper you will be using for the print. I use a wide bristle brush or foam brush to apply the ground to the paper. Let it dry, and then put a small drop of vegetable or linseed oil directly onto the coated paper. Leave it overnight. When you check it the next day, with any luck there will still be a small pool of oil present. Check the back of your paper to ensure nothing has soaked through and the paper is clean and free of any oil spots. This will ensure your paper has sufficient ground to accept your photo oils and oil pencils.
Prepare an inkjet print. Have an image scanned, or select one of your digital images, and make whatever repairs or adjustments you need. (Note: I have a master file of digital images that I copy when I am ready to make changes, and make changes only to that copy. That way, I have a master I can return to if I make a mistake or don’t like my final outcome.) When you like what you have onscreen, lighten it overall by about 10%. Just like you want to avoid deep blacks or blown highlights on darkroom paper, you are after the same effect here. Print your image on the same paper you have previously tested with the gelatin ground, and let the print sit for a few hours to ensure your inks have set. (Note: I have done all my inkjet printing with an Epson 2200 photo printer using archival, pigmented inks. If you are using dye-based inks, your results may vary.) Then apply the warmed, clear gelatin solution the same way you did for your test, brushing first across, then down the print to ensure even coverage. When the print has completely dried, you should be free to hand color just as you would with a darkroom print. You will bypass applying the PM Solution. Use your pencils with care, and apply the kneaded eraser with less force.
I came across this old print of my mother and me. It was in poor shape, discolored and with emulsion missing in some areas.
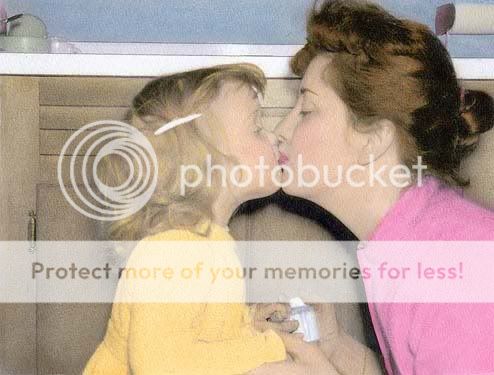
After cleaning the print digitally, I prepared Arches inkjet paper with a gelatin ground that would keep the photo oils from penetrating into the paper. I selected a special color scheme to enhance the idealized, highly romanticized “retro” feel I wanted to portray.
SUMMARY
Discovering all the ways to apply one’s particular artistry to enhance or change the mood of a photograph is a very personal approach. For me, the art of traditional hand coloring is at the top of the list. I employ several crossover art forms in my work: I enjoy Polaroid image transfers, emulsion lifts, and bromoil printmaking, to name a few. Hand coloring lends itself perfectly to all of these techniques, in one form or another, and can help me to rework these images however I wish.
I made this bromoil print from an HIE negative. I then dyed the print with coffee, and colored with chalks

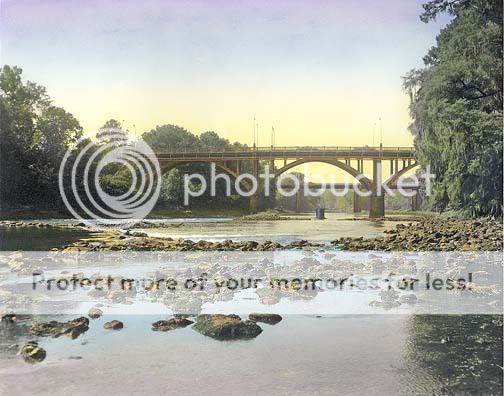
Before….. I shot this picture with Tri X 400 on a cold winter day as I was approaching a trail head. At the time, I was interested in nothing more but the pattern from the shadows on the bridge.
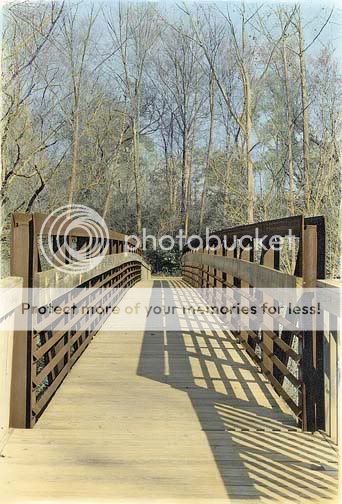
After…. I decided to fully hand color this image and turn the bleak winter scene into a spring day. The addition of color helped express the feeling of welcome I get whenever I hike through this area.
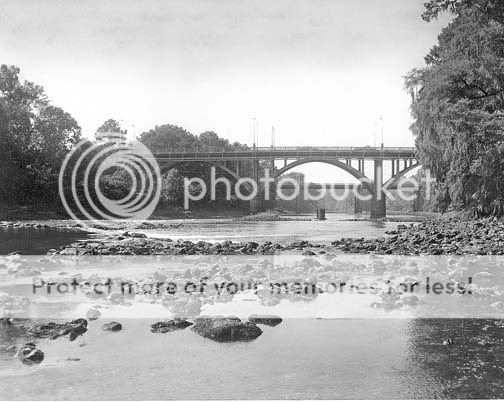
Before…. This image was shot on a hot August “dog day”, with little wind, no clouds and oppressive humidity in a flat sky. This image was taken at high noon.
Photo courtesy of Brad Sprinkle
After…. I decided to turn it into a more pleasing image of a summer sunset with the addition of both warm and cooler colors.
Keep in mind: not every B&W image is meant to be hand colored, nor is it improved by the application of color. Sometimes, the best emotion an image can offer is through the very absence of color. Determining which of your B&W prints would be enhanced by color, and in what medium, becomes an interesting way to further evaluate your images. You will find yourself asking what it is you are trying to express, what feeling you wish your image to convey.
I hope to have imparted the sense of excitement and exploration that is to be gained by the art of hand coloring. Feel free to contact me through The Photo Forum or via my website. I heartily encourage you to explore on your own, and see how you can turn your photographs into unique works of art. The possibilities are truly endless!
BIBLIOGRAPHY and RECOMMENDED READING
<SUP>1</SUP> The Photographer’s Toning Book© 2003 by Tim Rudman
Published by Amphoto Books
<SUP>2</SUP> Creative Photo Printmaking© 1996 by Theresa Airey
Published by Amphoto Books
Photo-Imaging© 2002 by Jill Enfield
Published by Amphoto Books
Handcoloring Photographs© 1994 by James A. McKinnis
Published by Amphoto Books
Resources:
Freestyle Photographic Supplies – B&W darkroom papers, hand coloring supplies; creative consultants
B&H Photo – All manner of photographic supplies, inkjet papers, photo oil sets and hand coloring supplies
All images © Terri Sprinkle unless otherwise stated
Introduction to Hand Coloring
by Terri Sprinkle
INTRODUCTION
The art of hand coloring black and white prints has been around almost as long as photography itself. Its humble beginnings date back to those early days of the first daguerreotypes, when people began to realize that this new-fangled “photography” delivered exactly what it promised – the lens was capturing them just the way they looked. Often times, this was not what they wanted! Gone were those idealized portraits they were used to seeing from their portrait painters – the ones that put softness to their hair, a twinkle in their baby blue eyes and a romantic flush to their cheeks. While first dismayed at this apparent new intrusion onto their business of portraiture, it didn’t take long for the shrewdest of portrait artists to figure out how they could still make money - by working alongside portrait photographers, and offering a new service: applying their colorful oils to these prints. The art of hand coloring photographs was born!
Why hand color the traditional way?
I have been hand coloring black and white photographs for several years now. Learning this technique has, without question, led me down an artistic path in my photography that I would never have thought possible. My passion for what is (loosely) referred to as “fine art” black and white photography suddenly took on a new meaning. Having this art form as a way to enhance, or even change the feel of an image, is extremely liberating.
Some artists call this process hand painting, some call it hand tinting – but those terms can also mean slightly different processes, depending upon your medium, or even whose work you’re viewing – so, for the purposes of this article, we will refer to this process as hand coloring.
Obviously, a sense of appreciation for the traditionally processed, silver gelatin print comes into play. While there is a growing popularity for “selective coloring” of digital images, the traditional method forces you into the role of real hands-on artistry. In his informative guide, The Photographer’s Toning Book <SUP>1</SUP>, Dr. Tim Rudman writes: [there is] “…considerable satisfaction that is to be had from the craft aspect of printmaking. The thrill of watching the image slowly emerge never completely disappears. The sense of creation that is to be had by physically handling a sheet of photographic paper through all the stages of exposing, developing….is very real. It is a tactile process involving a ‘real’ and evolving product, quite unlike the rather abstract computer image that has no physical substance throughout its embryonic development until the ‘print’ command is given.”
The technique has certainly come a long way from its rudimentary beginnings. What this article mainly focuses on is the traditional art of hand coloring. I call this “traditional” hand coloring because, for the majority of this article, the images you will view will be of traditionally hand processed, darkroom-generated silver gelatin prints. These prints are highly archival, meaning they are produced using wet darkroom methods and, with proper storage conditions, can last several hundred years. In addition, the preferred medium with hand coloring is with photo oils, either in tubes or in pencils. These photo oils are, themselves, very archival, so they will do nothing to interfere with the archival stability of the silver gelatin print.
I am emphasizing this medium because, in my opinion, this is the classic and best way to hand color. Not just for the most archival properties, although that can be an important consideration, but also because these photo oils are transparent, pure, rich in color, and impart the most superior look in a hand colored piece, and this process is very creatively rewarding. I will be discussing other media a bit later on, and touch on digital applications, as well, but for the moment we are going to concentrate on the traditional method.
Adding color can dramatically change the mood to a B&W photograph. The image above was shot with Kodak HIE and has an ominous feel to it, as befitting an infrared image shot after a storm.
By cropping the original image to bring the house into the forefront, then applying an array of color to soften the image, the mood is completely changed. The image becomes one that simply showcases the fine old architecture of this antebellum home.
BASIC SUPPLIES
Here is a list of the basic supplies needed to get started with hand coloring. All art supply houses will carry these items, as well as online stores.
* Photographic oils (oil tubes, oil pencils) Although there are a few brands available, by far the most widely used photo oils on the market are Marshall’s Photo Oils© and their oil pencil sets. The pencils can be invaluable in coloring smaller areas of detail and, since they are manufactured by Marshall’s, the colors are meant to complement the photo oils.
Marshall’s Master Photo Oils set, photo oil pencil sets
* Cotton balls Any brand will suffice. All that is pertinent here is that 100% cotton is used – synthetic fibers are strongly discouraged. Not only will synthetic cotton not hold the oils as well as 100% cotton, the synthetic fibers can damage the delicate emulsion of the photographic paper when applied.
* Q-tips © Of both rounded and pointed tips, as an aid to applying small amounts of oil.
* Foam core board Available at art supply stores. This is an optional suggestion, but works well as a good work surface over a kitchen or drafting table. They are lightweight but strong, and will keep your table at home clean.
* Toothpicks, wooden skewers For use as hand made cotton skewers to apply or blend oils in small areas.
* Color wheel An important tool for helping you mix colors, and they contain a lot of other information, as well. You will want a color wheel handy when considering color choices for your print.
* Kneaded erasers are indispensable in their ability to clean out areas of your print where you don’t want color – the eyes of a portrait subject is a good example. You will learn to spread a “wash” of color over a large area of your print – and you use the kneaded eraser to clean out areas where color is not desired. You can continue to fold these erasers in on themselves – kneading them, if you will – for a long period of use.
* Good lighting, comfortable seating I worked with a woman who enjoyed standing at her kitchen counter while she hand colored. She produced lovely images and apparently didn’t mind standing for extended periods of time, so this worked for her. It’s not something that I recommend, however! I work at a drafting table with only the slightest tilt, in a high-backed cushioned chair with foot supports. This is what works for me, and what I would recommend to keep yourself close to your work, and comfortable enough to stay with it for a few hours. My drafting table is by a window where I can use available daylight – but I most always supplement this with a good daylight bulb in a lamp attached to the front of my drafting table.
Along with your photo oils, have these supplies assembled when preparing to hand color.
PAPER CHOICES
Paper considerations are crucial. There are several great brands available and you owe it to yourself to try several of them, to see what works best for you. My personal favorite has long been the now discontinued Agfa (MC) Classic 118, which is what I have recommended for my students. However, any semi-matte or matte fiber based paper will do - as long as it has some “tooth” to the emulsion and boasts a rich white base.
It is also possible to hand color on resin coated papers, although generally not recommended. Fiber based papers absorb the oils much better than RC. Standard RC papers are about 50% plastic and 50% paper, and have a very thin silver emulsion. Without question, the quality and archival stability of RC papers has significantly improved over the last few years. However, at the collectable – and sellable – level, fiber-based papers will always be considered far more valuable.
The surface of the paper is also important. You can color on a semi-matte or matte surface, depending on the paper. You cannot, however, use photo oils on a glossy surface, regardless of whether the paper is FB or RC. The glossy coating represents a ground barrier, and actually prevents the oils from being absorbed into the paper. There are some artists who simply spray over a glossy paper with a workable pre-fixative, and this will certainly add some tooth to the surface and give the oils something to cling to – but for me, it hardly seems worth the effort. For best results you want the oils to actually become part of the fiber of the paper, not just lying on top!
Also important is how to PRINT an image you want to hand color. If you print yourself, simply print approximately 10% lighter than you would for a print of normal contrast and tonal range. Keep a moderate contrast -not flat, but not too high. Make sure there is detail in both shadows and highlights of your print. You will quickly discover that the photo oils are transparent, and a blown area will remain blown, while a deep black will not reflect the color. If someone does printing for you, discuss these considerations in advance, and ask for a density spread to choose from.
If you have a print that needs spotting, always spot BEFORE hand coloring. If you are planning to tone your print, tone your print BEFORE spotting
BASIC COLOR THEORY
PRIMARY COLORS
Red Yellow Blue
The primary colors are called primary because you cannot mix any combination of colors to create them. They are considered the “pure” colors.
SECONDARY COLORS
However, you can create other colors by mixing two primary colors, which in turn, become secondary colors.
For instance:
Yellow and blue = green.
Blue and red = violet
Red and yellow = orange
TERTIARY COLORS
Combining a primary color with a secondary color will yield a tertiary color. There are six tertiary colors.
For instance: Red (primary) and orange (secondary) = red orange.
NOTE: All of the above mixing is done using equal proportions of either primary or secondary colors.
DEFINITIONS AND TERMS:
As previously mentioned, color wheels can be extremely helpful tools when learning to mix colors. When studying your color wheel, you will notice there is a split between what is called “warm” and “cool” colors. Cool colors always contain blue, which is the cool primary color. Warm colors are made up of reds, yellows and oranges.
Warm colors are the “advancing” colors, and cool colors “recede”. To help you cement this concept, think of a B&W image of a laughing child dressed in play clothes. You might want to color those clothes in warm, vibrant tones, to “advance” the subject. Now think of a B&W landscape, an image that contains distant mountains. You would want to color those mountains in cooler, “receding” shades of purple or blue – which happens to be the way your eye would perceive them in nature. Shadow areas can always be colored in various hues of violet or blue, as shadows naturally form in “recessed” areas and call for a receding color.
Keep in mind the color representations on a color wheel are highly idealized – meaning, “Your results may vary”! Don’t be discouraged if you are attempting to mix a color that you see on your color wheel, and it does not appear to be an exact replica. Mixing takes practice and patience. In addition, the larger photo oil sets contain many pre-mixed colors, so much of the work is done for you!
Color wheels are available in several sizes, and easily found at art supply stores.
Hue: Another word for color.
Intensity: The brightness or dullness of a color.
Shade: A color that has been mixed with black.
Tint: A color that has been mixed with white.
Tone: A color that has been mixed with gray.
Value: Meaning the lightness or the darkness of a color.
Color Harmonies An understanding of color harmony allows more freedom of choice in your palette, while still achieving professional looking results. By selecting a color harmony and identifying those colors on your color wheel, you can then lighten or darken these colors by the addition of white or black, or dull them with the addition of gray, and still be within a given color harmony. This does not limit you to using only these colors when hand coloring an image, of course, but provides direction and guidance for a pleasing end result.
On the color wheel, colors that are directly opposite from each other are called complementary colors. Red and green are complementary colors. When used close together in hand coloring, they serve to intensify each other. When coloring a landscape, for example, if you want to make a red flower stand out with more intensity, you may add some green around it. Using this type of contrast is a great way to add visual interest to your work.
A split complementary is a trilogy of colors. Taking one color as the main color, find that color’s complementary color directly across the color wheel. Then look at the two colors on either side of the complementary color. These three colors make a split complementary color harmony. Blue, red-orange and yellow-orange make up a split complementary.
A triadic color harmony is also a trilogy of colors. You again start with one color as the main color and, using your color wheel, find that color’s split complementary as above, and then locate the colors on either side of the split complementary. Violet, orange and green make a triadic color harmony.
“Cemetery faucet” is an example of a triadic color harmony. Can you see how the three colors relate to one another on the color wheel?
Photograph courtesy of Brad Sprinkle
PREPARING YOUR PRINT
When you open a box of Marshall’s © photo oils, you will see you have been provided with a few “extras”, the number of which will vary depending upon the size of the set. However, all sets will come with a small bottle of a prepared medium called, not surprisingly: PM Solution©. This is an archival medium used to moisten the top emulsion of your print. The old portraitists used blends of turpentine with their oils; this medium is fundamentally the same but is more stable. It helps with the flow of the oils, and makes blending and rubbing down colors easier. You’ll want to dampen a cotton swab – not soak it to where it’s dripping – and apply the PM solution in an even, circular motion until the entire print is lightly coated.
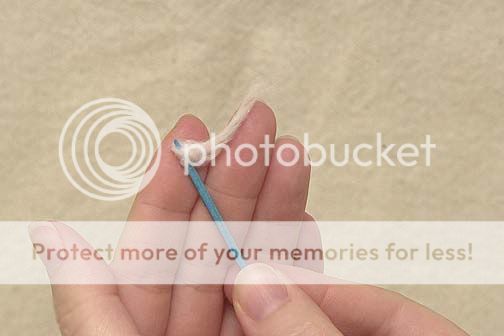
While you let your print dry, make yourself some skewers. Using a toothpick and a tiny amount of cotton, slightly moisten the tip of the toothpick (I dip mine in a small pool of water) and twirl the cotton around it, to form a tiny, rounded cotton-tipped end, covering the point. It takes a little practice, but is easy, and they are very handy to have nearby. I use these a lot when I’ve mixed a special color blend that I don’t have a matching pencil color for, and I need to color in a small area. They are also what I used to rub down a pencil line. I will make several, of various sizes, whether I end up using them or not – they’re ready to go. In addition, if you want to skip the purchase of a pencil set, you can use these skewers as an economical replacement, using only minute amounts of the oils with them.
It takes a little practice, but wrapping a skewer is easy and they are useful to have around
A completed skewer. Using a tiny bit of cotton allows for less waste when coloring.
So, your print is prepped, you have good lighting, your oils are laid out with your palette, skewers, q-tips and swabs. You’re about ready to begin!
How to apply photo oils and pencils to your print:
It’s extremely intimidating to look a perfectly good B&W print and think that you’re going to improve it by hand coloring! The best way to get past those doubts is to dive right in. Go ahead - make your mistakes, hate what you’ve done and start all over – just keep plugging away until you suddenly see that you got it right, and it’s exactly as you envisioned. Everyone has their first few efforts, and some prints will simply be easier to color than others.
Choosing your first hand colored pieces I would advise you to start by selecting one very basic portrait, and one basic landscape – both images as uncluttered as you can get them. A studio portrait, similar to a school portrait setup, is ideal, as there is no background to concern yourself with and the subject’s face is your only concern. It should be well lighted and contain both eyes of your subject. Avoid attempting to color a high key portrait until you have mastered the basics. If you don’t have a studio portrait at your disposal, you can easily use an outdoor portrait. Take care to have soft light, preferably open shade, to avoid heavy shadows under the eyes or on the sides of the face.
Any landscape will do, but I would advise you to choose one that a) contains no people, as this is not what you want to concern yourself with at first and b) is as simple and uncluttered as you can make it. Think of obtaining a shot of a bridge over a stream, or a pasture in front of a mountain range.
Basic hand coloring terms
Wash: This is a term used to describe applying color to large areas of your print. It is often the first technique you will use when facing a B&W image. After laying out your colors on your palette, scoop up a small amount of the desired pigment onto a cotton ball and, in a circular motion similar to that used when applying the PM solution, wash the color over the area. This is an effective way to cover large areas of your print. When coloring a portrait, you will begin by washing a flesh tone over all areas showing skin. When coloring a landscape, you will wash a selected sky color over the sky, or a green over a large area of land.
Apply base color to a print in a broad sweeping motion called a “ wash”
Don’t worry about going “outside the lines”. In fact, overlaying the boundaries is generally recommended to avoid any kind of “halo” effect by not covering an area completely.
Once an area has been washed, you will notice it seems uneven. Switch to a clean cotton ball and begin to rub down the applied color, evening the tones to a uniform color. You will begin to see how the tonal values of your B&W print suddenly come into play to assist you. The tonal values will naturally keep a darker hue over darker areas of your print, while the lighter areas are much more transparent. The effect should be rich and natural. Stop a few times and rest your eyes by looking away from the print, across your room or out the window. Then look down to assess your tones. If your color seems too dark for you, continue to rub down, using an even, circular motion. If you feel you’ve rubbed down too much, you can apply some more pigment. Remember, it takes repetition to develop a good feel for what will work. This takes practice, so expect your first few prints to take much longer than at any other time!
Clean: Once you are satisfied with your overall wash of a given area, it is time to clean up outside the lines. The most effective way to do this is to continue rubbing down until only a hint of the color shows, and then apply your kneaded eraser. It magically removes all traces of pigment, leaving only your B&W emulsion. There is seldom any need to reapply PM solution, so don’t worry about it. If you decide to completely remove a selected color, you can use the Marshall’s Marlene©, which is a cleaner designed for that purpose. Simply apply the Marlene onto a cotton swab and wipe off all pigment, switching to clean cotton swabs as you go. Once you have cleaned off all unwanted color, you may let the print dry down then reapply a small amount of the PM solution before you begin again.
After rubbing down unwanted color with clean cotton, use the kneaded eraser
Detail work: Like the name implies, this is the part of the process where you make your print begin to come alive by bring out small details. This is where your skewers and pencils will come in handy. Use your pencils and skewers with a light touch. It is desirable to have a fine point on your pencils, but remember not to press too hard on the surface of your print. Use a light touch and start with a line when using pencils. For a slightly larger area, lay your pencil to one side and use a sweeping motion to lay on the color. Then (and this is most important) rub down your pencil color. Use a clean skewer or q-tip to rub and blend. If you see a telltale pencil mark, you have pressed too hard.
Photo oil pencils are excellent ways to color in small areas. Use skewers to rub down pencil lines
Detailing the areas of your print is the most enjoyable part of the hand coloring process for me. This is when I can select eye color for a portrait, flower color for a landscape, or blend in browns and reds for a rusty bridge. It is where you can put your individual stamp upon a piece.
Hand coloring B&W Portraits
Begin by determining your subject’s flesh tone. Flesh tones are seldom achieved with just one color. Men, women, children, babies are all approached a little differently. It’s important to achieve a natural look regardless of complexion type, so be prepared to spend some time blending.
Depending upon the size of the photo oil set you purchase, you will have between one to three flesh tone oils. You can get more by using Basic Flesh and mixing, or you can experiment with the additional flesh colors that may be included in your set.
Flesh tones –
Light to medium: Use Flesh with a little Cheek (approximately 4:1 ratio)
Medium to dark: Use Flesh #2 - OR, Verona Brown mixed with Flesh
Mix your flesh tones and apply in a wash of color using a cotton swab, covering the entire area to be colored. It is okay to cover the eyes and any hair over the skin. Rub down with another cotton swab to desired tones.
Flesh shadows: Verona brown or Flesh #2.
Cheeks, corners of eyes, gums – use Cheek
Eyes – use skewer with appropriate oil color, or color pencil – after coloring the eye, rub any highlights or catch lights in the eye down to white. Clean out whites of eyes with kneaded eraser.
Lips – women and children: Lipstick (for lips the Lipstick pencil is recommended)
Men: lipstick, rubbed down more
Rub from the outside in when rubbing down gums or tongue, and rotate the colors of Cheek and Lip to avoid too much of the same rosy tint. Clean out the teeth last, using kneaded eraser.
Hair – When coloring hair, you will be using three colors: your main color for the overall wash, a shadow color for the low lights, and a highlight color for the highlights. The pencils are excellent for using in low- and highlight details. The chart below is a starting point only.
Hair Color Main Color Shadow Color Highlight Color
Blonde Raw sienna Verona Brown or Sepia Cad Yellow (rubbed down)
Brown Verona Brown Neutral tint Raw Sienna
Black Neutral tint Cobalt violet Sky Blue or Chinese Blue
Red Flesh Verona Brown or Sepia Cad. Orange
Silver Extender Cobalt violet Sky Blue or Chinese Blue, rubbed down
Clothing – Your subject’s clothing can often dictate your color choices. A good choice for denim in blue jeans, for example, is Ultra Blue Extra Strong, with Cobalt Violet in the shadows and Sky Blue in the highlights along creases.
As a general rule, a pleasing portrait will have warmer colors for clothing, with cooler colors in the background. This helps to separate the subject from the background. There will be instances when this is not possible, of course, so experiment to see what works.
If you are doing a hand colored portrait for a friend or client, they might have very specific ideas on the clothing colors and only wish for you to follow them - regardless of your knowledgeable suggestions! Be prepared for this if you take on clients.
HAND COLORING B&W LANDSCAPES
The “wash” technique is utilized frequently in landscapes. For example, covering trees, pastures, and hills with a base wash of tree green is good for a starting color, with low lights and highlights added for depth and texture. After applying a wash of color, pencils are recommended for detailing highlights and shadows in landscapes. Use blue or purple in the shadows. Highlights should be warm colors such as Oxide Green, Raw Sienna and Cad. Yellow. Below are some general guidelines.
Blue sky – Sky Blue, sometimes Chinese Blue. Sky Blue is a light, thin color, good for clear bright days. Chinese Blue is a richer color and is good for a deeper sky. For a stormy, ominous sky, Payne’s Gray is a wonderful color, with some Cobalt Violet in the deeper clouds. Apply your blue as a wash, covering the sky in your print.
Clouds – After your initial wash of the sky color, clean out the clouds by rubbing down until only the barest hint of blue from your initial wash remains. Use Cad. Yellow in highlights, and Cobalt Violet in shadows.
Distant mountains – Neutral Tint with Cobalt Violet. For middle distance, switch to a bluish-gray hue for additional separation.
Trees – Use a wash of Tree Green for the leaves. For pines, mix with a little Viridian. Use Verona Brown or Sepia in trunks and branches, with Raw Sienna in areas the sun may be hitting.
Bushes – similar to trees, use Tree Green on shrubs, and evergreens mix with Viridian.
Grass – wash of Tree Green. Add Oxide Green in highlights, Verona Brown in any area showing ground. For straw or hay use Raw Sienna.
Water – water reflects the color of the sky, low-hanging trees or vegetation growing nearby. As a hand coloring artist you will find you must consider the color of everything – including the color of water! Oceans can range from blue to green, with a color range of blue-gray, blue green, depending on whether the day is clear or cloudy. Study your print and determine how deep the water is – you may start with a deeper hue that you’ll want to lighten as the water approaches lakeshore or beach. An important consideration is whitecaps in oceans, or rapids in rivers – these contain natural whites and should be rubbed down to the white in the print. When coloring the reflections, use the same colors as whatever the object is being reflected, whether it is a red barn or green leaves – just add some neutral tint to darken the shade.
Rocks can be many colors, so it helps if you were familiar with the terrain. Out West rocks have a decidedly reddish hue and in the Southeast range from grays to browns. Use warmer colors for rocks in the foreground, cooler colors in the background.
Dirt can be many shades of brown. Experiment with Verona Brown (a warm brown) and Sepia (a cooler brown). Georgia clay can be achieved with Verona Brown mixed with Cheek.
Asphalt roads can be colored with Paynes Gray (rubbed down) or Neutral Tint.
ADVANCED TECHNIQUES AND OTHER MEDIA
The main thing I’d like to emphasize is the importance of having non-oil-based hand-coloring medium as part of your arsenal. Particularly when coloring on inkjet prints, where there is a wide array of printers, inks, and paper combinations, non-oil-based mediums are a must.
I. Other media. Although I work mainly with photo oils and oil pencils on silver gelatin prints, I have had great results hand coloring with other media, on different papers. Below, I have listed some “tried and true” examples. As hand coloring artists, you should never feel limited by your selections. I encourage you to try them all, see what you enjoy using and get creative. The possibilities are limited only by your imagination!
A. Pastels. This can be a somewhat misleading term to the novice. When I think of “pastels” I usually think in terms of a color whose value has been lightened considerably to a delicate hue. But for the hand coloring artist, we are generally referring to colored chalks, and some brands offer bright and vivid colors. They are similar to photo oils only in that they can be rubbed down the same way, using soft cotton swabs, and they are transparent. No PM Solution is required to prepare your print, though you must use a photographic paper with some “tooth”. They lift off easily with a kneaded eraser. They are widely available art supply stores and come in solid bars or in pencils. I prefer pencils because they offer better control, and can use a sharper point for detail work, or lay the pencil flat for a broad wash of color. The use of a finishing spray is recommended, though sprays can slightly alter some colors, so some testing in advance is a good idea to see if this will adversely affect your final image.
B. Berol Prismacolor© pencils. These are high quality wax pencils that come in a wide variety of colors. The colors are intense and can be gone over repeatedly for buildup of color. You may pre-coat a fiber-based print with PM solution for greater ease in blending. These pencils are not oil-based and can be used on most any paper that has tooth. They are not as transparent as photo oils or pastels, nor do they blend as easily, so start in small areas to get used to handling them before tackling larger sections of a print. They can leave behind a waxy sheen, much heavier in appearance than photo oils, which may or may not enhance your image, so study your print in advance when considering using these pencils.
C. Watercolors. Watercolors can be used on a variety of photographic papers. They can be thinned for the barest hint of color and are exceedingly easy to remove – with water! A dampened cotton swab will suffice. They can be applied directly to the photograph with an artist’s brush or cotton swabs, and are widely available. They can be purchased in cake form, tubes, pencils, and crayons. The crayons are waxy, brightly colored, water-soluble crayons that are easily applied to most photographic papers. Like all watercolors, they are easily removed with water and a finishing spray is recommended to help preserve your work. Watercolors are widely available at art supply stores.
D. Oil sticks and bars. These oil paints can be used directly on matte and RC papers, and held like a pencil to cover large areas with a wash of color. Some brands offer thinner sticks for better control. They can be blended with cotton swabs, and you can elect to apply PM solution to your print before using for better blending. They do not blend as easily as photo oils but the colors are more intense. You may also use artist’s brushes to apply these oils. Simply dip the brush in turpenoid (available at art supply stores) and run the tip of the brush across the bar to collect pigment. Use sparingly until you get comfortable handling them, and you may come to fully appreciate their beautiful hues. They are less transparent than photo oils, but can be thinned. Depending on brand, there is a wide variety of colors available. Good brands are Winsor & Newton © and Shiva© .
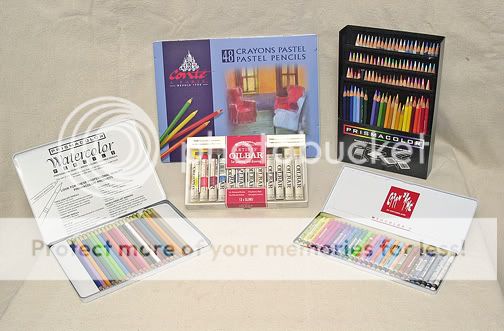
From left to right: Prismacolor watercolor pencils, Conte pastel (chalk) pencils, Winsor & Newton Oil Bar sticks, Prismacolor wax pencils, Caran d’Ache watercolor crayons
II. Digital applications. As more photographers use digital cameras exclusively, or add them to their standard photographic equipment, it is easy to believe this would have a negative impact on the traditional art of hand coloring. Not so! Using the new archival, pigment based printer inks, while employing a variety of high quality inkjet papers, you can print out a high quality inkjet image with sound archival properties. Using Photoshop© or other photo imaging software, you can convert your color digital images to black and white. After printing, you then have creative freedom to apply color as your own vision dictates.
A. Inkjet papers. The main rule of thumb to keep in mind is this: oil and paper don’t mix! Some matte inkjet papers are uncoated, and will absorb photo oils quickly into a shapeless blob that cannot be rubbed down or removed. Even oil pencils can be hard to blend and, without a ground barrier between the oils and the paper, eventually the paper will deteriorate and rot. It is important to know in advance if the inkjet paper you have selected has such a ground, or coating. Also, the use of high quality inkjet paper that carries a mention of archival properties is recommended. Paper manufacturers are changing their products rapidly, and papers that were widely available 2-3 years ago have now been modified or discontinued. A great way to test several papers with your particular ink/printer combination is to order a “sampler pack” from the manufacturer.
B. Non oil-based media. Familiarizing yourself with other coloring media is important to the hand coloring artist. As mentioned above, pastels, water-soluble colored pencils (without the water) and wax pencils such as Prismacolor© can all be effectively used on an inkjet print. Once you have determined an effective paper and ink combination, it is time to select your media. Keep in mind you are not limited to a single choice, but can mix media just like with a photographic print – the main difference being you must omit oil-based media from your list of choices. After printing, leave the print alone for several hours to allow all the ink to dry and “set” into the paper. Avoid using PM solution on an inkjet print – the inks may smear and ruin the print. Instead, a wax or watercolor pencil dipped into a bit of extender can help with blending, as can tortillons, blending pencils and q-tips. For pastels, just select a paper with good tooth. I do a wash of lighter color first, and then begin adding darker colors for shading. For bright spots of intense color, wax pencils are a good choice. Use kneaded erasers and turpenoid sparingly for mistakes, until you see what your inkjet paper will allow. Experiment, be patient and have fun!
C. Making your own ground. This is a fun and easy way to be able to use your photo oils on any inkjet paper, regardless of the manufacturer’s grounding, or onto plain artist’s paper. I have read a few variations on the proportions for mixing this; I use what is outlined in Theresa Airey’s book, Creative Photo Printmaking <SUP>2</SUP> , as this makes the smallest amount possible, and a little goes a long way. A ground, as stated before, is simply a barrier between the oils and the paper fibers. Putting oils directly onto the fibers will eventually rot the paper (even if the paper initially accepts the oils without smearing). You can get around this by taking one packet of unflavored gelatin (I use Knox©, which is available at the grocery store) and combining it with approximately 5 ounces of warm tap water, and let the mixture sit for a few hours. It will cloud up during that time, so you must then gently heat it until it clears. Don’t boil the mixture, and stir while you warm it up. Before you apply it to a digital print, coat some onto the same paper you will be using for the print. I use a wide bristle brush or foam brush to apply the ground to the paper. Let it dry, and then put a small drop of vegetable or linseed oil directly onto the coated paper. Leave it overnight. When you check it the next day, with any luck there will still be a small pool of oil present. Check the back of your paper to ensure nothing has soaked through and the paper is clean and free of any oil spots. This will ensure your paper has sufficient ground to accept your photo oils and oil pencils.
Prepare an inkjet print. Have an image scanned, or select one of your digital images, and make whatever repairs or adjustments you need. (Note: I have a master file of digital images that I copy when I am ready to make changes, and make changes only to that copy. That way, I have a master I can return to if I make a mistake or don’t like my final outcome.) When you like what you have onscreen, lighten it overall by about 10%. Just like you want to avoid deep blacks or blown highlights on darkroom paper, you are after the same effect here. Print your image on the same paper you have previously tested with the gelatin ground, and let the print sit for a few hours to ensure your inks have set. (Note: I have done all my inkjet printing with an Epson 2200 photo printer using archival, pigmented inks. If you are using dye-based inks, your results may vary.) Then apply the warmed, clear gelatin solution the same way you did for your test, brushing first across, then down the print to ensure even coverage. When the print has completely dried, you should be free to hand color just as you would with a darkroom print. You will bypass applying the PM Solution. Use your pencils with care, and apply the kneaded eraser with less force.
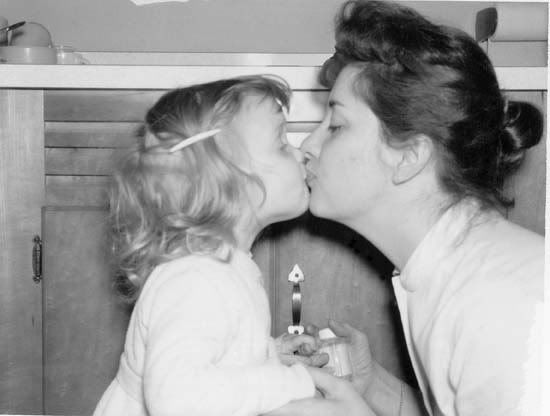
I came across this old print of my mother and me. It was in poor shape, discolored and with emulsion missing in some areas.
After cleaning the print digitally, I prepared Arches inkjet paper with a gelatin ground that would keep the photo oils from penetrating into the paper. I selected a special color scheme to enhance the idealized, highly romanticized “retro” feel I wanted to portray.
SUMMARY
Discovering all the ways to apply one’s particular artistry to enhance or change the mood of a photograph is a very personal approach. For me, the art of traditional hand coloring is at the top of the list. I employ several crossover art forms in my work: I enjoy Polaroid image transfers, emulsion lifts, and bromoil printmaking, to name a few. Hand coloring lends itself perfectly to all of these techniques, in one form or another, and can help me to rework these images however I wish.
I made this bromoil print from an HIE negative. I then dyed the print with coffee, and colored with chalks
Before….. I shot this picture with Tri X 400 on a cold winter day as I was approaching a trail head. At the time, I was interested in nothing more but the pattern from the shadows on the bridge.
After…. I decided to fully hand color this image and turn the bleak winter scene into a spring day. The addition of color helped express the feeling of welcome I get whenever I hike through this area.
Before…. This image was shot on a hot August “dog day”, with little wind, no clouds and oppressive humidity in a flat sky. This image was taken at high noon.
Photo courtesy of Brad Sprinkle
After…. I decided to turn it into a more pleasing image of a summer sunset with the addition of both warm and cooler colors.
Keep in mind: not every B&W image is meant to be hand colored, nor is it improved by the application of color. Sometimes, the best emotion an image can offer is through the very absence of color. Determining which of your B&W prints would be enhanced by color, and in what medium, becomes an interesting way to further evaluate your images. You will find yourself asking what it is you are trying to express, what feeling you wish your image to convey.
I hope to have imparted the sense of excitement and exploration that is to be gained by the art of hand coloring. Feel free to contact me through The Photo Forum or via my website. I heartily encourage you to explore on your own, and see how you can turn your photographs into unique works of art. The possibilities are truly endless!
BIBLIOGRAPHY and RECOMMENDED READING
<SUP>1</SUP> The Photographer’s Toning Book© 2003 by Tim Rudman
Published by Amphoto Books
<SUP>2</SUP> Creative Photo Printmaking© 1996 by Theresa Airey
Published by Amphoto Books
Photo-Imaging© 2002 by Jill Enfield
Published by Amphoto Books
Handcoloring Photographs© 1994 by James A. McKinnis
Published by Amphoto Books
Resources:
Freestyle Photographic Supplies – B&W darkroom papers, hand coloring supplies; creative consultants
B&H Photo – All manner of photographic supplies, inkjet papers, photo oil sets and hand coloring supplies
All images © Terri Sprinkle unless otherwise stated
Last edited by a moderator:


 Gracious! Hand coloring photographs has been around since practically the beginning of photography. It was necessary in the beginning if you wanted some color in your images. It turned into more of an art form once color photography came on the scene, but since it still has that special "look" it never died out. Even though Marshall's as a company is gone, there is a new line of photo oils from Arista, I believe - a full line of photo oils. Check out


![[No title]](/data/xfmg/thumbnail/36/36644-d48bde7a35945a119c05c18e8c748c27.jpg?1734169161)


