Mottled (Grainy?) B&W Prints

Does he not wash his film on the Patterson reels? I would think that any fixer would be adequately removed after having washed any film for an adequate length of time.
 
Grade four? ... maybe turn the knob all the way to eleven :guitar:[/QUOTE

Yes, grade 4 in the early 1980s I printed hundreds of negatives on grade four paper.

His example Prints look horrible on grade 2
 
Yeah, I remember using grade 4 for those slightly thin negs ... don't think I ever really used grade 5, maybe as an experiment that didn't turn out that great ... I would just have discarded negs that were that under-exposed.
 
Lowering one's exposure index is the very first step to getting a more generous exposure. The OP has already told us basically how he meters...lowering the exposure index by one exposure value will lead to a more generous exposure even though he makes no change in his light metering technique.

Generally, Exposure Index is more of a reference for digital cameras as opposed to film. In digital, if you have an exposure index (a TRUE exposure index) of say "800", that is the native value of sensitivity to light that the chip has to record a specific value correctly on the chip itself. Using this value, if assigned by the manufacturer, will yield the best results for noise, contrast and exposure. So, if you go higher or lower than this value, it will involve post processing in both photography and cinematography, which in the case of the OP, is not a helpful thing. It can also introduce a significant level of noise as well, which again is not good. In ISO's, which have been around since 1974 and are a combination of the old ASA and DIN (German) standards. Pushing and pulling the ISO also causes issues within the film. Pull the processing, shooting at say 100 or 200 with 400 ISO film can introduce contrast issues simply because the over exposure can not allow full development of the highlights, and you'll often get muddy looking prints without proper contrast changes. Generally, pulling film is done to control the contrast of a VERY contrasty scene and not for exposure only compensation. If not exposed and compensate in the processing accordingly, you risk blown out highlights on the film itself and gross over exposure. Oppositely, if you push the film, you need to process it differently as well. When you push film, you are grossly under exposing the film (again, according the the manufacturer's recommendations) and compensating for this by significantly over developing. This also has significant issues with both contrast, which is very high (and opposite of pulling the film) and extensive grain. Using specific developers for this, such as Acufine can limit these bad traits, but there are still compensations that need to be made in printing as well. It can get quite complicated. A good densitometer will prove this for the film side quite easily.

Because of this complication, and the OP own admission that they are fairly new to all of this, it is best to stick to the manufacturer's recommendations. Shoot at 400 ISO, metering correctly, then developing correctly with fresh chemistry and good working habits consistently and their results will improve. Changing ISO's and EI's, and using the terms interchangeably is confusing to anyone starting out in this process, so let's keep it simple for them and make it correct. After they become more proficient, then start the experimentation, but first, get it right to begin with. Just my take on this.

Cordially,

Mark
 
No in fact exposure index is a very well-known legacy of the film era, and not the digital era.

The original poster revealed that he was not shooting Tri-x but Fuji Acros 100.

The original poster told us that he was trying to use a plus minus which I assume he meant centered LCD display reading in his f3 titanium.if he is using the cameras built-in reflected light meter as most people do a simple lowering of his exposure index would lead to more generous exposure.

Whenever a person uses a film above or below the manufacturer's ISO rating, that numerical value has long been for over 50 years, called the EI, which as you probably know stands for exposure index.
 
As far as keeping it correct, you sir are making a huge mistake telling people that exposure index is a byproduct of the digital photography era, when in fact it is well-known that the term was used by the late 1960s.
 
Telling the OP to set his camera to 400 ISO when he is using Fuji acros 100 would be a massive step in the wrong direction. It is very important to read a poster's query very carefully. No matter what this guy does setting the camera to 400 ISO would cause massive under exposure.
I would tend to agree withyou that developing for nine minutes would most likely make an improved negative.

the idea of using grade 2 enlarging paper or grade 2 polycontrast or multi contrast filter is based upon a much higher gamma negative, which was common in the 1940s and 1950s.

if you want to print really thin delicate negatives like his then you need a higher contrast paper and it would also be useful to use a much more higher contrast enlarger than a beseler 23c II....say a Leitz Focomat IIc.
 
Last edited:
Telling the OP to set his camera to 400 ISO when he is using Fuji acros 100 would be a massive step in the wrong direction. It is very important to read a poster's query very carefully. No matter what this guy does setting the camera to 400 ISO would cause massive under exposure.
I would tend to agree withyou that developing for nine minutes would most likely make an improved negative.

I seemed to remember he mentioned Tri-X, which is what I was referring to. You know, it's perfectly OK for you to disagree with me. Does not bother me in the least. I can only tell you though that after working as a photojournalist for 35 years, writing for the largest photo magazine in the world and teaching for 10 years that the very best way to teach someone something technical is to keep it simple. When I teach this, I tell the students 400 ISO for Tri-X, develop it at this temperature with this developer and here is how you should do this, this and this. Step them through. Once they have the basics down, camera, exposure and development, then ask "OK, what would happen if you did all of this at 100 or 1600 ISO with Tri-X film?" and then have them go do it. Now, they will fail with this because they will have over and under exposed film, but they learn that exposure and film processing are connected. Then, show them that if they shorten the 100 ISO development and lengthen the 1600 ISO development, what happens? well, the 100 ISO has less contrast, so even though it is exposed correctly, the development is shorter and the highlights don't fully develop, so instead of a grade 2 paper, I have to use a grade 3 or maybe even 4, depending on the scene. And instead of a grade 2 or 3 for the 1600, I might have to use a 1 or even a zero, again depending on the scene. and WOW... look at that grain! Then, you say "well, what could you change on the 1600 ISO to make the grain less?" Then you introduce them to different developers and it shows them that different developers have different characteristics and some have a finer grain than others, and depending on what you're doing and the goals of the image, changing developers is an option to get a higher quality. You have to step people through the process, otherwise you lose them. They become frustrated and something that they loved, they now hate because they don't understand it. So, saying all of that Derrel, I stand by what I have said here. Be well and stay healthy.

Cordially,

Mark
 
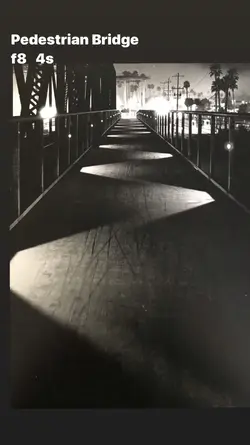
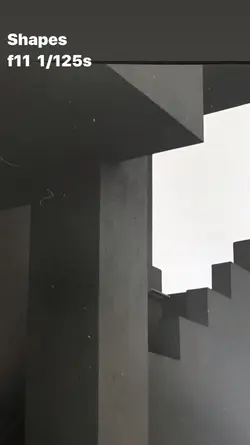
Thanks for everyone’s input. I’m taking baby steps to make small one variable at a time corrections rather than tackling to many things at once, especially more advanced methods like pushing, pulling, ETC.

Here is a quick update:
  1. Safelight DID have a light leak around the red tinted glass. I fixed that.
  2. There was a small amount of ambient light coming in under the garage door. I fixed that.
  3. I incorrectly referenced the wrong developing time for the film, the last two rolls came out much denser with more even light in the shadows (see below)
  4. Kept temp stable at 68°F during development led to consistent development roll to roll.
  5. Moved from a #2 filter on enlarger to #1 to bring down contrast - seems to have made prints more balanced
  6. Used RC multigrade paper and colors appear much more smooth, almost no grain, and very even.
  7. As suggested I did a test roll using Kodak Tri-X 400, the film below was processed using this method:
    1. Developer: ilfosol 3, 1+9, time 7:30 - agitate every minute for ten seconds “rolling” the tank
    2. Stop Bath: ilfostop 1+19, 20 seconds - rolling tank for first 10 then resting for 10
    3. Fixer: ilford rapid fixer 1+4, time 4:00 - agitate every minute for ten seconds “rolling” the tank
    4. Rinse: fresh water for 5 / 10 / 20 seconds with final fourth rinse for 10 seconds with 5ml of wetting agent
The prints where developed using the following method on a Beseler 23c II B&W enlarger:
  1. 50mm Nikkor lens at f11
  2. Ilford #1 filter in upper housing of enlarger
  3. 8 second exposure
  4. Developer: ilford multigrade, 1+9, time 1:30
  5. Stop bath: ilford stop, 1+19, time 0:30
  6. Fixer: ilford rapid fixer, 1+4, time 1:00
  7. Rinse: Paterson rinser for 3 minutes
  8. Squeegee and dry for 12 hours
I know I still have a long way to go, but these came out much improved thanks to all your advice. If there are any major issues you see, I’m happy to take more pointers!
 

Attachments

  • 2EB5C5B4-0C7A-4FB8-8F6F-9365E88143CB.jpeg
    2EB5C5B4-0C7A-4FB8-8F6F-9365E88143CB.jpeg
    302.1 KB · Views: 128
  • 472F9B9F-99B8-415B-8C9F-7442E8A34387.jpeg
    472F9B9F-99B8-415B-8C9F-7442E8A34387.jpeg
    1.7 MB · Views: 140
  • 1E3C3614-674D-402B-805D-C8B172673F7D.jpeg
    1E3C3614-674D-402B-805D-C8B172673F7D.jpeg
    243.3 KB · Views: 133
  • AC5296BF-1195-45E8-ABF1-541BFA397FF7.jpeg
    AC5296BF-1195-45E8-ABF1-541BFA397FF7.jpeg
    258 KB · Views: 134
  • E28F75D4-3123-4568-B6FD-16DC6BC0214A.jpeg
    E28F75D4-3123-4568-B6FD-16DC6BC0214A.jpeg
    173.1 KB · Views: 137
Those do look better. Keep at it. The more you print the more you learn. You might want to look for old darkroom books. These days they are cheap and full of great info.
olVwOkV.jpg
 
Glad to hear you fixed two sources of light leaks and made some adjustments on other parameters. Your results look much better.
 

Most reactions

New Topics

Back
Top