My First Roll of Film. Ever.

Mach2

TPF Noob!
Joined
Jul 28, 2014
Messages
30
Reaction score
15
Location
Canada, eh?
Can others edit my Photos
Photos OK to edit
I'm venturing into all sorts of unfamiliar territory here, and I love it. I was born in '96, so digital cameras were already starting to become popular. I didn't get a camera until I was 11 or so, and even then, it was a crappy little pink point-and-shoot, with every setting automated.

This is my first time shooting with film (that's a lie. I actually shot a full two rolls worth of film, but I'd loaded it into the camera wrong and it didn't advance. Whoops!). This is my first time shooting with manual settings. So that's pretty cool, right?

Anywho! Here are some of the ones I'm proud of. I'd love to hear what everyone thinks of them, and what I can do to get better shots in the future.
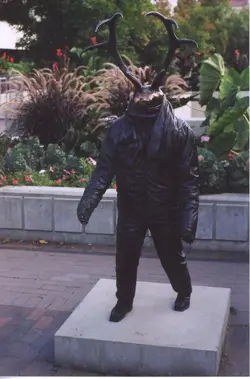
1. Statue

I found this statue on the campus of my university. I have no idea what it's supposed to be, but I love it. There's no plaque, no title, no artist credit. He's just there.

2. Fearless

This is my little bro. He likes to skateboard. I told him that if I took him to the skate park, he had to let me take a few pictures.

3. Flowers

The biggest lesson I learned from this roll of film was that, due to my shaky hands, I have to use the fastest shutter speed I can get away with, or prop my camera against something. Otherwise, stuff turns out blurry.
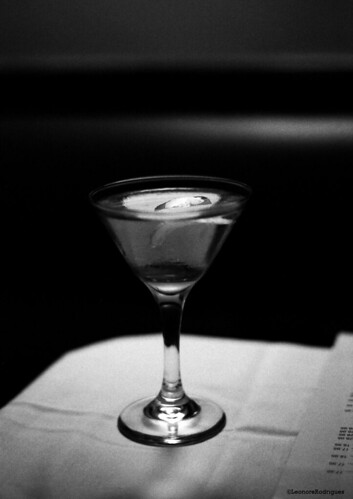
4. Night Life

Taken in downtown Nashville. I wish I'd had time to snap more pictures, but the rest of the group kept on walking, and I didn't want to get left behind. XD

5. Street Art

This one is my favourite. I love street art. Freaking love it. Yarnbombs, graffiti, murals. I was walking home and saw this guy painting, just down the road from me. Not wanting to miss an opportunity, I quickly ran home and grabbed my camera. Then I worked up all my courage to ask if I could take his picture. He said "Sure," and continued painting.
I do wish I'd panned to the left just a tiny bit more, so that his body was closer to the right edge of the frame. But I'm still happy with this one.


All of these were shot with a Pentax K1000, 50mm lens, 400 ISO Kodak film, then scanned and uploaded. There were a few more that I liked on this roll of film, but these were my top 5. :)
 

Attachments

  • 1- Minotaur.jpg
    1- Minotaur.jpg
    396.8 KB · Views: 173
  • 8- Fearless.jpg
    8- Fearless.jpg
    376.6 KB · Views: 177
  • 15- Am I tumblr worthy yet.jpg
    15- Am I tumblr worthy yet.jpg
    268.4 KB · Views: 200
  • 19- Bright Lights, Big City.jpg
    19- Bright Lights, Big City.jpg
    357.4 KB · Views: 185
  • 10- Street Art.jpg
    10- Street Art.jpg
    357 KB · Views: 182
How fun! Congrats on getting through your first roll of film. Wait till you decide to try B&W film - you might end up with a serious addiction!! ;)

I think #5 is your strongest shot here. Nice exposure and no camera-shake - (a little motion in the subject's arm is okay here, because it shows the artist's movement while he works - makes it a more dynamic shot). It sounds like you're already learning the value of fast film/shutter speed to avoid camera shake, and you might ultimately want a tripod (though I understand you were walking around with friends here). The first two, though both are nicely composed, are under-exposed so look a little dark. Your meter based its exposure for the sky in #2, and you want it to expose for your important subject. With every roll, you will learn a lot. Keep a record of your settings for each frame and you'll understand how to tweak them for the next time.

Keep shooting! Have fun!
 
I really can't wait to get my hands on a roll of B&W film. It's gonna be excellent. :3

Thanks for the pointers! Mental notes have been made.

A tripod may be handy someday. Not yet, though. Most of my photos aren't really planned. I just happen to bring my camera along with me places. If I get to the point where I go out places for the specific purpose of photography, then I'll think about investing in the tripod.
 
Congrats! Isn't the first roll exciting? :1219:

I agree with Terri - the last one is the strongest because it's got good composition AND exposure. I would argue that the composition of the skateboarder is stronger, but yes, his face is a bit underexposed.

The statue is funny - I love stuff that makes you think "What the eff were they thinking??" ;)

As for camera shake, yes - you'll find that anything below 1/60 shutter speed is likely to end up blurry unless you have the camera stabilized or you get really really good at breathing and bracing techniques for stabilizing the camera. But don't be afraid to open up the aperture to get more light. Depends on what you want to achieve in the shot, of course, but that picture of the flowers would have been nice with a shallow depth of field so you could have tried opening the aperture rather than slowing the shutter speed.

You've got the f1.7 lens, right? Here's what it can do with a wide open aperture and 400 speed Tri-X: (Also a teaser to get you to try black and white! :cool-48: )

Day 253 - Martini by limrodrigues, on Flickr

I think the shutter was at 1/60, maybe 1/30 and resting on my shoulder or the back of my chair. Can't remember exactly but the angle is too high for it to have been resting on the table):

The K1000 is such a great camera, and that 50mm f1.7 is a gem of a lens. You're going to have fun! :boogie:
 
These are nice for first time out. Tip: overexpose colour negative film a little.
 
I never use a tripod, I think it's more a matter of knowing how to best use one for (people often do for landscapes, studio work, etc.) - if I set one up I'd just wander away from it anyway! lol So for general use I agree it's getting a proper exposure, figuring out settings so you can get a fast enough shutter speed to avoid blur.

Indoor low light can be tricky and that's where a tabletop tripod might be an option. If I use existing room light I open a curtain, angle a lampshade, think about the time of day and when I'll be getting the most light.

Looks like with the skateboarder the camera's meter may have been reading the light coming from the background not the light hitting the subject in front of you. With the statue (great subject!) think about the direction of the light and time of day and your vantage point.

You got some nice pictures, and that last one is really good, so it seems like you're on the right track. Hope you enjoy shooting film as much as some of us longtime film photographers do. (Is the first roll of film exciting? I can't remember that far back! lol)
 
That's a gorgeous shot, Limr. Makes me want to go find B&W as soon as possible. :3

Could you explain the relation between aperture size and depth of field? And what exactly depth of field is? I've been trying to get my head around it, but it's not quite clicking for some reason.

Vintage, the first roll is incredibly exciting! My hands were shaking excessively when I was opening up the envelope of prints. XD

Also, your comment about watching the time of day makes me want to go back and shoot that statue again. If I've got my directions right in my head, it faces west. Could be really neat lighting when the sun is going down. :3
 
Okay, you already know that higher number+smaller aperture, right? On your lens, I believe f22 is the smallest aperture and if you have the f1.7, then that means it's your widest aperture. It's generally considered a "fast" lens because you can open the aperture quite wide and get in a lot of light. This is useful in low light conditions.

But the size of the aperture also affects how much of the scene is in focus. Smaller apertures give you a large depth of field. Imagine a really long ruler starting at your feet and laid out on the ground in front of you. Your aperture is set at f16. From your feet to, let's say 2 meters, will still be out of focus, but from 2 meters until maybe 12 meters, the image will be in focus. The depth of field is called "deep."

These are not exact numbers - it's just for explanation purposes. The exact numbers also depend on the focal length of your lens (50mm vs 90mm vs 28mm, etc...).

Now switch your aperture to f2. Now it's not 2 to 12 meters that will be in focus, but maybe 6-8 meters. The depth of field is said to be 'narrow' now because you just have a sliver of space that will be in focus.

So opening up the lens to the wider apertures will give you more light, but it will also give you a shallow depth of field. This can be desirable at times and maybe other times, not so much. It becomes not just a matter of light but how you want your photo to look.

Also remember that opening the aperture will let more light in, and if you need the light because you don't want to go slower than a 1/60 shutter speed, and if you don't mind the shallow depth of field, that's fine. If it's bright conditions, though, and you want the wide aperture specifically for the depth of field and not just light, then you'll have to increase your shutter speed to control the light.

Here's a website with some illustrations: Focusing Basics | Aperture and Depth of Field

On my other computer, I've got examples of this - I'll post them when I'm at that other computer.
 
I haven't done anything to these shots, so please excuse any dust spots :)
(They also seem to be big - I didn't resize them and haven't attached photos on the new format before. I usually link from Flickr but these haven't been put there. So sorry if they're kind of big!)

Here's the scene taken with a smaller aperture (probably f11 but I can't remember for sure):
Untitled-Scanned-59.jpg


And here's the same image at a wider aperture/narrower dof:
Untitled-Scanned-60.jpg


You can see not only is the background blurred, but look at the foreground as well. This can be a very effective way to isolate the subject if the background is a little cluttered, for example. In this case, I decided I didn't like the shallow depth of field for this scene - it isolates that vertical fence post but it's not interesting enough as a subject to warrant that isolation, and the background is pretty enough that I don't want it too blurry. Sometimes is easier to visualize the difference, and other times, you take both shots to see which one you like better :)
 
Ahhhh I think I get it now. Thank you for taking the time to write up that explanation.
 

Most reactions

New Topics

Back
Top